This is the guide, I’ll show you two options on how to bulk create users in Active Directory. Both options allow you to create AD users from a csv file. By using a PowerShell script or a tool you can streamline the user creation process and save yourself lots of time.
In this article.
- Option 1. Bulk Create AD Users with the AD Pro Toolkit
- Option 2. Bulk Create AD Users with PowerShell
- Verify AD User Import
- Bulk Modify Users After Import
Option 1. Bulk Create AD Users with the AD Pro Toolkit
In this first example, I’ll use the AD User Creation Tool that is included with the AD Pro Toolkit. This tool makes it very easy to bulk import users and is a great alternative if you don’t want to deal with PowerShell scripts. Also, there are certain user fields that PowerShell does not support and a 3rd party import tool is needed.
You can download a free trial of the toolkit and try it for yourself.
Below is a summary of how to bulk create Active Directory users with the AD Pro Toolkit.
- Open the “Import Users” Tool.
- Click the “Download CSV Template” button.
- Fill out the CSV file and save it. Use the provided template as a reference.
- Select the “Import Options” button and change any options you need.
- Click “Browse” to select your csv template and click “Run” to start the import.
In the example below, I bulk created 42 users, added them to multiple groups, set the users manager and multiple other attributes.

If any accounts from the CSV fail to import it will provide an error in the logs. You can see below I had six accounts that did not create because the logon name already exists.
Requirements
I recommend the follow CSV headers and settings when creating new user accounts. You can remove any column in the CSV that you do not need.
- SamAccountName (required) = This will be the users logon name.
- password (required) = users password. Make sure it meets your password requirements.
- givenName (required) = First name
- sn (required) = Last name
- OU = The organizational unit to add the user accounts into. This is the distinguished name of the OU. If you leave it blank it will import into the default users container.
- DisplayName = This is the users display name.
- Groups = Groups to add the users to. Separate each group with a comma.
- Force Password Change at Next Logon = Click the import options button to enable this for each user.
Download the included CSV template as a reference or starter template.

Here is a screenshot of my CSV file (click to enlarge).

You can download my CSV template here.
Import Options
Under import options you can change the follow settings.
- Enable Users = This will enable the accounts when they are created (on by default).
- Force Password Change = Select this to enable force password change at next logon
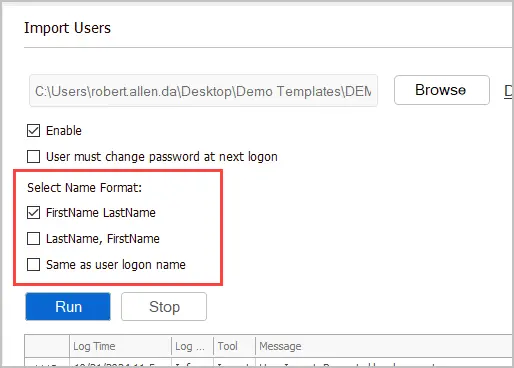
- Name = Select this to change the name format to LastName, FirstName.

User Name Format
You can choose from 3 different name formats when bulk creating accounts.
- FirstName LastName
- LastName, FirstName
- Same as user logon name.
Before clicking run select the name format for your user accounts.
The GUI tool is a huge time saver and makes importing user accounts into Active Directory super easy. Plus, you don’t have to modify any scripts or need PowerShell experience.
The AD Pro Toolkit also includes a Bulk User Update Tool to modify multiple user accounts at once. This is a huge time saver for when you need to mass update user information such as department, telephone number, email addresses, and so on.
Try the AD Pro Toolkit for FREE, download your copy here.
Option 2: Bulk Create AD Users with PowerShell
What you will need:
- PowerShell Active Directory Module loaded – The script I provide will load the module you just need to run it from a computer that has RSAT tools installed or the AD role.
- Rights to create user accounts in Active Directory
- CSV File (See below)
- PowerShell Script (See below)
Step 1: Setup the CSV file
A basic CSV file should have the following headers. Technically you can import new accounts with just the SamAccountName, Name, and the password column but that is not recommended.
- SamAccountName = this will be the users logon name
- password = users password. Make sure it meets your password requirements.
- path = OU where you want to import users to. This is the distinguished name of the OU. If you leave it blank it will import into the default users container.
- GivenName = First name
- Surname = Last name
- Name = Name
- DisplayName = Display Name
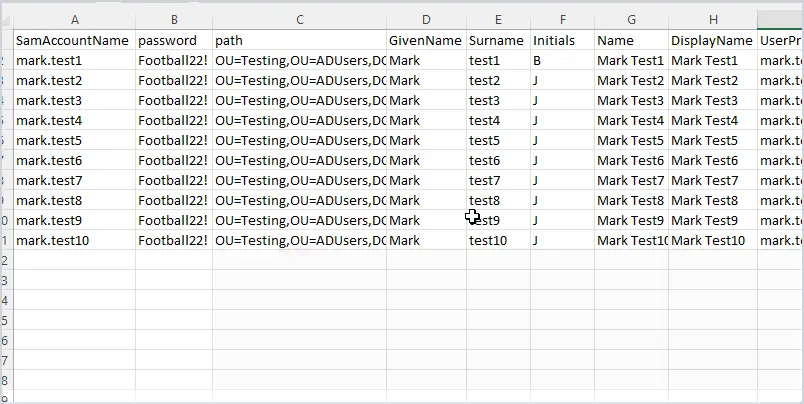
Above is an example of my CSV file.
How do you find the OU path?
The OU path is the distinguishedName attribute, to find this open up Active Directory Users and Computers and browse to the OU you want to import to, then right click and select properties then select attribute editor.
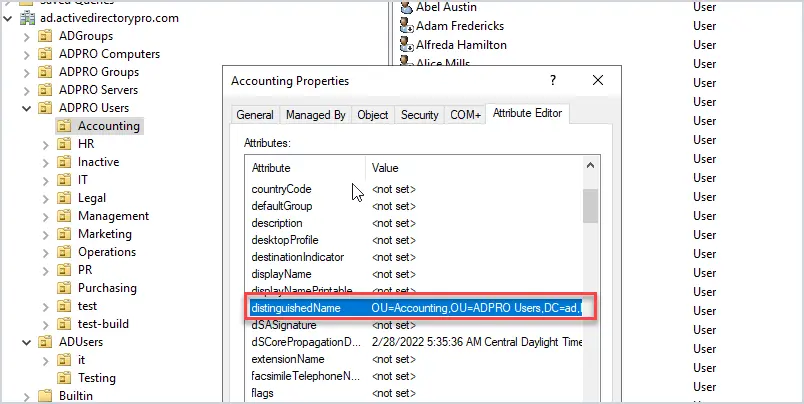
Copy the path into the path column in the CSV file.
At this point the CSV file has the required fields, you can jump to step 2 (setting up the PowerShell script) or keep reading to configure optional fields for user accounts.
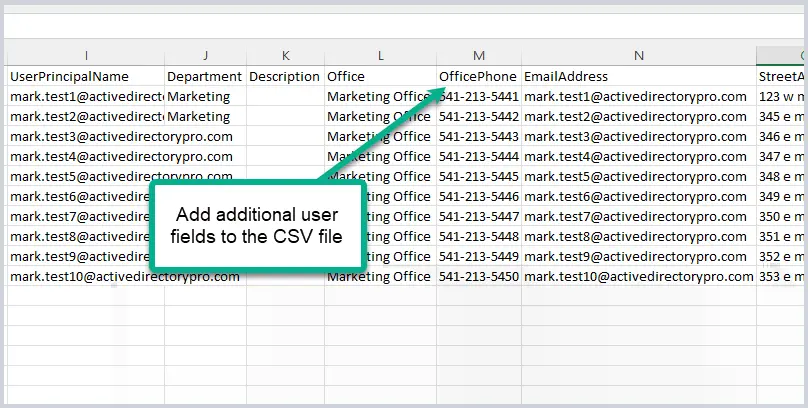
Add additional user fields to the CSV file.
You may want to include some additional user fields in the CSV. Just know that whatever columns you add to the CSV you will also need to include them in the PowerShell script.
I’ve included several common user fields in the CSV template and PowerShell script.
- UserPrincipalName
- Department
- Description
- Office
- OfficePhone
- EmailAddress
- StreetAddress
- POBox
- City
- State
- PostalCode
- Title
- Company
To add more I recommend looking at the PowerShell new-aduser cmdlet to see which parameters are supported.
I like to keep the name of the headers the same as the new-aduser parameters, it makes it easier to troubleshoot.
At this point, you should have a CSV file configured, and save the file to your local computer.
Step 2: Configure the PowerShell Script
Copy the script below and modify it as needed.
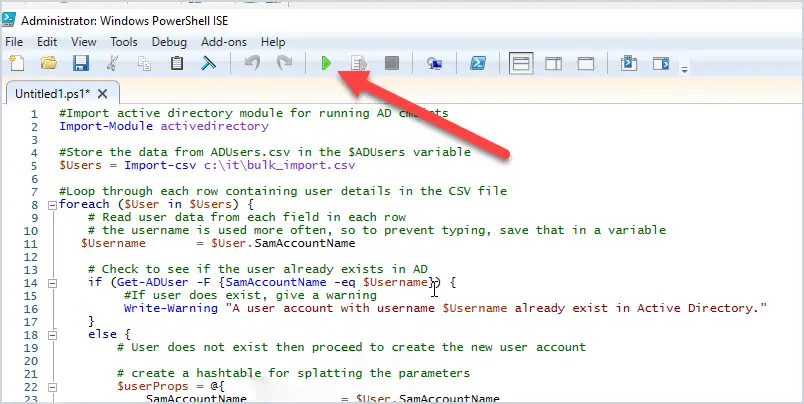
#Import active directory module for running AD cmdlets
#Author: Robert Allen
#Website: activedirectrypro.com

Import-Module activedirectory

#Store the data from ADUsers.csv in the $ADUsers variable
$Users = Import-csv c:\it\users.csv

#Loop through each row containing user details in the CSV file
foreach ($User in $Users) {
    # Read user data from each field in each row
    # the username is used more often, so to prevent typing, save that in a variable
   $Username       = $User.SamAccountName

    # Check to see if the user already exists in AD
    if (Get-ADUser -F {SamAccountName -eq $Username}) {
         #If user does exist, give a warning
         Write-Warning "A user account with username $Username already exist in Active Directory."
    }
    else {
        # User does not exist then proceed to create the new user account

        # create a hashtable for splatting the parameters
        $userProps = @{
            SamAccountName             = $User.SamAccountName
            Path                       = $User.Path
            GivenName                  = $User.GivenName
            Surname                    = $User.Surname
            Initials                   = $User.Initials
            Name                       = $User.Name
            DisplayName                = $User.DisplayName
            UserPrincipalName          = $user.UserPrincipalName
            Department                 = $User.Department
            Description                = $User.Description
            Office                     = $User.Office
            OfficePhone                = $User.OfficePhone
            StreetAddress              = $User.StreetAddress
            POBox                      = $User.POBox
            City                       = $User.City
            State                      = $User.State
            PostalCode                 = $User.PostalCode
            Title                      = $User.Title
            Company                    = $User.Company
            Country                    = $User.Country
            EmailAddress               = $User.Email
            AccountPassword            = (ConvertTo-SecureString $User.Password -AsPlainText -Force)
            Enabled                    = $true
            ChangePasswordAtLogon      = $true
        }   #end userprops

         New-ADUser @userProps
       #  Write-Host "The user account $User is created." -ForegroundColor Cyan


    } #end else

}
You will need to modify the path to the CSV file you saved from step 1 (unless it matches what I have in the script).
$ADUsers = Import-csv C:\it\bulk_import.csvBy default, the script sets the accounts to enable. You can change this by setting Enabled to false
Enabled = $falseBy default, the script sets the accounts to change password at the next logon. To change this set “ChangePasswordAtlogon to false.
ChangePasswordAtLogon = $falseThat should do it for configuring the script. It’s pretty much ready to go as is.
Step 3: Run the PowerShell Script to import the accounts
At this point, the CSV file should be setup with the user’s information and the Powershell script should be modified (if needed)
Now it’s time to execute the script.
In PowerShell ISE just click the green button to run the script. If you saved the script to a ps1 file just run the script instead of running directly from ISE.
It will return the prompt when completed. Any errors will be displayed in the console.
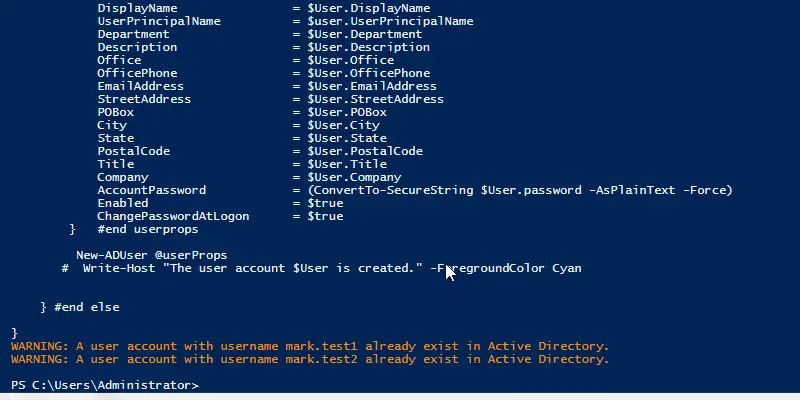
Now check Active Directory to verify the accounts imported.
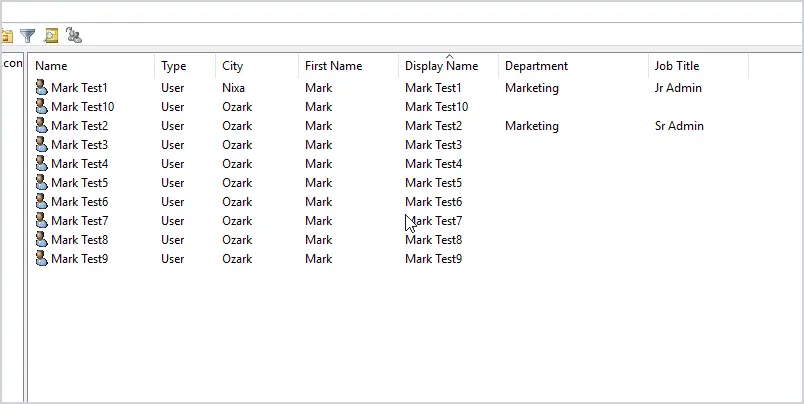
Verify AD User Import
This step is optional but I like to list all accounts from the domain or OU I imported to as a way to verify the import. It’s also useful for getting a list of user accounts and exporting it to csv.
Below is the PowerShell command to get all domain users. The results are sent to a gridview to make it easier to read.
You can add or remove whatever user attributes you need.
Get-ADUser -filter * -properties * | select-object samaccountname, givenname, surname,streetaddress,st,physicalDeliveryOfficeName,manager,mail,title,company,whenCreated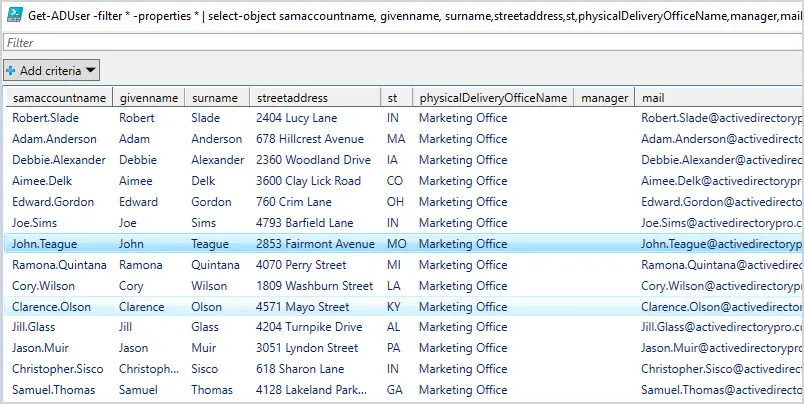
Another option is to use the user export tool that is included in the AD Pro Toolkit. You can select to list all domain users, users from an OU or from a group. You can also easily add or remove columns to the report.

Bulk Modify Users After Import
What if you made an error during the import or forgot to include user details in the CSV?
No worries, you can bulk modify user accounts after the import completes. You can use PowerShell and the GUI tool to bulk update existing AD users. Check out the guides and resources below.
The AD Pro Toolkit includes the Bulk Updater Tool. It also works by using a CSV file, just fill it out and run the tool to bulk modify user attributes.

Additional Resources
- LDAP Mapping – Shows a mapping of the user fields in the Active Directory User and Computer console to their LDAP attribute names.
- Active Directory Pro Documentation – Guides and examples on how to use the AD Pro Toolkit.

Manager = $User.Manager
how to add those fields without error
Hi, I get this error on every line:
New-ADUser : Directory object not found
At line:33 char:10
+ New-ADUser @userProps
+ ~~~~~~~~~~~~~~~~~~~~~
+ CategoryInfo : ObjectNotFound: (CN=Tom Jones…domain,DC=com:String) [New-ADUser], ADIdentityNotFoundException
+ FullyQualifiedErrorId : ActiveDirectoryCmdlet:Microsoft.ActiveDirectory.Management.ADIdentityNotFoundException,Microsoft.ActiveDirectory.Management.Commands.NewADUser
Every csv line is typically like this (except for the header which appears only once):
SamAccountName,password,path,GivenName,Surname,Name,DisplayName
Tom,password,”CN=Tom Jones,CN=Users,DC=domain,DC=com”,Tom,Jones,Tom Jones,Tom Jones
I would double check the -path value.
Country = $User.Country
MobilePhone = $User.MobilePhone
Manager = $User.Manager
how to add those fields without error
New-ADUser : Identity info provided in the extended attribute: ‘Manager’ could not be resolved. Reason: ‘Cannot find an object with identity:
anyone can help ?
Figured it out… There were blank rows with commas in my CSV. This post pointed me some-what in the right direction: https://stackoverflow.com/questions/69985192/powershell-automation-script-update-ad-error-the-search-filter-is-not-recognized
Hi,
Seeing the below error multiple times:
Get-ADUser : The search filter cannot be recognized
At C:\path\to\ps\file:14 char:9
+ if (Get-ADUser -Filter {SamAccountName -eq $Username}) {
+ ~~~~~~~~~~~~~~~~~~~~~~~~~~~~~~~~~~~~~~~~~~~~~~~~~
+ CategoryInfo : NotSpecified: (:) [Get-ADUser], ADException
+ FullyQualifiedErrorId : ActiveDirectoryServer:8254,Microsoft.ActiveDirectory.Management.Commands.GetADUser
Doesn’t appear to be preventing the creation of the user account and am getting the warning message that the user exists so it does seem like the filter is doing something. Any ideas how to get it from popping up? Thank you!
Getting the following error on all lines:
Get-ADUser : Variable: ‘Username’ found in expression: $Username is not defined.
At C:\bulk_import_script.ps1:14 char:9
+ if (Get-ADUser -F {Username -eq $Username}) {
+ ~~~~~~~~~~~~~~~~~~~~~~~~~~~~~~~~~~~~~~
+ CategoryInfo : InvalidArgument: (:) [Get-ADUser], ArgumentException
+ FullyQualifiedErrorId : ActiveDirectoryCmdlet:System.ArgumentException,Microsoft.ActiveDirectory.Management.Commands.GetADUser
Hi Robert Allen,
Thank you sharing. This script is work but I found a result issue e.g. In the CSV file, I input mark1@mydomain.com but my result is mark@yourdomain.com
How to fix the result to mydomain.com?
Note: In my servers, there are more than one authoritative domains.
Can we skip adding an attribute to @userProps if that attribute has blank value in Csv file?
Yes
Error–UserPrincipalName: The term “-userPrincipalname” is not recognized as the name of a cmdlet.
-UserPrincipalName “$Username@domain.com” `
Hi.
Is anyone find how to update also the Country?
Thanks,
Rafael Almeida
User Ranjan Sahoo: Error while saving user. Access is denied.
I got this error, anyone help pls
New-ADUser : The server is unwilling to process the request
At line:43 char:9
+ New-ADUser `
+ ~~~~~~~~~~~~
hi
Is there a way to add home directory and home drive from this script
Previusly it was working perfectly, But now last 2 week i’m getting this error could you please look into this.
WARNING: Error initializing default drive: ‘Unable to find a default server with Active Directory Web Services running.’.
Get-ADUser : Unable to find a default server with Active Directory Web Services running.
At line:23 char:6
+ if (Get-ADUser -F {SamAccountName -eq $Username})
+ ~~~~~~~~~~~~~~~~
+ CategoryInfo : ResourceUnavailable: (:) [Get-ADUser], ADServerDownException
+ FullyQualifiedErrorId : ActiveDirectoryServer:1355,Microsoft.ActiveDirectory.Management.Commands.GetADUser
Server is down. Restart server.
THank for Sharing
But if i want add group in the csv file . so How can i do
can you sharing with powershell ???
Bulk tool throws error, no matter what csv is used:
2021-04-29 14:18:05.9174|FATAL|Bulk_User_Creator.Form1|You can ignore bad data by setting BadDataFound to null.
2021-04-29 14:18:05.9174|FATAL|Bulk_User_Creator.Form1|You can ignore bad data by setting BadDataFound to null.
2021-04-29 14:18:05.9327|FATAL|Bulk_User_Creator.Form1| at CsvHelper.CsvParser.Read()
at CsvHelper.CsvReader.Read()
at CsvHelper.CsvReader.d__63`1.MoveNext()
at System.Collections.Generic.List`1..ctor(IEnumerable`1 collection)
at System.Linq.Enumerable.ToList[TSource](IEnumerable`1 source)
at Bulk_User_Creator.Form1.BeginUserCreation()
Ivan, send me an email with the csv.
Good script.
Modified some little stuff :
Adding -Encoding UTF8 to the Import-CSV.
No funky char for non-english
Adding $SAMAccountName = try { $Username.substring(0, 20) } catch [ArgumentOutOfRangeException] { $Username }
Add Flexibility for long username but prevent errors by trunking it for the SAMAccountName.
Good stuff. Thanks for sharing.
Hello,
What if I want to add in the attribute „adminDescription”
What should it look like?
{‘adminDescription’=noemail} ?
Thanks,
I know this isn’t the best way to do this but this is what they want us to do.
We have about 1200 accounts we need to create from a company we are merging with.
These folks will not be logging into our domain, and they want them to have their company email address.
Firstname Lastname Email Address EmployeeID
John Smith Jsmith@othercompany.com 12345
I wanted to just create contacts for these user, but they are insisting that we include the employee ID.
Will your script allow me to do this?
If it will All of these users will go into the same OU. Can I change this line:
-Path $OU `
to read
-Path “OU=Users,OU=Parent OU,OU=Grandparent OU,DC=WGI,DC=local
Thanks for your help on this, and this script. It has been very helpful in the past.
Hi
Yes, you just need to put that path in the CSV OU column.
Hello,
On a AWS AD Server, and receiving this error :
-AccountPassword : The term ‘-AccountPassword’ is not recognized as the name of a cmdlet, function, script file, or operable program. Check the spelling of the name, or
if a path was included, verify that the path is correct and try again.
Thanks
Get-ADUser : Zmienna: „Username” znaleziona w wyrażeniu $Username nie jest zdefiniowana.
At line:31 char:6
+ if (Get-ADUser -Filter {SamAccountName -eq $Username})
+ ~~~~~~~~~~~~~~~~~~~~~~~~~~~~~~~~~~~~~~~~~~~~~~~~~
+ CategoryInfo : InvalidArgument: (:) [Get-ADUser], ArgumentException
+ FullyQualifiedErrorId : ActiveDirectoryCmdlet:System.ArgumentException,Microsoft.ActiveDirectory.Management.Commands.GetADUser
PS C:\Users\Administrator>
Will this work for creating local users?
This is just for creating users in Active Directory.
when i run you script i get this error can you assist.
-Description : The term ‘-Description’ is not recognized as the name of a cmdlet, function, script file, or operable
program. Check the spelling of the name, or if a path was included, verify that the path is correct and try again.
At line:52 char:13
+ -Description $description
+ ~~~~~~~~~~~~
+ CategoryInfo : ObjectNotFound: (-Description:String) [], CommandNotFoundException
+ FullyQualifiedErrorId : CommandNotFoundException
ConvertTo-SecureString : Cannot bind argument to parameter ‘String’ because it is null.
At line:54 char:54
+ … -AccountPassword (convertto-securestring $Password8 -AsPlai …
+ ~~~~~~~~~~
+ CategoryInfo : InvalidData: (:) [ConvertTo-SecureString], ParameterBindingValidationException
+ FullyQualifiedErrorId : ParameterArgumentValidationErrorNullNotAllowed,Microsoft.PowerShell.Commands.ConvertToSecureS
tringCommand
New-ADUser : The password does not meet the length, complexity, or history requirement of the domain.
At line:35 char:3
+ New-ADUser `
+ ~~~~~~~~~~~~
+ CategoryInfo : InvalidData: (CN=Sam smith,CN…=hra,DC=nycnet :String) [New-ADUser], ADPasswordComplexityExc
eption
+ FullyQualifiedErrorId : ActiveDirectoryServer:1325,Microsoft.ActiveDirectory.Management.Commands.NewADUser
-Description : The term ‘-Description’ is not recognized as the name of a cmdlet, function, script file, or operable
program. Check the spelling of the name, or if a path was included, verify that the path is correct and try again.
At line:52 char:13
+ -Description $description
+ ~~~~~~~~~~~~
+ CategoryInfo : ObjectNotFound: (-Description:String) [], CommandNotFoundException
+ FullyQualifiedErrorId : CommandNotFoundException
ConvertTo-SecureString : Cannot bind argument to parameter ‘String’ because it is null.
At line:54 char:54
+ … -AccountPassword (convertto-securestring $Password8 -AsPlai …
+ ~~~~~~~~~~
+ CategoryInfo : InvalidData: (:) [ConvertTo-SecureString], ParameterBindingValidationException
+ FullyQualifiedErrorId : ParameterArgumentValidationErrorNullNotAllowed,Microsoft.PowerShell.Commands.ConvertToSecureS
tringCommand
Thank you! works
hey ,
you have any video or document from that i can learn how to make a script for adding bulk user in AD with .bat file ?
Why do you want to use .bat file? The best option for creating bulk users is to use PowerShell or the GUI tool I created.
Is there any script available that creates bulk ad-users and copies the properties from a template user?
It does not create an email box in exchange or office 365. It just adds the email address to the Active Directory attribute field.
How can i add ip phone number
i have a problem when i click run code i get that error
new-ADUser : The server is unwilling to process the request
At C:\it\bulk_users1.ps1:41 char:3
+ New-ADUser `
+ ~~~~~~~~~~~~
+ CategoryInfo : NotSpecified: (CN=Joshua Lynch…ctorypro,DC=COM:String) [New-ADUse
r], ADException
+ FullyQualifiedErrorId : ActiveDirectoryServer:0,Microsoft.ActiveDirectory.Management.Comman
ds.NewADUser
New-ADUser : The server is unwilling to process the request
At C:\it\bulk_users1.ps1:41 char:3
+ New-ADUser `
+ ~~~~~~~~~~~~
+ CategoryInfo : NotSpecified: (CN=Sam smith,CN…ctorypro,DC=COM:String) [New-ADUse
r], ADException
+ FullyQualifiedErrorId : ActiveDirectoryServer:0,Microsoft.ActiveDirectory.Management.Comman
ds.NewADUser
PS C:\it>
Try it with a single user and make sure you run PowerShell as an administrator.
One little tip: CSV delimiters may differ in some regions / localized Excel versions, so if you use for example semicolons (like me) instead of commas, extend your CSV import line:
$ADUsers = Import-csv -Path “A:\Some\Path\tofile.csv” -Delimiter “;”
Anyway, it’s an easy, very useful and very clear script, thanks for sharing! 🙂
Good tips. Thanks
Prix82, great tip. Thanks for sharing!
thanks, it’s worked with me
Great tool, was hoping it would work for me but I can’t past an [Access is Denied.] error when I attempt the import. Know the credentials I’m using are good; I can manually create a user just fine. Pared the attributes down to just three fields (Sam-Account-Name, Passwod, OrganizationalUnit) and one record, fails every time. Tried several different OU’s, same error.
Any ideas?
Hi Sam. Is this with the script or GUI tool? If you purchased the GUI tool send me an email. I need to make sure you are on the latest version, there have been several updates.
Hi Robert,
What code can I add to add the new user email address in the proxyAddress field of the attribute editor.
Thanks for the help
How do I map User Logon name to its appropriate domain? Say for example I have a child domain on DC2 with a domain like studentid@student.myuni.com. When I bulk import using SolarWinds GUI tool everything works except this mapping is not taking place, any ideas?
With the GUI tools, you can right click and run as a different user and authenticate to the child domain. With PowerShell, you can use the -server parameter to specify the domain controller instance to connect to.
Thanks very much, for providing a few options for bulk creating users on AD. Very, very useful info.
Nicely done, to the point and detailed! Impressive work you have done. Many thanks!!
Hi Robert,
I would like to use this PS Script to bulk import users in a new environment.
.csv is like
firstname lastname username email city country state zipcode password telephone jobtitle company ou Department
Jack Lamers j.lamers j.lamers@company.com Venray Nederland Limburg 5803 AN P@$$w0rd 0612345678 Sysop
NEH CN=etcetcetc ICT
When I run your script, I receive these errors
PS C:\Users\Administrator> C:\Beheer\powershell_create_bulk_users\bulk_users1.ps1
Get-ADUser : Variable: ‘Username’ found in expression: $Username is not defined.
At C:\Beheer\powershell_create_bulk_users\bulk_users1.ps1:31 char:6
+ if (Get-ADUser -Filter {SamAccountName -eq $Username})
+ ~~~~~~~~~~~~~~~~~~~~~~~~~~~~~~~~~~~~~~~~~~~~~~~~~
+ CategoryInfo : InvalidArgument: (:) [Get-ADUser], ArgumentException
+ FullyQualifiedErrorId : ActiveDirectoryCmdlet:System.ArgumentException,Microsoft.ActiveDirectory.Management.Commands.GetADUser
Any Idea?
thanks for your assistance to date
how can i generate a new random username in your script………
The GUI tool is amazing, but I get and error saying: could not create user [Access is denied.] I am both Domain Admin and Enterprise Admin. can you help?
Please log into your account and download the latest version. If you still have issues please send me an email.
Thanks
Roberts
Thank you so much. This has been a life saver. I saw in one of the comments you were working on a solution for adding to Groups. Has this been completed? It would help out a lot in my environment.
Hi Cindy.
Yes, it is complete. I’ve created a GUI bulk user creation tool that includes the option to add users to a group.
You can see complete details on this page https://activedirectorypro.com/ad-bulk-user-creation-tool/
I also have a another tool for bulk updating (adding or removing) users from groups. https://activedirectorypro.com/ad-pro-toolkit/ad-group-management-tool/
sorry, seems my mapping is inaccurate.
this is works great
Love this, big time saver, however I am having issues trying to figure out how to add the new bulk users to their proper groups. Can you help with this?
Much appreciate it.
The Solar Winds tool works well, but I have added an extra column. All students are members of Sudents_SG to I have added groupMembershipSAM to the csv file which I map across to Group-Membership-SAM in the User Import Tool but it does not get imported. Any idea why this is the case?
The SolarWinds tool was very buggy so I removed it. I created a much easier GUI tool, you can download a free trial here -> https://activedirectorypro.com/ad-bulk-user-creation-tool/
I was so pleased to find this post, Robert. I too have to create new students every year/semester. I had been using a python script given to me using LDAP. But I wanted more granularity. This is great. But I shy away from the powershell (newbie) and tried the solarwinds user import tool. It started out great, but kept hitting errors (it was the OU mapping). When I finally got it to create the accounts, it did not populate all the attributes from the CSV, only the pre-win2000 attribute. What am I missing?
So, the same as the last commenter, every year we have the need to create hundreds of new student accounts. Additionally, we have summer school classes that are open to non-district kids. So, that is a bunch more accounts that are created every year! We were contracting this bulk creation out to our network support people. But you tool works like a dream and will save us time AND money! One question though: the Sam-Account-Name isn’t populating the user logon name in AD…shouldn’t it? Or do I have to map that somewhere else? Additionally, when I look at the OU in AD, I would like to see the students’ names in the Name column rather than the Sam-Account-Name. What do I need to change to make these things happen? Thanks!!
Hi Robert,
Thank you for this helpful post.
I would like to upload a users with option Password Never Expires in Account tab. How do I set this option in .csv file?
Thank you
Regards,
Thao
That is a big security risk, I would not recommend doing that.
Hello Robert,
This is very helpful. I usually create multiple users in AD every 2 weeks and your script saves me a lot of time. Do you know how I can insert the details for Pager, Mobile in Telephones tab and also assign them to specific Security Group?
Thanks a lo!
Having trouble adding a user to a domain group when using the script. I’m a novice with Powershell. I have the AD group in my csv file. Any help would be great.
# Import active directory module for running AD cmdlets
Import-Module activedirectory
#Store the data from ADUsers.csv in the $ADUsers variable
$ADUsers = Import-csv C:\AD_Tool\Master.csv
#Loop through each row containing user details in the CSV file
foreach ($User in $ADUsers)
{
#Read user data from each field in each row and assign the data to a variable as below
$Username = $User.username
$Password = $User.password
$Firstname = $User.firstname
$Lastname = $User.lastname
$SamAccountName =$User.SamAccountName
$OU = $User.ou #This field refers to the OU the user account is to be created in
$email = $User.email
$company = $User.company
$department = $User.department
$Password = $User.Password
$homedirectory = $User.homedirectory
$homeDrive = $User.homeDrive
$EmployeeID = $User.EmployeeID
$EmployeeNumber = $User.EmployeeNumber
$Add-ADGroupMember -Identity = $User.Add-ADGroupMember -Identity
#Check to see if the user already exists in AD
if (Get-ADUser -F {SamAccountName -eq $Username})
{
#If user does exist, give a warning
Write-Warning “A user account with username $Username already exist in Active Directory.”
}
else
{
#User does not exist then proceed to create the new user account
#Account will be created in the OU provided by the $OU variable read from the CSV file
New-ADUser `
-SamAccountName $Username `
-UserPrincipalName “$Username@mydomain.org” `
-Name “$Firstname $Lastname” `
-GivenName $Firstname `
-Surname $Lastname `
-Enabled $True `
-DisplayName “$Lastname, $Firstname” `
-Path $OU `
-EmailAddress $email `
-homeDrive $homeDrive `
-homedirectory $homedirectory `
-EmployeeID $EmployeeID `
-EmployeeNumber $EmployeeNumber `
-Add-Add-ADGroupMember -Identity $Add-ADGroupMember -Identity `
-AccountPassword (convertto-securestring $Password -AsPlainText -Force) -ChangePasswordAtLogon $False
did this script work?
Thank you. Thank you. Thank you.
Every year I need to create 180+ “new Student” Accounts in AD. With a little modification of the amazing ground work you have shared with the world, you have saved me days of manually entering in each account. I used the Powershell and .csv approach, and it works flawlessly! Previously I have used some “trial software” that had obvious limitations, and expectations, but knew there had to be a way Powershell could do it. And here you are! Thank you so very much for sharing this.
Tim, glad this worked for you. Thanks for the feedback.
I am haping problems using the Solarwinds GUI. The main problem is that I am trying to also set the User-Principal-Name to the firstname.lastname@company.com
I cannot get it to work.
The SolarWinds bulk creation tool had too many problems so I removed it. I created a better much easier to use GUI tool, check it out – > https://activedirectorypro.com/ad-bulk-user-creation-tool/
Thank you, it was very helpful and a nice GUI tool
Hi,
Im trying to figure out how to script adding proxyaddress
I’ve created a tool for that. Check out the full how to guide -> https://activedirectorypro.com/how-to-bulk-modify-ad-user-attributes/
Hi Ricky / anyone else wondering how to do this,
For additional attributes that don’t have a specific PowerShell property, you can use:
New-ADUser -OtherAttributes @{‘proxyAddresses’=$proxyAddresses}
In this case, for a proxy address. You can include as many as you like in the curly brackets, I included {‘co’=$co} for the full country name as New-ADUser doesn’t have a property for directly setting it (only the country code, e.g. US).
Hope that helps.
can you add an option to add to groups? i am copying from a template so if i use your script, i will need to add the users to groups manually.
Yup. I’m working on a GUI version that will include many more options including adding to group.
Honestly, took me whole day to figure out why PS method didn’t work and user import tool works so better. Found out that it was due to wrong OU information, no doubt in that your tutorial is so step by step helpful guide for experts or newbies.
please tell me how to assign ip address to users
Assigning IP addresses is done with DHCP. See this how to -> https://activedirectorypro.com/configure-dhcp-server/
Hi Rob,
This script works like a charm! One question: Is there a way to add a person to an AD Group when you import them?
Thanks a bunch!
Hi i am not able to add more field. its not giving me option in search box also
Can the Solarwinds tool be used to just update attributes to existing users?
The SolarWinds tool will not update existing user attributes. I have created a tool for this though check how the complete how to guide https://activedirectorypro.com/how-to-bulk-modify-ad-user-attributes/
How can I also make the users a part of a member group in ad ?
Hi Everyone,
First I want to thank you for sharing this awesome tutorial!
For some reason, I get an error message with the following text:
Get-ADUser : Variable: ‘Username’ found in expression: $Username is not defined.
At C:\scripts\bulk_users1.ps1:31 char:6
+ if (Get-ADUser -F {SamAccountName -eq $Username})
+ ~~~~~~~~~~~~~~~~~~~~~~~~~~~~~~~~~~~~~~~~~~~~
+ CategoryInfo : InvalidArgument: (:) [Get-ADUser], ArgumentException
+ FullyQualifiedErrorId : ActiveDirectoryCmdlet:System.ArgumentException,Microsoft.ActiveDirectory.Management.Commands.GetADUser
I only changed the lines to my OU’s and my domain
If somebody would like to help me I would appreciate it 🙂
-Sven
Hi Everyone,
I have a problem with the script. I got the following message:
Get-ADUser : Variable: ‘Username’ found in expression: $Username is not defined.
At C:\scripts\bulk_users1.ps1:31 char:6
+ if (Get-ADUser -F {SamAccountName -eq $Username})
+ ~~~~~~~~~~~~~~~~~~~~~~~~~~~~~~~~~~~~~~~~~~~~
+ CategoryInfo : InvalidArgument: (:) [Get-ADUser], ArgumentException
+ FullyQualifiedErrorId : ActiveDirectoryCmdlet:System.ArgumentException,Microsoft.ActiveDirectory.Management.Commands.GetADUser
I only changed the lines that are required in this tutorial.
If somebody can help me that would be very much appreciated 🙂
Hi Robert
What if you wanted to bulk update existing AD users by populating fields with values
I’m going to write a separate post on this subject. Is there anything specific you would like to see examples of?
Hi Robert,
Did you get a chance to write a separate post on bulk update of existing AD users?
I’ve created a GUI tool for this, it’s very very close to being completed. It’s basically PowerShell with a GUI.
Thanks for this great knowledge
Hi Robert! Thank you so much for this approach. I took your example and I’ve modified the logic for the following reasons.
Suppose you’re managing a multi-domain AD environment (same forest) and HR department send you the list of new hires for the entire company each month. If you don’t have a software managed solution (which is my case) you have to manage the process by your own.
So, in the CSV file I’ve added the following columns:
– UPNSuffix
– UPN (which is a formula — =TEXTJOIN(,TRUE,A2,”@”,H2) where A2 contains Name/SamAccountName property and H2 contains UPNSuffix string) As a result you have SamAccountName@UPNSuffix.
– MobilePhone (value required for sales users)
– OU (this is for creating accounts into different OUs)
The main change in the script logic is based on “what if HR send you a list in which a given SamAccountName is already created for a user account, but the lastname of the user has changed (let’s say… a woman got married)?. According to the validation you’re doing, the script will throw a warning and it’ll skip the creation when in fact the account must be modified.
Let’s take into account the fact that modifications are required as creations as well. So… instead of using New-ADUser what must be used is Set-ADUser. I’ve spent many hours trying to figure out WHY Set-ADUser throw errors when all the information in the CSV is accurate. What I’ve realized is… Set-ADUser will throw errors “IF THERE’S AN EMPTY EXEL CELL AND YOU’RE TRYING TO MAP THE VALUE OF SUCH CELL AS A PROPERTY IN ACTIVE DIRECTORY USER ACCOUNT OBJECT”.
I have user accounts whose INITIAL property doesn’t matter so they’re empty cells in my CSV, but the foreach() script block is taking it into account so I had errors (nothing that could be easily realize in the error message by the way).
So… in order to get this covered, I had to add $ErrorActionPreference = “SilentlyContinue” at the beginning of the script.
Lastly, Set-ADUser won’t modify Fullname property. Again… if for some reason HR give you a list with this value changed, the way I’ve covered this is by adding Get-ADUser -Identity ($User.SamAccountName) | Rename-ADObject -NewName $User.DisplayName -Verbose within foreach() script block.
I hope this helps someone who faced the same issues I’ve faced, or needs to achieve the same goals as I have.
Thanks a lot Robert. Your script gave me the starting point of my whole search!
Fernando thanks for the details, I’m sure this will help others.
The script I provided is very basic so I’m happy you was able to use it as a starting point.
Hello
What about if there are duplicate user names? Is there something I can add to your script that would just add a 1 or 2 or 3 until the account is created
thank. it’s work
could you please inform how to add field extensionAttribute from csv to AD
because i try it but did not work
you should tell the OU path in the video.where we find the ou path and how it work.
Robert,
Could this also be used to set the newly created imported users with default “Member of” groups? This way they could be set to distros, security groups, etc without having to go back manually and set each one up after the import.
Is that legal some one without ur permission to change domain sir i need help and report
Can I do this before I join the user computers to the domain?
Also, if I have multiple unmanaged users in the company and now I want to create an AD DC to manage them, what is the best way to do it and what the order of operation should be?
Thanks.
I figured out my issue. Thanks for this script it was great!
Can we use the GUI tool to import attributes for pre-existing user accounts in AD.
The solarwinds GUI only creates accounts. I have a GUI tool exactly for this need. You can see a video demo here https://activedirectorypro.com/bulk-user-update-tool/
I am looking at doing this but only creating mail enabled contacts in bulk. I was currently doing this by loading the contacts from an remote LDAP and then looping through them. I was getting server errors like, server not responding, while looping. Is this method any different? I could create this file from the remote LDAP and then run your method but it looks similar to my current loop. And by bulk I mean over 10k mail enabled contacts.
How can I add roaming profile to the script ?
That should be the -ProfilePath parameter if using PowerShell. This parameter is already included in the GUI tool.
thank, it’s excellent !!
You’re welcome.
Hello, Robert,
The manual that you publish is perfect for now that I use WS2016.
Thanks for sharing.
This is excellent!
Do you know if there is a way to import a user without setting a new pw?
Sharbel, Having user accounts with no passwords is a big security risk. I would not recommend it.
With that said I think you can use this command New-ADUser “John Doe”. This will create the account but will disable it until a password is provided.
This is amazing, I tweaked it to suit my requirements and it worked like the name of Jesus!
Thank you!
Gideon, glad it worked.
Thank you for this! This works like a charm!
You’re welcome. Glad it worked.
Hello,
How to update the manager Details in AD. for bulk users.
For PowerShell, you will need to add the manager parameter plus add it to the excel sheet.
For the GUI tool, it is already included.
I been looking for a script that works is there a reason why you didnt add the description and office fields?
Hi Nick,
The description and office fields are not something I commonly used when creating bulk users. The script can easily be modified to include any fields you want, just add the field to the excel file and include it in the script.
What about adding attributes like ProxyAddresses or UserPrincipleName?
Yup those can be added. The GUI Tool already has them included in the CSV template.