Active Directory Bulk User Update Tool
Easily bulk update Active Directory users with the AD User Update Tool. With this GUI tool, you can easily mass-update user account properties such as: Office, telephone, street, city, state, manager, department, company, title, department, home folder, employee number, groups and many more. This tool is a huge time saver and eliminates the need for complicated scripts or manually modifying user accounts.
Download Free Trial Schedule Demo
Features:
- Easily bulk update AD user account properties
- Bulk modify user account options such as change password at next logon, password never expired, disable or enable user accounts.
- Includes CSV template. Template includes 35 user attributes; you can add more if needed.
- Automate user import with the built-in scheduler.
- Add or remove users to groups.
Read First:
- Run a small test first – Run a small test to ensure the accounts are being updated as expected. This is a powerful tool and you can mess up a lot of accounts if you don’t test it first.
- ID Column – One of the following attributes must be present in the CSV template and will be used to identify the accounts to update.
- SamAccountName (default)
- EmployeeID
- EmployeeNumber
- UserPrincipalName
- CSV Headers are case sensitive – The csv header must match the correct spelling of the LDAP name. You can add and remove columns just make sure they are spelled correctly.
- CSV Template – The CSV template includes 32 attributes. You can add additional attributes to the CSV. If you add additional attributes and it doesn’t work, please contact support.
- Existing values – If an attribute already has a value, the tool will replace the value. If the attribute is blank the tool will add that value. If the cell is blank in the CSV then it is ignored.
- Remove option – You can remove values by adding remove in the CSV file. You can update and remove attributes at the same time.
How to Use the AD Bulk User Update Tool
- Open the Bulk User Modification tool (Located under user management tools).
- Click the “Download CSV Template” button.
- Note: You can also generate a template by using the user export tool.
- Fill out the CSV with user details.
- The CSV must have one of the following headers to identify the accounts:
- SamAccountName (default)
- EmployeeID
- EmployeeNumber
- UserPrincipalName
- Click the update options button and select your ID column.
- Select your CSV template and click run.

CSV Example.

Remove User Account Properties
If you want to bulk remove user account properties then just put remove in the CSV column. In this example, I will remove the department information. Here is a screenshot of the CSV.

If any of these users had anything in the department field in Active Directory this tool will remove it.
Now check the logs and Active Directory to verify.
Supported Attributes List
Below is a list of attributes included in the template. The CSV headers are case sensitive and can be in any order. You can delete any columns from the template that you do not need. If a cell has no value (blank) then it will not update the account.
| Attribute Name (column headers) | Example Value | Description |
|---|---|---|
| sAMAccountName | robert.allen | This will be the users logon name. |
| password | Fuutbaal#123 | The password for the user. |
| memberof | group1,group2 | This will add users to a group. Use the groups name and separate multiple groups with a comma. |
| giveName | Robert | This is the users first name. (General tab) |
| initials | RA | The users initials (General tab). |
| sn | Allen | This is the users last name (General tab). |
| displayname | Robert Allen | The users display name (General tab). |
| description | IT staff | This is the description field in Active Directory (General tab). |
| physicalDeliveryOfficeName | 1st floor | This is the office field in Active Directory (General tab). |
| telephoneNumber | 1-888-214-3802 | This is the Telephone number field (General tab). |
| robert@activedirectorypro.com | This is the E-mail field (General tab). | |
| wwwHomepage | activedirectorypro.com | Web page field (General tab). |
| streetAddress | 123 W. EagleCrest LN | Street field (Address tab). |
| postOfficeBox | PO Box 1 | P.O Box field (Address tab). |
| l | Springfield | This is the City field (Address tab). |
| st | MO | State/province field (Address tab). |
| postalCode | 65802 | Zip/Postal Code field (Address tab). |
| c | US | 2-digit string value |
| co | United States | open string value |
| countryCode | 840 | integer value |
| profilePath | \file1\profiles\%username% | Profile path field (Profile tab). |
| scriptPath | it.bat | Logon script field (Profile tab). |
| homeDirectory | \file2\users\IT\%username | This is the home folder path (Profile tab) |
| homePhone | 1-888-214-3802 | Home phone (Telephones tab) |
| mobile | 1-888-214-3802 | Mobile number (Telephones tab) |
| ipPhone | 1-888-214-3802 | Ip phone (Telephones tab) |
| title | Network Manager | Job title field (Organization tab) |
| department | IT | Department field (Organization tab) |
| company | Active Directory Pro | Company field (Organization tab) |
| employeeID | 12345 | This is the employeeID attribute |
| EmployeeNumber | 1 | This is the employeenumber attribute |
| manager | robert.allen | This will assign a manager to the user account. Use the managers logon name. |
| proxyAddresses | SMTP:test.user1@activedirectorypro.com, smtp:test.user2@activedirectorypro.com | This column will add additional proxyAddress to the user. |
| proxyAddresses_update | smtp:test.user3@activedirectorypro.com | This will update existing proxyAddresses. |
Add Additional Attributes
You can add additional user attributes to the CSV file, you just need to know the LDAP name. You can find the LDAP name by opening the attribute editor in Active Directory Users and Computers. You could also use PowerShell to list all user account properties.
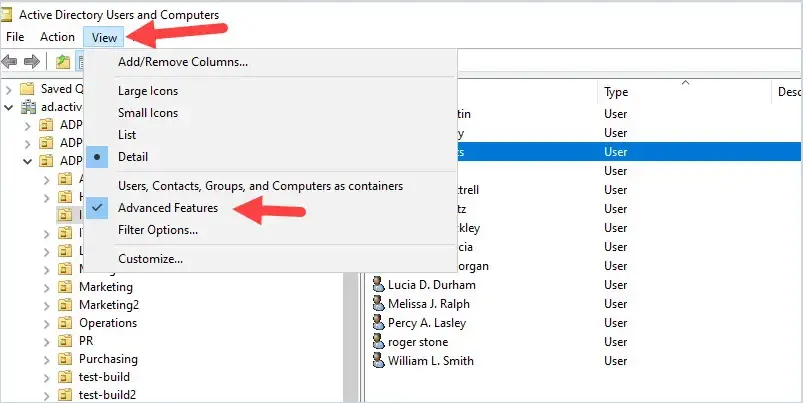
To see the attribute editor you first need to enable the advanced features in Active Directory Users and Computer
Click view from the top menu then select advanced features.
Now when you open an account you will see the attribute editor tab.
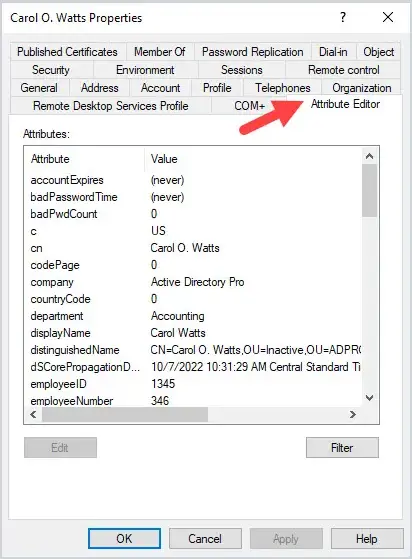
The attribute editor screen will show you all the user LDAP properties.
Now just find the attribute name and add it to the CSV. For example, I want to add information to the other Home telephone section for users.
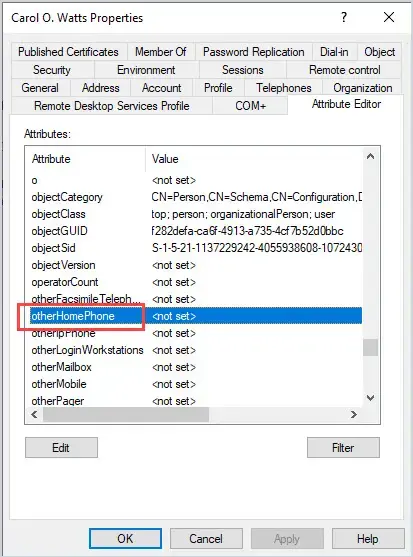
In the attribute editor, I see the name is “otherHomePhone”. I will add this to the CSV.
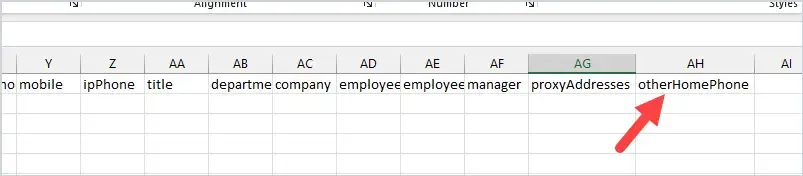
All done. That is how you add additional attributes to the CSV file to import with new accounts.
Schedule User Updates
You can use the built-in task scheduler to automate updating AD users.
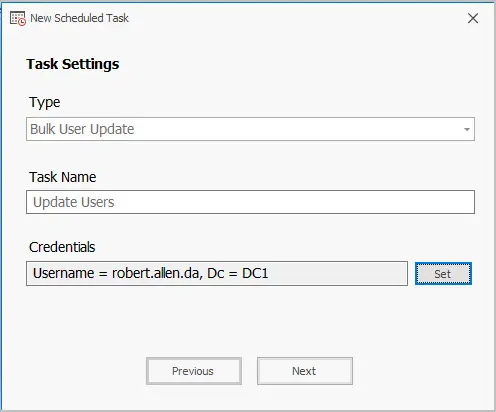
- Click on Scheduler.
- Click on the Add button.
- For the type select “Bulk User update”
- Give the task a name.
- Set the credentials.

- Click Next
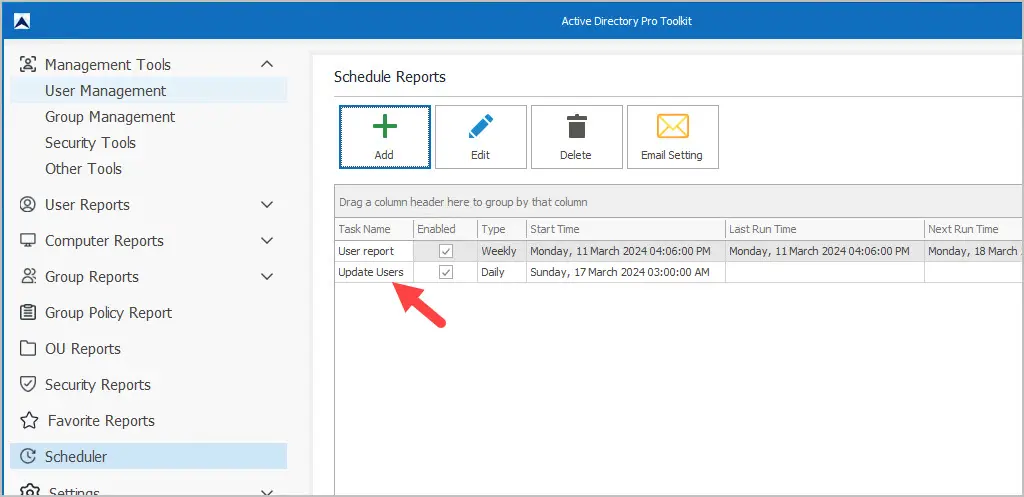
- Set the schedule frequency. You can choose from Daily, Weekly or Monthly.
- Click Next
- Select your CSV template. If you need to change the ID column click the options button. When done click Finish.
- Your task will now appear in the list.