
This is a list of common Active Directory Group Policies (GPOs) that should be implemented in an Active Directory environment for security and administrative convenience. Please note that not all these settings may be right for your environment so consider each carefully. As with any GPO settings, test on a small group of users and computers before rolling out.
1. Enable Audit Logs
Enabling audit logs helps to monitor activity on your network and is a great security tool for identifying threats in your infrastructure.
At a minimum, you should enable Audit System Events. This policy is in Computer Configuration -> Windows Settings –> Security Settings –> Audit Policy.
Change “Audit System Events” to Success, Failure.
See the article Windows Server Audit Policy for auditing best practices.
2. Screen Lockout Time
Enable a lock-out time from inactivity on your domain computers to protect data and privacy. A generally accepted time is 10 – 15 minutes but can be shorter if need be. Teaching your users to lock their computers when they are walking away from their desks is great. But a backup plan is always ideal.
This setting is in Computer Configuration –> Windows Settings –> Security Settings –> Local Policies –> Security Options.
Modify the time for Interactive Logon: Machine inactivity limit.
See the article GPO lock screen for more details.
3. Password Policy
Enforcing a strong password policy is critical for the security of your domain.
These settings are in Computer Configuration –> Windows Settings –> Security Settings –> Account Policies –> Password Policy.
See the article Active Directory password policy for more details.
4. Account Lockout Policy
Enforcing an account lockout policy will help keep your domain computers secure. A malicious actor could attempt to guess passwords for a domain account.
These settings are in Computer Configuration –> Windows Settings –> Security Settings –> Account Policies –> Account Lockout Policy.
See the article Active Directory account lockout policy for more details.
5. Removable Media
Allowing your users to plug in USB drives, external hard drives, or insert CDs, DVDs, should be turned off. You open the door up to your network being infected with viruses or malware.
These settings are in User Configuration –> Policies –> Administrative Templates –> System –> Removable Storage Access
You can enable Deny read and execute on specific devices or Enable All Removable Storage classes: Deny all access” to block all devices.
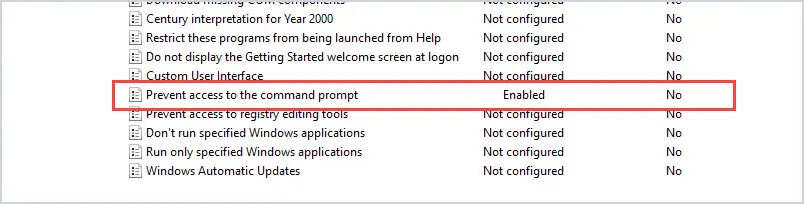
6. Restrict access to the command prompt and PowerShell
Limit access to the command prompt and PowerShell to prevent commands from being run by regular user accounts. If a system is compromised, the command prompt or PowerShell could be used to elevate a user account. Also, PowerShell can be used to run malicious scripts and is often used to spread ransomware.
To prevent access to the command prompt, enable the setting “Prevent access to the command prompt”.
The setting is in User Configuration –> Administrative Templates –> System.
To disable PowerShell, see the article disable PowerShell GPO.
7. Limit access to Control Panel options
You should limit access to what users can change in Control Panel. Users can change a lot of system settings in the Control Panel such as network settings, adding and removing software, and adding and removing users. All of these activities could open the door to a security breach.
To lock down access to the control panel, you want to enable “Prohibit access to Control Panel and PC Settings”.
This setting is located at User Configuration –> Administrative Templates –> Control Panel
8. Limit who can install software
All software should be tested and approved before being installed on a network. Also, regular user accounts should not be allowed to install software. This is for both security and to alleviate issues the software may cause.
This setting is in Computer Configuration –> Administrative Templates –> Windows Components –> Windows Installer.
Click on “Prohibit User Installs” and enable the policy.
9. Guest Account Settings
Guest accounts grant access to a computer without using a password. This is a security concern as well as a data access concern. It’s best to disable guest access.
This setting is in Computer Configuration –> Windows Settings –> Security Settings –> Local Policies -> Security Options
Click on “Accounts: Guest Account Status” and select disabled.
10. Prevent Storing LAN Manager Hash
LAN Manager stores account passwords in hashes in the local SAM database. The hash is weak and very susceptible to hacking. This should be turned off.
The setting is in Computer Configuration –> Windows Settings –> Security Settings –> Local Policies –> Security Options.
Set “Network Security: Do not store LAN Manager hash value on next password change” policy to Enabled.
11. Limit Local Account use of a blank password to console only
Blank passwords are a high-security threat. In the case that an admin inadvertently creates a local account with no password before it is added to the domain, you can block the ability for that account to be used via RDP, Telnet, and FTP.
This setting is in Computer Configuration –> Windows Settings –> Security Settings –> Local Policies –> Security Options.
Set “Accounts: Limit local account use of blank password to console logon only” to Enabled.
12. Turn off forced restarts
If you are using Windows Update, disable automatic restarts when users are logged on. This will prevent a lot of angry emails and phone calls.
This setting is in Computer Configuration –> Administrative Templates –> Windows Components –> Windows Updates.
Enable the policy “No auto-restart with logged on users for scheduled automatic updates installations”.
13. Monitor Changes to GPO Settings
Tracking changes to your Group Policy Object settings is very helpful when you have multiple admins making changes.
This setting is in Computer Configuration –> Policies –> Windows Settings –> Security Settings –> Advanced Audit Policy Configuration –> Audit Policies/DS Access.
Select Audit Directory Service Changes and click Success.
14. Block Microsoft Store
Users can get carried away with launching apps from Microsoft Store. This creates an admin nightmare.
To block Microsoft Store, Enable the setting “Turn off the store application”.
This setting is in Computer Configuration –> Administrative Templates -> Windows Components –> Store
There are some apps that still require updating via Microsoft Store, you can allow this by going to Computer Configuration –> Administrative Templates –> Windows Components –> Store.
Select the policy “Turn off automatic download and install of updates” and select disable.
15. Disable Anonymous SID/Name Translation
If this option is enabled, it is possible using the SID to get the name of the built-in Administrator account even if the admin account has been changed to a different name.
The setting is in Computer Configuration –> Windows Settings –> Security Settings –> Local Policies –> Security Options.
Change the policy “Network access: Allow anonymous SID/Name translation” to Disabled.
16. Limit access to the Registry
Altering the registry settings is always a major concern for admins. You can lock down the registry so that users can’t alter it.
This setting is in User Configuration –> Administrative Templates –> System.
Select the policy “Prevent access to registry editing tools” and set it to Enabled.
Then under Disable regedit from running silently, change to Yes.
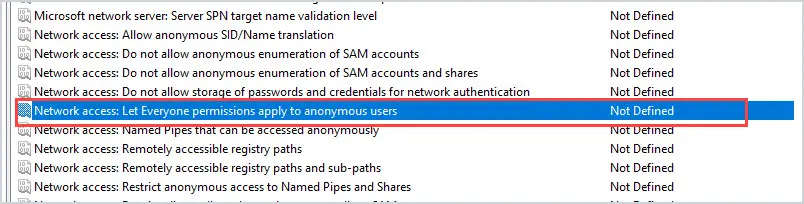
17. Remove Anonymous Users from Everyone Permissions
This should be disabled by default. I would double-check. If this is enabled, anonymous users can access any resources that everyone permissions have access to.
This setting is in Computer Configuration –> Windows Settings –> Security Settings –> Local Policies –> Security Options
“Network access: Let everyone permissions apply to anonymous users” should be set to Disabled.
18. Turn on auditing for NTLM to make sure you are not using it.
NTLM is a legacy authentication protocol and has several vulnerabilities, it was replaced with Kerberos in Windows 2000. Before you disable it, make sure you don’t have any legacy clients still using these authentication methods.
Audit NTLM Usage
This setting is in Computer Configuration –> Windows Settings –> Security Settings –> Local Policies –> Security Options.
Select policy “Network Security: Restrict NTLM: Audit NTLM authentication in this domain” and enable all.
You can view the Event Viewer under Applications and Services Log – Microsoft – Windows – NTLM to see if NTLM is being used. Look for NTLM in the Authentication Package value. The Package name will show you what version of NTLM is being used.
After making sure your domain is not using NTLM, you can disable it.
Disable NTLM (Make sure you audit your network first)
This setting is in Computer Configuration –> Windows Settings –> Security Settings –> Local Policies –> Security Options.
Select policy “Network Security: Restrict NTLM: NTLM authentication in this domain” and select Deny All.
19. Disable LLMNR
Link local Multicast Name Resolution (LLMNR) is a protocol used to resolve IP Addresses to host names. Basically, it performs domain name lookups without a DNS server. It works by sending a broadcast out on the network looking for an address and any devices on the network can respond. This can easily be used by an attacker to respond to these broadcasts and connect to machines. In a business network, your devices should be using a DNS server you control or approve.
You can disable LLMNR with this policy setting.
Computer Configuration -> Administrative Templates -> Network -> DNS ClientEnable Turn Off Multicast Name Resolution policy by changing its value to Enabled
20. Control the Local Administrators Group
If you do not limit access to the local administrator’s group then how do you know which accounts are full administrator rights? Over time staff will create and add existing accounts into the local administrator’s group on workstations and laptops. This will give the account full rights to the computer allowing them to install software, and drivers, make system changes, and so on. This is bad security practice and no user should be doing their day to day work with full administrator rights.
You can use group policy to control which users are members of this group and prevent other staff from making changes.
Refer to the remove local admin rights guide for step-by-step instructions.
21. Windows Firewall
I recommend you centrally manage the Windows firewall using group policy. This is similar to the local administrator rights issue, if you are not centrally managing it the rules can get out of control. If a user gets a firewall prompt to allow or deny something that could easily click allow all the time. Any requests to unblock something should come through the IT/Security team.
See the article Windows firewall best practices for more details.
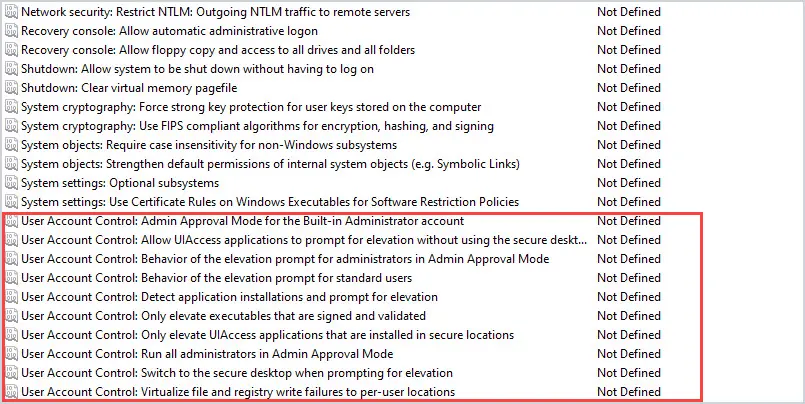
22. Enable User Account Control (UAC)
With UAC, applications run in the security context of a regular user (non-administrator account) and it prompts for permissions when the application needs administrator-level access.
This is another layer of security to help protect users, computers, and your network. This is another setting that users or other staff can disable. Use group policy to centrally force UAC to be enabled and prevent it from being disabled.
The UAC policies are located in the following:
Computer Configuration -> Policies -> Windows Settings -> Security Settings -> Local Policies -> Security Options.
23. Applocker or Software Restriction Policies
Applocker is a feature that allows you to control which applications and files can run. This can help prevent unapproved software and files from running. For example, if a user downloads software from the internet and it is not approved in the Applocker policy the software will be blocked.
This can also help prevent ransomware and other malicious viruses from installing and spreading on your network. Applocker is only available on Windows enterprise addition. If you are running Windows pro then look into software restriction policies.
The software restriction policies are located in the following.
Computer Configuration -> Policies -> Windows Settings -> Security Settings -> Software restiriction policies
I hope you enjoyed this article. What GPOs do you use to improve security?
Very good!
Excellent