In this tutorial, I’ll show you two options on how to export Active Directory Users to CSV. I’ll also show you how to export users from an OU, and get specific user attributes like last logon, email addresses, state, city, and so on.
Table of contents
- Option 1. Export AD Users to CSV with the AD Pro Toolkit
- Option 2. Export AD Users to CSV with PowerShell
- How to Export All Users from Active Directory
Option 1. Export AD Users to CSV with the AD Pro Toolkit
In this first example, I’ll Export Users with the AD Pro Toolkit. This tool makes it very easy to export all users or users from an OU and groups.
Step 1. Download the AD Pro Toolkit
Click here to download a free trial
You can install the tool on your local computer or a server.
Step 2. Open Export Users Tool
Under Management Tools click on “Export”.

Step 3. Select Path
By default, the tool will export all domain users. To export users from a specific OU or group click the browse button. In this example, I have selected two OUs that I want to export users from.

Step 4. Add or Remove user Attributes
Click “Columns” to add or remove user attributes. You can also include custom attributes by clicking the “Add Custom Attribute” button. To re-arrange the attributes click the up or down arrows.

Step 5. Click “Run” to generate a list of users
This will display the accounts you want to export and all the properties you selected. This gives you a preview of what will be exported.
Step 6. Export the list of users
Click “Export” to export the list of AD users to CSV. Alternatively, you can select to export to Excel or PDF.

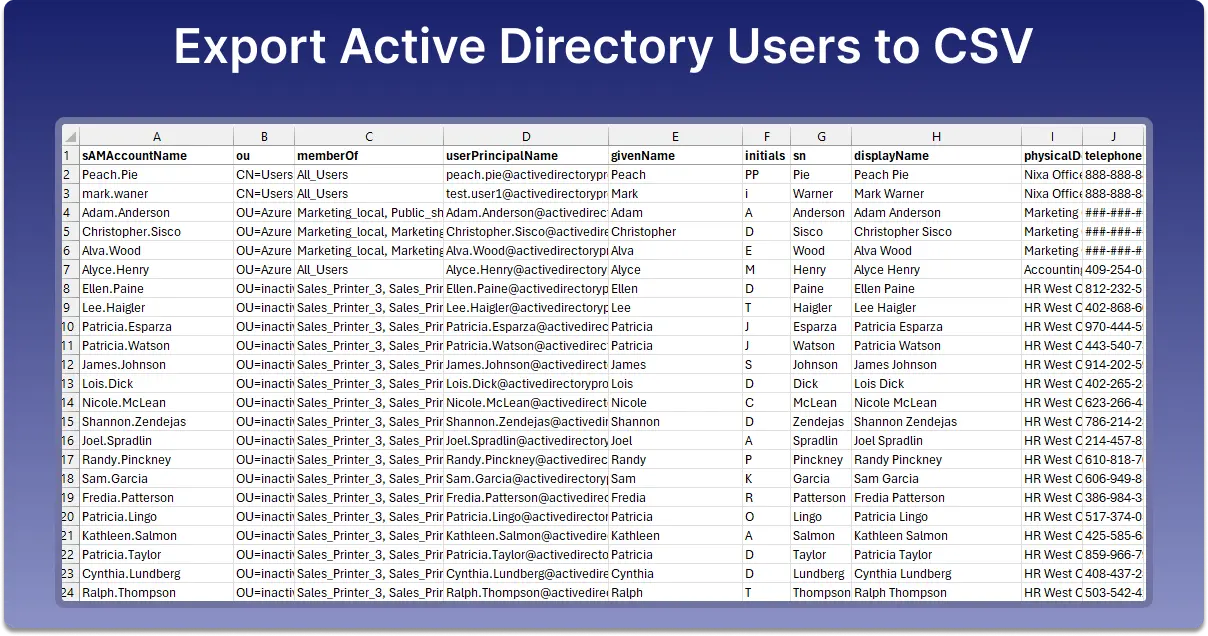
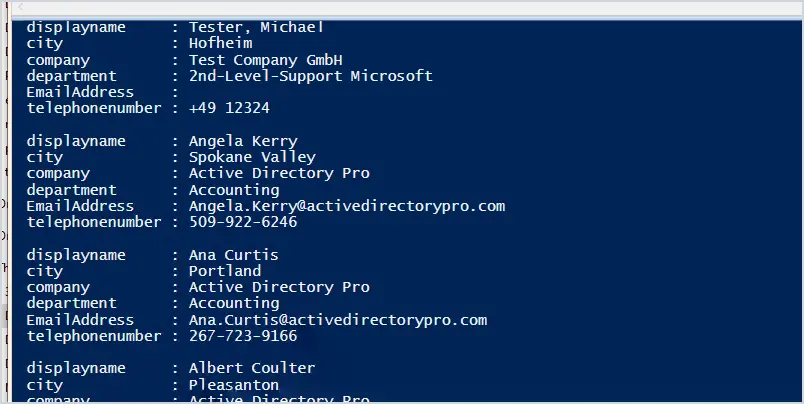
Below is an example from my export. So for each user, it will show you which security groups they are a member of and all the other user attributes I selected. Of course, you can just uncheck “memberOf” in the columns picker if you don’t want to see this info.
Option 2. Export AD Users to CSV with PowerShell
Here are the steps to export Active Directory users to CSV using PowerShell.
Step 1: Get-ADUser PowerShell Command
To export users with PowerShell, the Get-ADUser cmdlet is used. This command will get user accounts from Active Directory and display all or selected attributes. It’s important to know how this command works so you can export the data you need.
The most important thing to remember is how to display all the user attributes. This will come in useful when you want to export only specific account details.
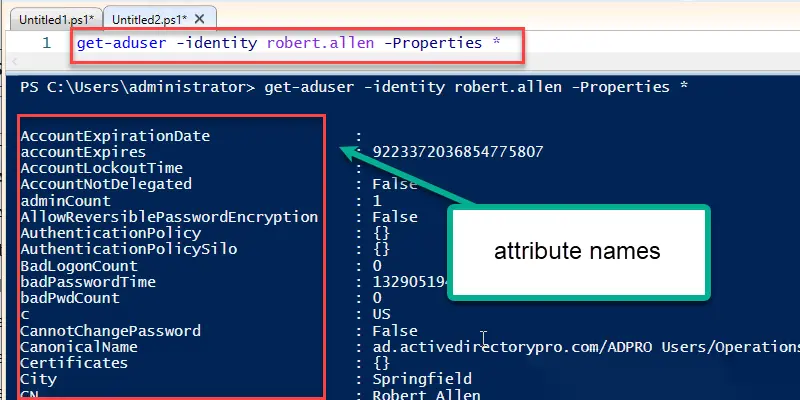
The below command will get all user attributes for a single user.
get-aduser -identity username -Properties *Change the “username” to a user in your domain.
Pay attention to the left column. These are the user attribute names and the values on the right. In example 4, I’ll show you how to select specific attributes to include in the export.
Related: How to bulk modify user attributes
Step 2: Export to CSV command
Add “export-CSV -path” to the end of the command to export to a CSV file. See the below example, I’m exporting all the properties for this user to c:\temp\export.csv.
get-aduser -identity username -Properties * | export-csv -path c:\temp\export.csv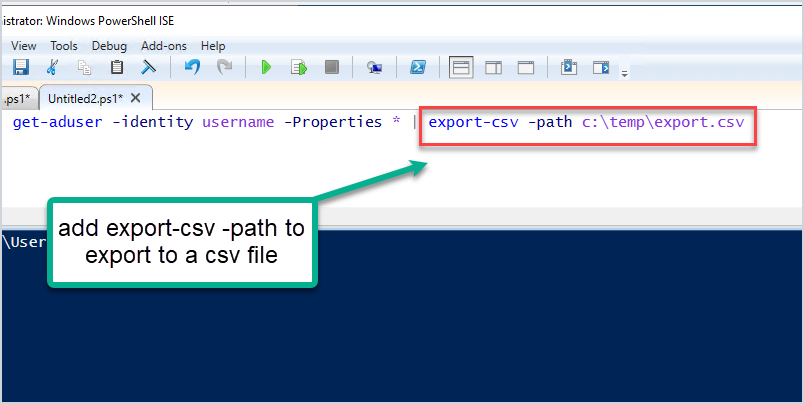
You should now have a CSV export of all user properties for a single user.
Step 3: Export specific user attributes
If you don’t want to export all user attributes then use the “select-object” command and enter only the attributes you need. If you have followed along from the beginning then you know how to find the attribute names, if not then jump to example 2.
In the below example I’ll export the DisplayName, City and State.
get-aduser -identity username -Properties * | select DisplayName, City, State | export-csv -path c:\temp\export.csvStep 4: How to export all users
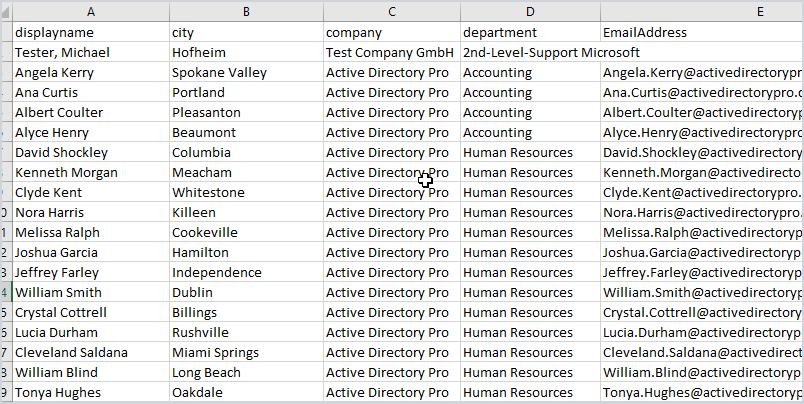
To export all users remove (-identity) and add (-filter *) to the command. In the below example I’m exporting all users and selecting displayname, city, company, department, EmailAddress, and telephonenumber.
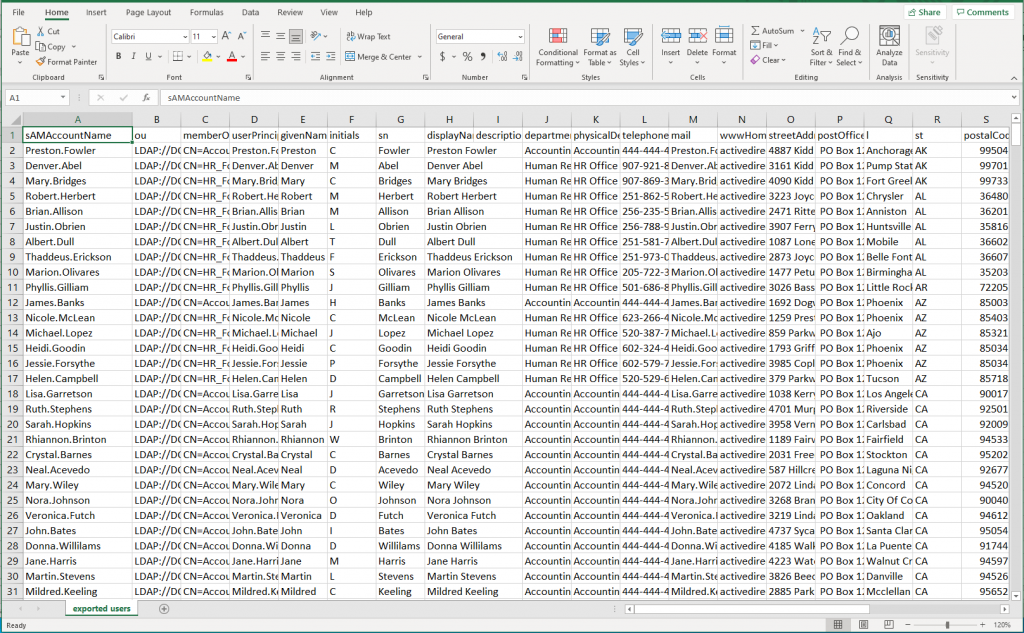
get-aduser -filter * -Properties * | select displayname, city, company, department, EmailAddress, telephonenumber | export-csv -path c:\temp\export-all.csvHere is what this looks like in PowerShell.
Here is the CSV.
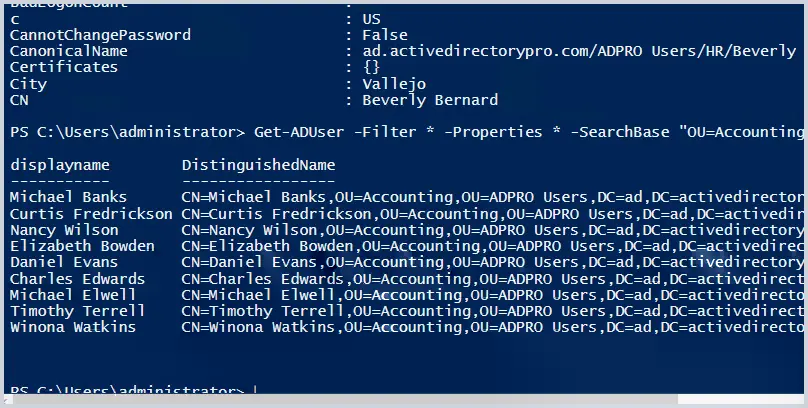
Step 5: Export Users from a specific OU

To export users from specific OUs use the “-SearchBase” command and the “distinguishedName” value of the OU.
In the below example I’m getting all the users in my accounting OU.
Get-ADUser -Filter * -Properties * -SearchBase "OU=Accounting,OU=ADPRO Users,DC=ad,DC=activedirectorypro,DC=com" | select displayname, DistinguishedName, EnabledHere is the PowerShell output.
Then add export-csv -path to the end to export this to CSV.
Get-ADUser -Filter * -Properties * -SearchBase "OU=Accounting,OU=ADPRO Users,DC=ad,DC=activedirectorypro,DC=com" | select displayname, DistinguishedName, Enabled | export-csv -path c:\temp\export-ou.csvAt this point, you should be able to export single, all users, or users from a specific OU. I also showed you how to export all or specific user attributes.
Below are a few more PowerShell examples.
Export only enabled users
To get just the enabled user accounts you need to add a filter that searches for enabled = true.
Get-ADUser -Filter {Enabled -eq $true} -properties * | select-object samaccountname,givenname,surname,Enabled | export-csv -path c:\export\exportusers.csvExport users to CSV with last logon date
get-aduser -Filter * -Properties * | select displayname, LastLogonDate | export-csv -path c:\temp\export_lastlogon.csvHow to Export All Users from Active Directory
To export all users from Active Directory, follow these steps.
- Open the Export Users Tool
- Click “Run”
- Click the “Export” button and select CSV.
- Optionally, click the Columns button to add or remove attributes.

With PowerShell, the below command will export all users to CSV. This will just export the user’s name, you will need to add additional attributes as needed.
Get-ADUser -Filter * -Properties * | Select-Object name | export-csv -path c:\export\allusers.csvI hope this article helped you learn how to export ad users to csv. You may also want to see our guide on how to export group members to csv.

Thank you for your informations, great help for my!
Hi Robert,
In Powershell this works.
Get-ADUser -Filter * -Properties * -SearchBase “OU=Accounting,OU=ADPRO Users,DC=ad,DC=activedirectorypro,DC=com” | select displayname, DistinguishedName, Enabled | export-csv -path c:\temp\export-ou.csv
But what if I want to list all users in ‘Accounting’ regrdless if they are in ‘ADPRO users” or not.
Can’t find a way to do this.
Thanks in advance, Gideon.
Hi,
You can use a filter to list users in a specific department. For example, to get all users in the Purchasing department use this command.
get-aduser -Filter {department -eq “Purchasing”} -properties department | Select sAMAccountName, department
This has helped immensely. I need help with applying filters to include only records where specific fields are not blank. For example mail or givenName are not blank or empty. For something like CSVDE in the past I’ve used -r “(&(mail=*)(givenName=*)”.
TIA
Hi Robert,
I need some help from you Please check the below cmdlet.
Get-ADUser -filter * -Properties MemberOf, LastLogonDate, Canonicalname, name, WhenCreated, description |Select-Object MemberOf, Canonicalname, name, whenCreated, description | Format-Table
when i run this above command it showed me proper in Powershell windows but when i export this csv format in memberof column i am getting this type of message Microsoft.ActiveDirectory.Management.ADPropertyValueCollection
rest all data output in proper way can please help me to get the correct command.
Thanks
Here is a possible solution.
Exporting multivalued attributes with Export-CSV cmdlet
Is there a way to update the users from the exported CSV file?
I have successfully exported a CSV with all the attributes required but now I want to update the CSV with phone numbers job titles etc. then run a powershell cmd that will update each users attributes.
#TYPE Selected.Microsoft.ActiveDirectory.Management.ADUser
“displayname”,”samaccountname”,”givenname”,”surname”,”description”,”title”,”city”,”company”,”department”,”EmailAddress”,”userprincipalname”,”telephonenumber”,”mobile”
Thanks!
You can update users from a CSV with the set-aduser cmdlet.
There are some examples of updating the proxyAddress in this guide. You can modify the PowerShell command to update other user attributes.
https://activedirectorypro.com/how-to-bulk-update-proxyaddresses-attribute/
Here are some examples of bulk updating user attributes with the AD Pro Toolkit.
https://activedirectorypro.com/how-to-bulk-modify-ad-user-attributes/
Hi Robert,
Thanks for the quick reply. These examples you have provided were exactly what I needed.
What colour is your cape and what is your Hero name?
Thanks!
Hi Roberts, how do i export deleted users to CSV file on Windows server 2016 & 2019
Please, it is very urgent
Hi, try this command.
Get-ADObject -IncludeDeletedObjects -Filter {objectClass -eq “user” -and IsDeleted -eq $True} -Properties displayname, whencreated,whenchanged | select -Property displayname, whencreated,whenchanged
We get requests like this. Give John Doe the same permissions and access as Jane Doe.
Is there a way to see permissions and access by user rather than looking at the properties of each folder?
We are starting with a list of unknown folders because we can’t see everything that Jane Doe has access to. So we have to ask the requester to provide a list of folders they want them to have access to.
The best way to do this is to grant permissions to groups rather than users. The groups should have a naming convention and describe exactly what they are used for. This way you can look at a users group membership and quickly determine what they have access to. If you are not setup this way you will need to scan the folders to analyze the permissions.
You can check folder permissions with PowerShell or a GUI tool. Refer to the article List List NTFS Permissions on all folders for details.
I have a list of users in csv, but I need to export certain AD attributes for each user.
Any idea how to put it in PowerShell string?
Thanks!
Hi Robert,
would like to export reports which shows only administrators only.
Thank you
I’m assuming domain administrators? See the article export active directory groups for steps.
Hi
Any steps on how to do email forwarding to external email in bulk using csv file?
Thanks for the reply
Thanks for this. Just one typo in your command right above the summary.
Get-ADUser -Filter * -Properties * | Select-Object name | export-csv -path c:\export\allusers.scv should be .csv at the end.
Thanks, I have updated it.
thanks for posting It have helpful for today
Hi, question from support perspective.
If you’re exporting all users and an extension attribute within an organization, would this have any impact on the users at all? Is it possible to slow down the system enough to impact users logging into the same servers?
With the AD Pro Toolkit, I exported about 3000 users and it took 10 seconds. While it was running the domain controller CPU went from 7% to 30% for those 10 seconds. My test server has 1 CPU with 2GB ram, a very small server. In production, I would recommend 2 CPUs and at least 4GB ram.
PowerShell uses very little CPU but took about 1 minute to export 3k users.
Neither option should impact users logging in but that depends on the CPU/Mem usage before its run. What does your CPU/Mem usage show before running an export?
Hi
I would need to export all users who do not have the extensionAttribue1 “Azuresync” what is the powershell command
Tanks
kindly send me command to get all users manager name without ou details included
Hello Can you the steps to follow to extract ad users by licence ?
would like to export users based on “Office”
Check out the user export tool I created, it included 26 user attributes that can be included in the export.
Server 2016, I would like to export users and groups they are in for instance “everybody”. Any ideas?
Hi PJ,
I created a GUI tool that makes this super easy, check it out.
https://activedirectorypro.com/reporting/
Thanks, very helpful.
Can we also export password?
No. Active Directory stores them in an encrypted format so they cannot be exported.
Hey Robert,
I tried using the command, but my syntax may be wrong. Can you take a look?
Get-AdUser -Filter * -SearchBase “OU=Digicel,OU=Bermuda,OU=Users,DC=BMU-DC-001,DC=digicelgroup,DC=local” -Property * | select-ObjectName, SamAccountName, PasswordExpired, PasswordLastSet, LastLogonDate, Enabled, DistinguishedName, DisplayName, GivenName, SurName|export-csv C:\Documents\output.csv
Thanks,
You’re missing -Properties * and you need a space after Select-Object and before the Export. FYI- the path for Documents is not in C:\ unless you actually have a folder called Documents under the C drive. Use the C:\Temp if unsure.
Try this:-
Get-AdUser -Filter * -Properties * -SearchBase “OU=Digicel,OU=Bermuda,OU=Users,DC=BMU-DC-001,DC=digicelgroup,DC=local” -Property * | Select-Object Name, SamAccountName, PasswordExpired, PasswordLastSet, LastLogonDate, Enabled, DistinguishedName, DisplayName, GivenName, SurName | export-csv C:\Temp\output.csv
Just noticed your properties * was in a different place…
Use this one instead:-
Get-AdUser -Filter * -Properties * -SearchBase “OU=Digicel,OU=Bermuda,OU=Users,DC=BMU-DC-001,DC=digicelgroup,DC=local” | Select-Object Name, SamAccountName, PasswordExpired, PasswordLastSet, LastLogonDate, Enabled, DistinguishedName, DisplayName, GivenName, SurName | export-csv C:\Temp\output.csv
Hi,
Can you please tell me where I gone wrong with “Get-ADUser -Filter * -property * | Select-object Name, Title -SearchBase “OU=O365,OU=Users,DC=danielx64,DC=com,DC=au” | export-csv -path c:\export\allusers.csv”?
Cheers
Daniel,
The -searchbase is in the wrong place. Try this
Get-ADUser -Filter * -SearchBase “OU=O365,OU=Users,DC=danielx64,DC=com,DC=au” -property * | Select-object Name, Title | export-csv -path c:\export\allusers.csv
this was very useful, however I would like to get the unix attributes, such as uid and gid. These show up as {username} rather then the number when I use get-aduser username -properties *
I wanna to export from a particular active directory not all active directories
Do you mean from a specific OU?
Actually that script isnt what I was looking for.
What I am referring to is when you open up the properties of a user and select the “account” tab, there is a button that says “log on to” and it shows what machines on the domain that that user is allowed to log on to.
That attribute is userWorkstations
Thanks! That worked perfectly!
I am trying to export a list of our AD users as well as their “Log On To” permissions to a CSV file. How could I do this?
CH, I think that is the logonWorkstation attribute. Try this
Get-ADUser -Filter * -Properties * | select name, logonworkstationExcellent thank you much
No problem
Do you have video on import LDAP users in to AD?. I am trying to import our LDAP users to AD then to Azure. I am able to migrate from AD to Azure AD just need to work on the LDAP to AD part 🙂
Yes, I have a complete tutorial with a video
https://activedirectorypro.com/create-bulk-users-active-directory/
Hello, how do I exclude disabled accounts in the query? I only need active users
Hi Lamin,
Here is an example of returning only enabled users.
Get-ADUser -Filter ‘enabled -eq $true’ -Properties * | Select-Object name | export-csv -path c:\export\allusers.scv
Hey Robert,
Thanks for putting this up. I’m curious if there is a way to list all users and all associated groups or organizational units in a single spread sheet?
I’ve got some software that needs to auto-group users by AD Group or OU but operates outside Microsoft Active Directory. I’d love to be able to have a user generate a CSV that has person/user in a column and then what groups or OU’s they are associated with.
Thx,
Dave
hi there
i want to know how do i export all my users in AD with all permissions ??
thanks
What do you mean by all permissions? Are you wanting the security group membership?
Thank you for posting this. It was very helpful for me today.
No problem, glad it was helpful!
It helped me immensely today as well. I don’t have access to the AD server, but I can ‘read’ AD with the MMC app. This was the first tutorial of several I had reviewed that got me exactly what I needed. Thank you, Mr. Robert Allen!