
In this guide, I share my Windows File Server Best Practices and tips.
These tips will help you in creating, managing, and securing your Windows File Servers.
List of Windows File Server Best Practices:
- Folder and File Structure
- Least Privilege Access
- Use Security Groups for Folder Security Permissions
- Security Group Names Should make Sense to Everyone
- DO NOT use the Everyone Group
- Map Drives with Group Policy
- Perform Regular File Server Backups
- Consider Data Replication and Redundancy
- Audit File Servers Regular
- File Server Resource Manager
1. Folder and File Structure
The most important step when creating a File Server is to carefully consider your directory structure. You want to have top-level directories and scale down from there. The more structured you have your folders and files, the easier it will be to understand and apply permissions.
Start out by analyzing your users and their roles. Try to group users together that have similar roles or collaborate often. This may be users that are in the same department or location. The directory structure needs to be easy to understand and scalable.
It’s important to come up with a naming convention and structure that makes sense to everyone. Avoid creating long folder names and using special characters. Strictly follow your naming convention and teach your users to follow it as well. You may need to lock down the top-level directories you want your users to adhere to so they can’t create folders to disrupt the structure.
In this article, we will use the business below as an example that may give you an idea of a directory structure.
Business XYZ has one location with 80 employees. They have the following departments: Finance, Marketing, Sales, Customer Service, and Human Resources.
The top-level directory structure could be the names of the departments: Finance, Marketing, Sales, Customer Service, and Human Resources.

Let’s focus on the top-level directory Finance. You can break it down into different roles under Finance. For example, under the Finance top-level folder, there are folders named Accounts Payable, Treasury, Accounts Receivable, and Executive. Then you can break it down further for workflow for the users in that job role like the example below.
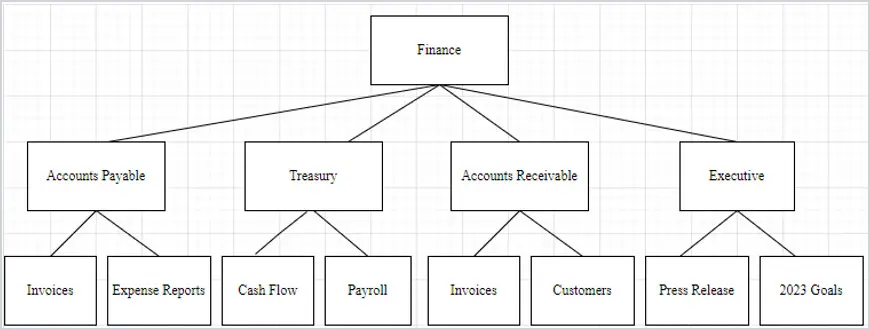
This will make the file server easy to manage and easy for the users to access.
2. Least Privilege Access
You should always go with the Least Privilege rule when giving permissions to anything. Consider creating read-only groups and read/write groups. If users do not need to modify data, don’t give them read/write access.
Of course, with this method, make sure you keep a consistent naming convention. For example, if you give specific access to the Accounts Payable folder under Finance, the read-only group could be named finance_accounts_payable_RO.
Also, consider creating a Deny_All group where you can add users that do not need access or access needs to be removed quickly from any data.
3. Use Security Groups for Folder Security Permissions
The next thing you want to consider is a permission structure. I highly recommend using Active Directory security groups to assign share and security permissions. DO NOT apply permissions to individual users, this becomes a security and management nightmare.
It is hard to keep up with all the places you’ve assigned individual permissions to. Also, when users leave the company or switch positions, they could still have access to data they no longer should have access to. If they are a member of a group then it makes it easy to add or remove permissions.
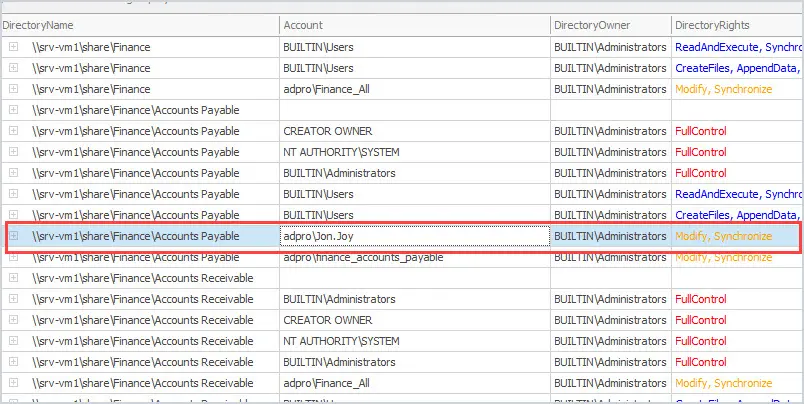
You can use PowerShell or a 3rd party tool to scan file shares to assist with identifying what AD groups and users have access to. Below is a screenshot of the NTFS Permissions Reporter and you can see it has found an individual user with modify permissions to the Accounts Payable folder.
Create top-level groups and add relevant users to that group, then scale down to specific groups. Try to keep your directory structure in a way that you don’t need to lock down subfolders nested more than 3 deep.
We will go back to the Finance department as an example.
The Finance folder is the top-level folder, then you have the Accounts Payable folder, and then under that the Invoices and Expense Reports folders. That is 3 deep. Try not to go further down than that. It can quickly become an admin hassle to try to keep track of several directories with specific permissions and manage the users in the groups. Of course, there are always exceptions to this rule. You need to do what would work best for your organization.
4. Security Group Names Should Make Sense to Everyone
You know from the pervious tip that you should use groups instead of users for permissions. The next tip is to name your security groups so they make sense.
Anyone should be able to look at the group name and have an idea of what it is used for. Don’t use truncated names, acronyms, star wars, or marvel character names.
Creating a security group called “R2D2” and using it to secure the Finance folder makes no sense. It is also not useful to other Administrators and unless you have really good documentation (which is hardly the case) then no one will know what the R2D2 group is used for. Often times the person that created it will forget.
I find it best to name the group based on what is being used for or applied to.
Going back to the Finance example, create a Security Group called Finance_All. Add all the users in Finance to that department. This would give them access to the Finance top-level directory and everything below it if you let the permissions propagate. Then, if you needed to be more restrictive with access to a folder, for example, the Accounts Payable folder, create a Security Group for that folder for example finance_accounts_payable.
Add only users that would need access to the Accounts Payable folder. Add comments to the groups in AD with the listing of the folder it gives access to. This will help other admins locate the groups they need easily. Looking at the group names in Active Directory anyone can easily see what the groups are used for.

5. DO NOT use the Everyone Group
The Everyone group will give access to all users who have logged in with a password as well as built-in non-password protected accounts such as Guest and local service. Basically, it gives everyone access (domain accounts and non domain accounts).
This is a huge security risk and I recommend that you audit your file servers for this type of access. Another group I like to avoid using is the authenticated Users group. This group includes all users who have authenticated to the domain (logged on). Using either of these groups is a huge security risk.
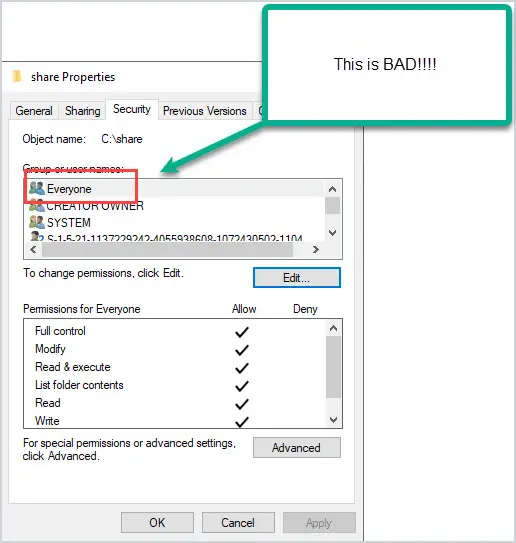
You can use the NTFS Permissions Reporter to quickly find which folders have the Everyone group applied and its security rights. After a scan, you can filter the account column for any user or group.

6. Map Drives with Group Policy
If you have your Active Directory structure aligned with how you set up your File Server, you can map drives for users using a Group Policy based on what OU they are in very easily.
Let’s assume your AD structure aligns with your File Server structure. You can map a network drive for the OU’s to each Top-Level folder for each department. For example, you can map the Finance OU to the Finance Top-Level folder, and so on.
Refer to the article group policy mapped drives for step-by-step instructions.
7. Regular File Server Backups
With any File Server, backups are extremely critical. Consider implementing the 3-2-1 backup strategy. This means having at least 3 copies of your data. Two of these can be onsite and one offsite. The two onsite should be on different forms of media.
Ransomware is always a concern so I can’t stress backups enough. Creating frequent backups of your data and then locking it down so read/write is no longer possible will ensure recovery from ransomware.
Always have a recovery plan in the event of a virus or ransomware.
If you are using a SAN or a NAS use snapshots. This provides a quick and easy option to restore files and folders. I’ve used some systems that allow end users to restore their own files. Also look into Windows shadow copies.
8. Consider Data Replication/Redundancy
If you use a SAN or NAS, consider data replication or redundancy in the event of a catastrophic hardware failure or environmental impact. Enable RAID whenever possible. Having a strong Disaster Recovery Plan is critical to recovering your infrastructure as quickly as possible.
Also, consider using DFS namespaces. DFS enables you to group shared folders across multiple servers for high availability.

Refer to the Microsoft article DFS Namespaces overview to learn more.
9. Auditing File Servers
You should do regular auditing of data and data access. Auditing all files on a File Server would create a lot of logs. Define what data is most critical to audit. This is especially important with access to sensitive and confidential data. You can set up a Group Policy to audit specific files and folders. Also, audit Active Directory groups that have access to confidential and sensitive data to notify you when a user is added or removed. There are several tools on the market to help with auditing.
Refer to the article Windows folder permissions report to learn how to create a report on folder permissions.
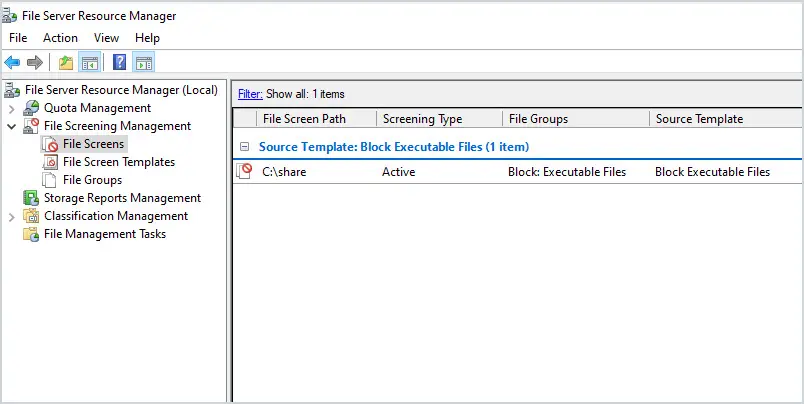
10. File Server Resource Manager
The file resource manager is a feature that can be installed on a Windows server. This feature provides some really great options to help you manage your windows file servers.
- Quota Management – This allows you to limit the space allowed for a volume or folder. For example, you could limit each department to 1TB of space. This can help you control disk usage and prevent uncontrolled growth.
- File Screening Management – This allows you to control what file types are allowed on the share. For example, I created a policy that blocks executables such as .exe and .msi. You can create exceptions as needed.
- Storage Reports – Create data reports, trends, monitor usage, and much more.
- Classification Management – This feature provides insight into your data by automating classification processes so that you can manage your data more effectively. You can classify files and apply policies based on this classification
- File Management Tasks – Automate policies and actions based on data classification.
The file server resource manager (FSRM) is free and I definatly recommend taking advantage of its features. Refer to the Microsoft article File Resource Manager overview to learn more.