In this guide, you will learn how to schedule a Windows reboot using group policy. This guide will work with a Windows server or client OS (Windows 10, 11).
Important Note: The scheduled reboot uses GPO preferences to create a scheduled task on the target computers. After you deploy the task and decide it needs to be disabled, you will need to deploy a separate GPO to delete it or manually delete it from the computer. Removing or disabling the GPO that created the task will not remove the task on the target computers. I’ll walk you through an example to show how it is done.
Important Note #2: Make sure you get approval for scheduled reboots. You want to make sure you don’t randomly reboot 911 operator computers (or any other critical computers). These things really do happen, so communicate, get approval, and plan for these changes.
Step 1: Identify Target Computers
First, you need to know which computers you want to schedule the reboot on. This step is very important because you don’t want to deploy the reboot task and then later realize it needs to be disabled on a bunch of computers. As I noted at the top you will have to manually delete or create a separate GPO to delete the scheduled reboot task. It will happen so just be prepared, someone will always complain and give a reason that their computer cannot be rebooted at a specific time.
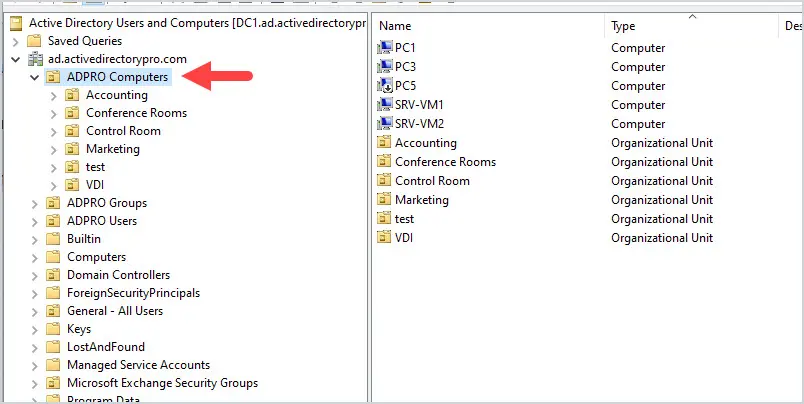
I’m going to deploy the scheduled reboot to all end user devices which are located in my ADPRO Computers OU. This will target computers in this OU and any SUB OU.
Step 2: Create a Group for Exclusions
You will probably need to exclude certain computers from the reboot. I like to put those computers into a group and deny them access to the reboot GPO. This will block the computers from creating the task.
In this example, I created a group called “gpo_exclude_reboot_task“.
If you have any computers that need to be excluded go ahead and add them as members to this group.
Step 3: Create the Scheduled Reboot GPO
1. Open the group policy management console.
2. Right click on the OU you identified in step 1 and select “create a GPO in this domain, and Link it here”
Give the GPO a name. I’ve called mine “GPO Reboot” so I know the task came from group policy vs local.

3. Exclude Group (optional)
Follow these steps to exclude a group from applying the GPO.
Select the GPO and click the delegation tab.
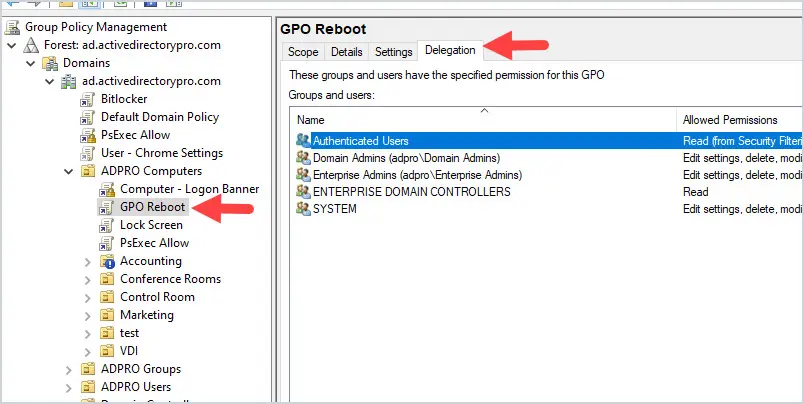
Click the Advanced button in the lower right corner.
Click Add and add the security group you created for exclusions.
For the permissions Select “Deny” for “apply group policy”.
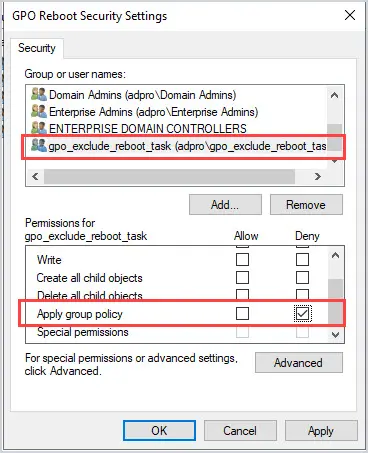
All done. Any computers that are a member of this group will be denied the GPO and will not create the scheduled reboot.
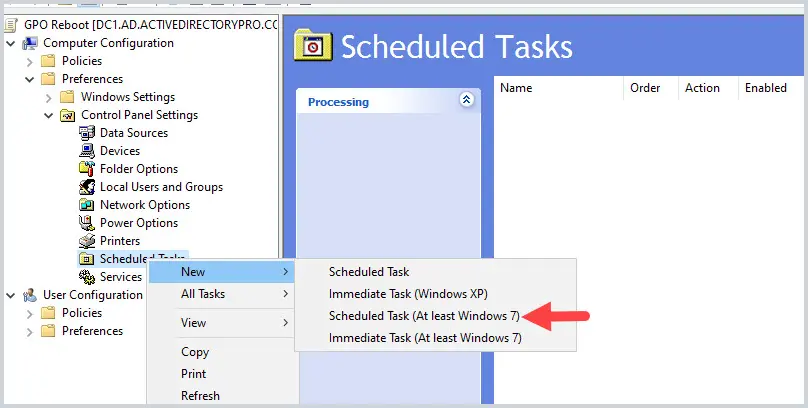
4. Open the GPO and browse to Computer Configuration -> Preferences -> Control Panel Settings -> Scheduled Tasks.
Right-click Scheduled Tasks and select “Scheduled Tasks (At least Windows 7)”, the other options do not work.
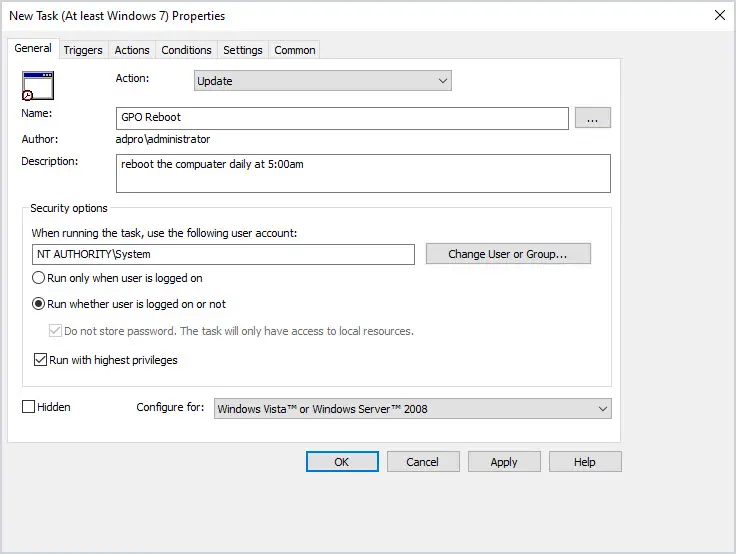
General Page Settings:
- Action: Update
- Name: This is the name of the scheduled task that will be created on the local computer. I’ve called mine GPO reboot.
- Description: enter a description for the task
- Change User or Group = enter system and click check names to use the local system account.
- Select Run whether user is logged on or not.
- Select Run with highest privileges.
Trigger settings:
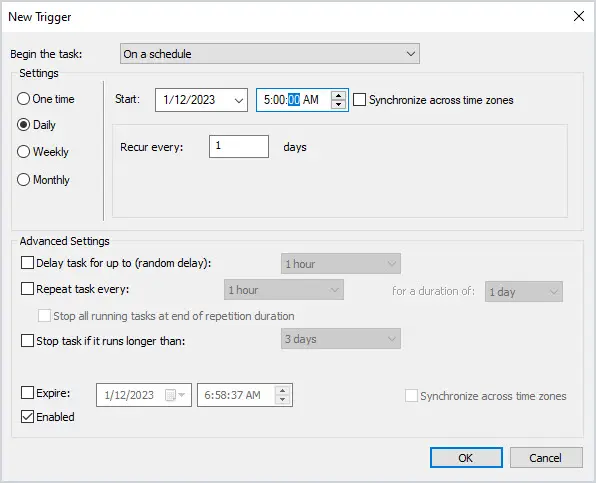
Click new. Configure the trigger settings according to your reboot schedule. For this example, I’ll create a daily reboot at 5:00 am.
Action Settings:
Click on New.
program/script = c:\windows\system32\shutdown.exe
Add arguments = /r /f
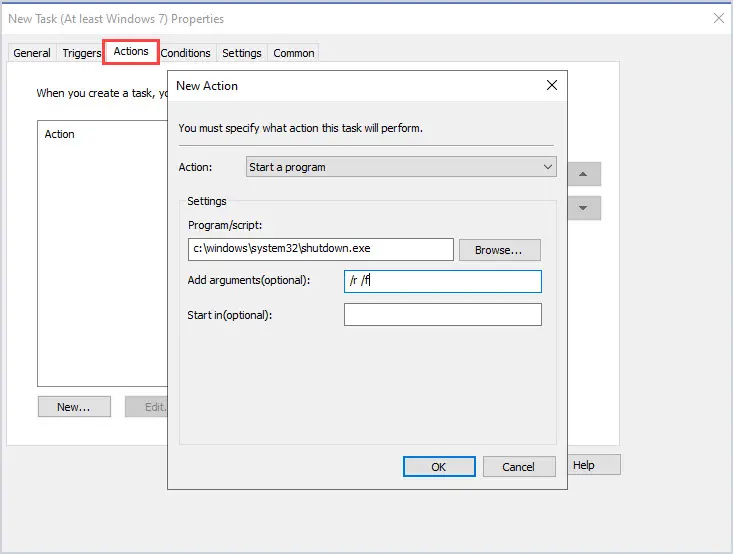
Note: You can use any arguments the shutdown.exe command supports. For example, if you wanted to display a message before the computer reboots use the /c switch like this.
/r /f /c "The IT department has initiated a remote restart on your computer"
You can also delay the reboot with the /t command. For example to delay the reboot by 60 seconds use /t 60.
Click OK. That completes the steps for configuring the GPO.
Step 4: Reboot or Run Gpupdate
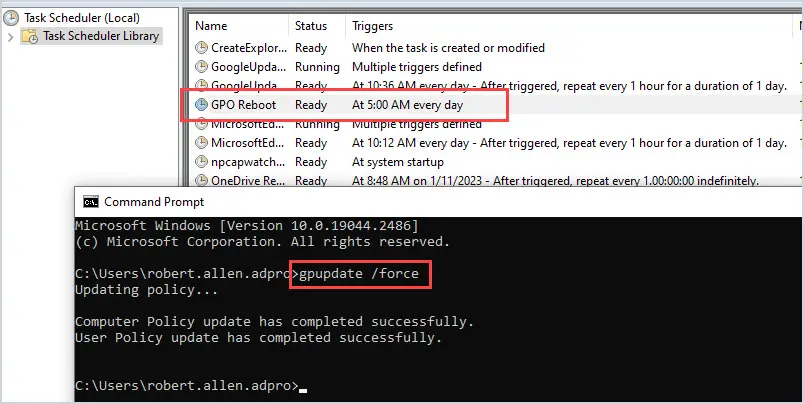
Group policy will refresh on the computers every 90 minutes and the scheduled task will be added then. If you want it to show up immediately reboot or run the gpupdate /force command.
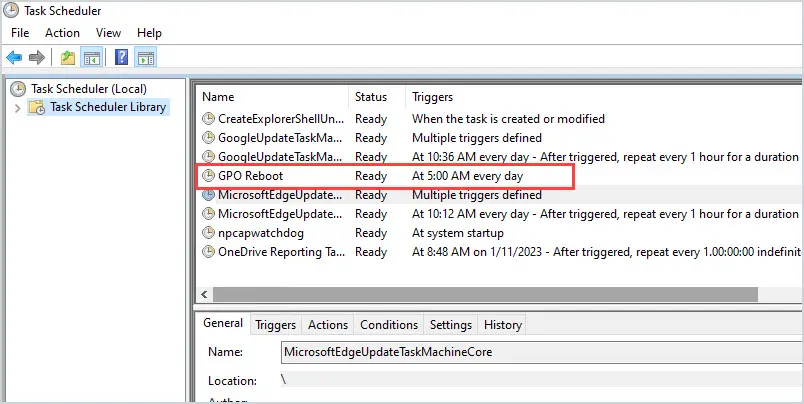
In the screenshot below, I’m logged into PC1 and run the gpupdate command. The GPO Reboot scheduled is now created on PC1.
Step 5: Remove the Scheduled Reboot
If the scheduled reboot was added to a computer and you need to remove it, follow these steps.
- You need to add the computer to the exclusion group so it does not get recreated.
- Make a copy of the GPO Reboot GPO.
You need to duplicate the “GPO Reboot” GPO and change the task to delete. You can do this by copying and pasting the GPO and then renaming it.
You can use item-level targeting to target a specific group. Create a group for computers that need the task removed. If you want to delete the task on all computers then ignore the item-level targeting settings.
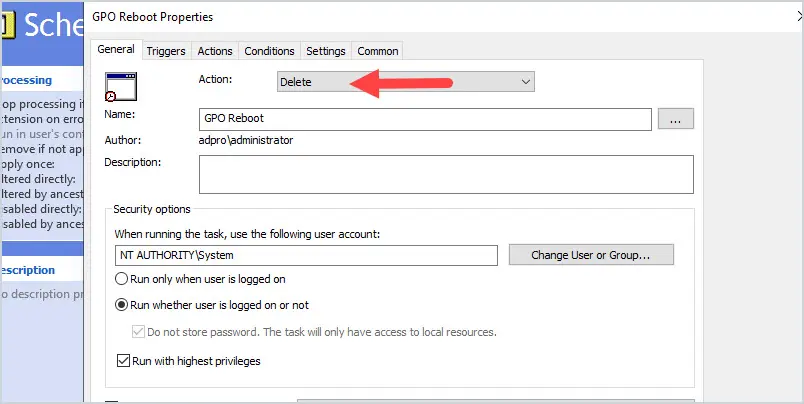
Edit the GPO and change the scheduled task action to delete.
Click on common and select Item-Level targeting.
Click new item and select security group.
Select the security group that contains the targeted computers.
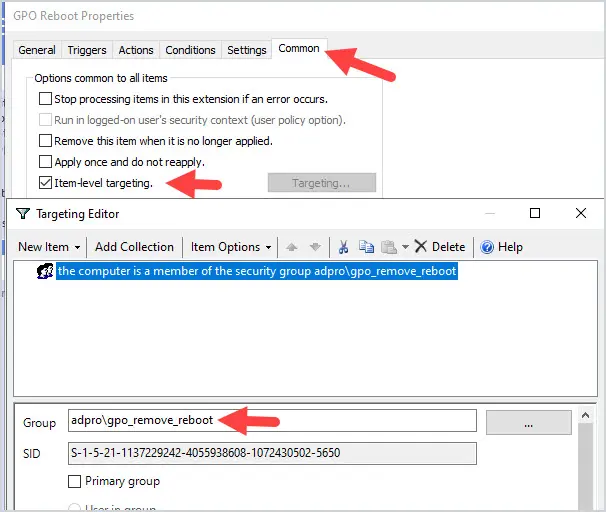
Click ok. Click ok again.
Reboot the computer and the GPO reboot task will be deleted.
Alternatively, you could use PowerShell to delete the scheduled tasks. I’ll update this article if anyone is interested in those steps.
How to Check Scheduled Tasks on all computers
If you want to check that the reboot task was created on all computers you can use PowerShell or a GUI tool. In this example, I’m going to use the AD Pro Toolkit to inventory the scheduled tasks.
Click on the service accounts report tool, and then click run.
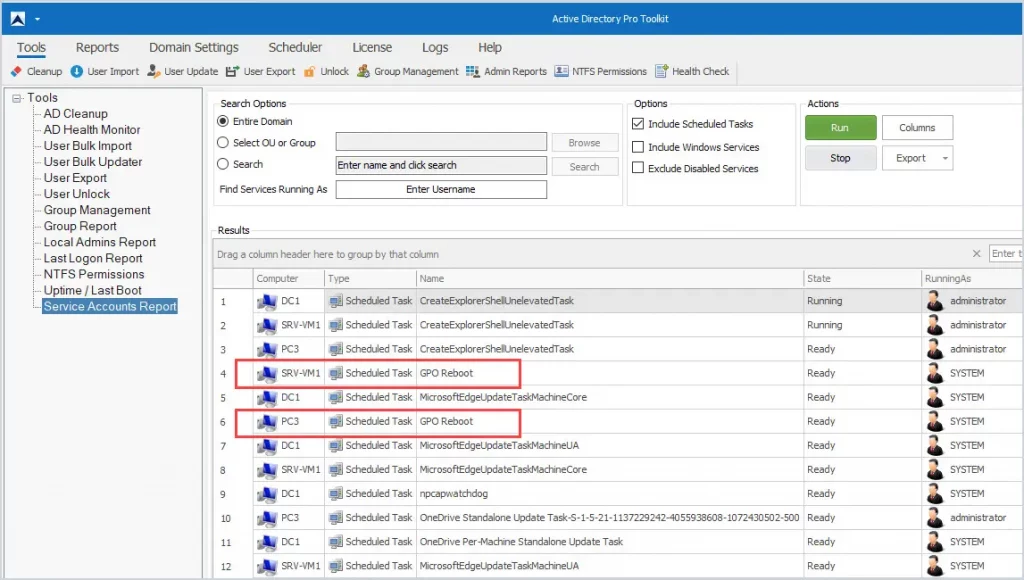
By default, it will scan and display all scheduled tasks. You can filter any column with a keyword. For example, my scheduled task is called “GPO Reboot” so I filtered the list using the word GPO. You can see below I’ve got three computers that reported the GPO Reboot scheduled task.
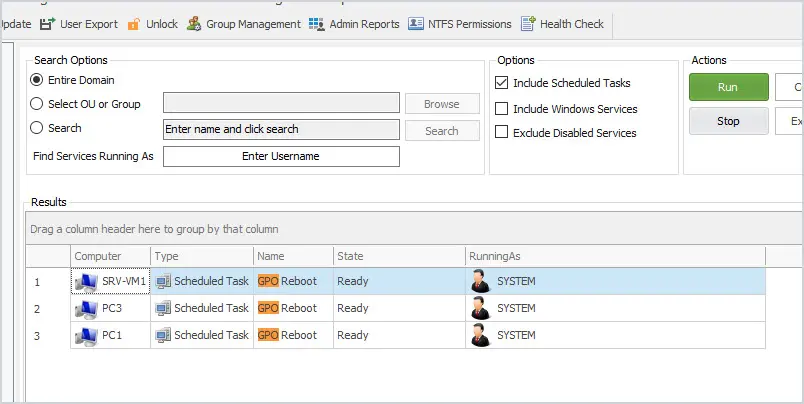
You can also add the Last Run Results column to verify the task is running.
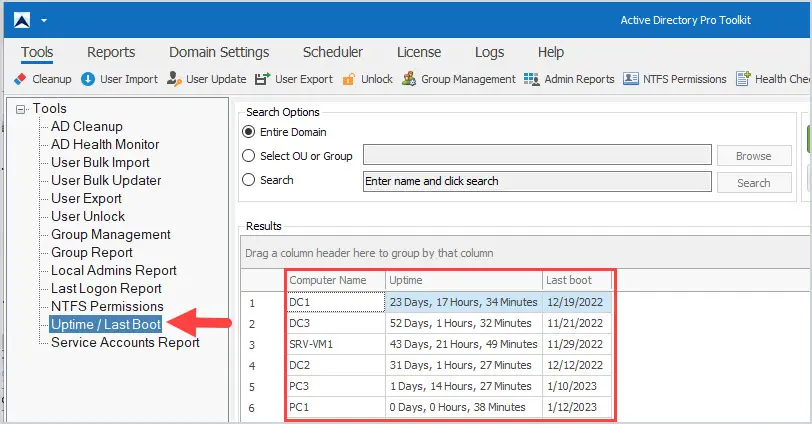
In addition, you can use the uptime tool to verify if computers are rebooting on this schedule. This tool will get the uptime and last boot date from all computers.
You can try the AD Pro Toolkit for Free. Click here to download.
If you have questions post a comment below.
Hi.
When I want to add NT AUTHORITY\System doesn’t allow I mean it’s not there. What I am doing wrong? 🙂
Is there a way to tell the GPO not to reboot workstations that are currently logged in AND in use? For example, if the user has been active within the last 30 minutes we don’t want to reboot. But if the user is logged in and has been inactive for more than 30 minutes, their workstation would be rebooted. Basically, we want to reboot all workstations at midnight, but not those who are ACTIVELY using them at that time. It would be rare that someone is working that late, but we do not want to reboot them if they are. We have many users who do not log off each day, so we want to force this reboot, each night at midnight.
Hi Dave,
The solution I posted uses the built-in shutdown command and it appears to have no option to detect if someone is currently logged in. I’m not aware of any other free utilities that provides this feature.
I have followed your steps and the group policy is not updating on the targets computers. I did gpupdate /force and restarted the computer. No luck. Any ideas?
If you run gpresult on the computer does it show the GPO being applied?
The GPO is showing up in gpresult, but is showing as State: disabled. It is still not showing up in task scheduler.