
This is the ultimate guide to Office 365 Security best practices.
In this guide, I’ll share my recommendations for improving Office 365 security, policy settings, and configuration options you should change.
Security for your Office 365 tenant is always a concern. Some security features are enabled by default and some you need to enable.
Some of these recommendations require additional license purchases.
Warning: I recommend that you get proper approval from your organization before making these security changes. You need to carefully review the recommendations and determine the potential impact of each change.
1. Enable Multi-Factor Authentication (MFA) for your tenant
The very first step you should do after you set up your tenant is to enable MFA for Office 365. MFA allows you to secure user logins by adding multiple authentication methods. These days, just a password is not the most secure, even with complex passwords. It is always a good idea to have more than one authentication method for any platform you use.
You can enable MFA for your tenant in Azure Active Directory on a per-user basis, by enabling Security Defaults, or by using Conditional Access policies
Options for MFA include using the Microsoft Authentication app, texting a code to a phone number, and OATH hardware tokens. If you want to use the OATH hardware tokens, you will need to purchase an Azure Active Directory Premium P1 or P2 license for each user you assign a token.
To see which users have MFA enabled or not refer to my article Get MFA Status with PowerShell. I will show you how to easily export the report to CSV.
2. Block Legacy Authentication Protocols
Legacy authentication is simply referring to an app or client that is only using basic authentication or simply passing a username and password. Leaving legacy authentication on opens the door for all types of credential attacks. Also, legacy authentication does not support MFA meaning you can’t force the use of MFA on apps or clients that are only using basic authentication. It should be relatively easy to move away from this since most apps or clients support modern authentication these days. You can use conditional access policies, enable security defaults, or turn off basic authentication protocols in the Org Settings in the admin center to block legacy authentication for your tenant.
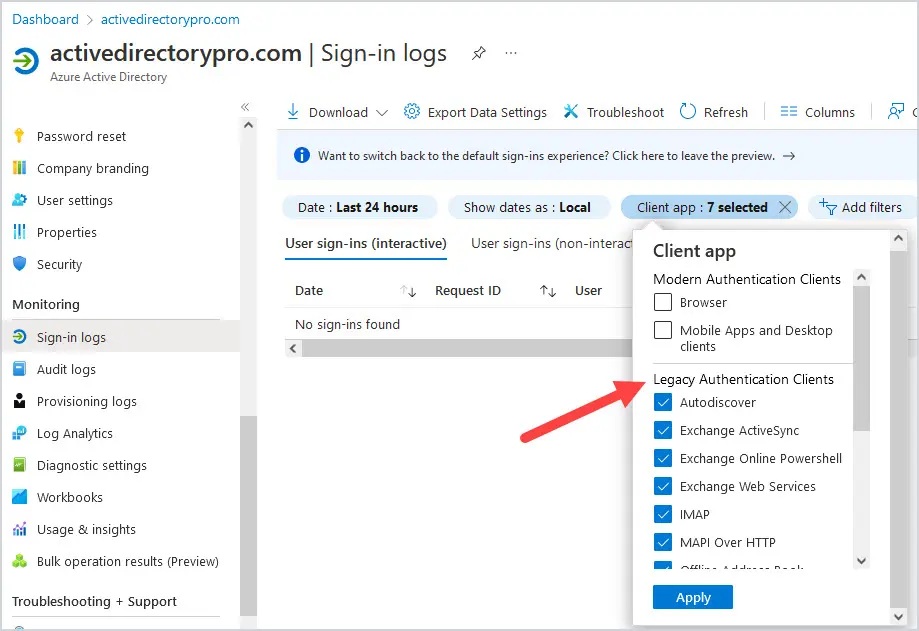
Before you turn off legacy authentication, I recommend you review Azure AD Sign-In logs to look for any legacy sign-ins.
Log into Azure AD by going to https://aad.portal.azure.com/ and then select Azure Active Directory and then Sign-in logs. Select Add Filters at the top. Select Client app and select all options under Legacy Authentication Clients.
3. Security Defaults in Azure Active Directory
If you have a tenant that was created after October 21, 2019, then Security Defaults are enabled by default in Azure. You do not need to purchase any additional licenses to use this feature.
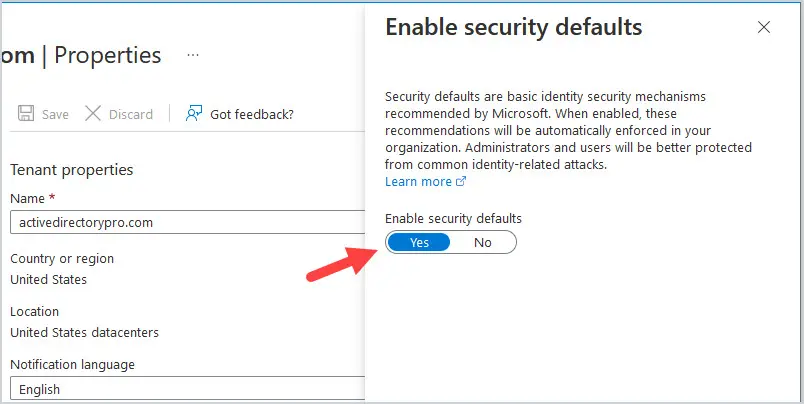
To see if Security Defaults are enabled in your tenant, login to your Azure Active Directory by going to https://aad.portal.azure.com and then click on Properties, then Manage Security Defaults at the bottom.
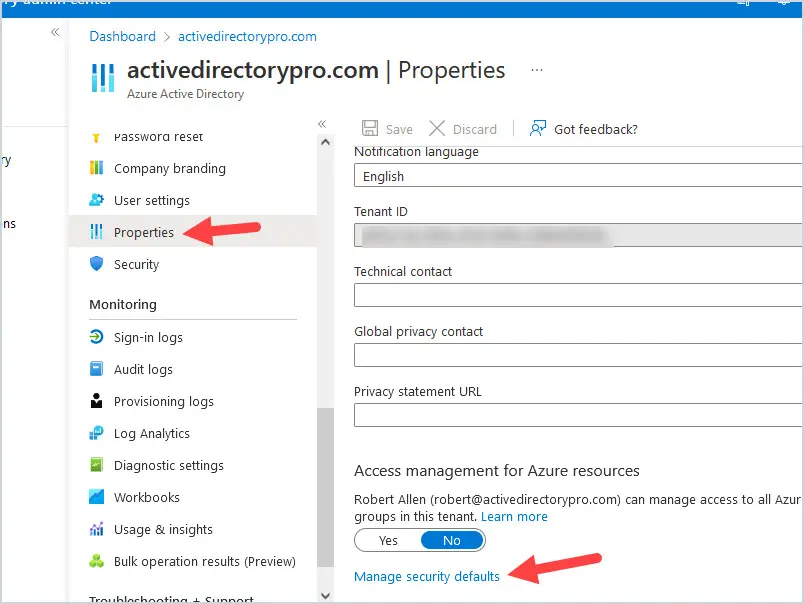
If it is set to Yes, then it is enabled for your tenant.
I would not enable Security Defaults if you are planning on implementing or already have Conditional Access Policies in place for your tenant. Also, if you are paying for Azure Active Directory P1 or P2 licenses, then using Conditional Access policies allows you more flexibility with your security policies.
When you enable Security Defaults, users and admins are required to register for MFA using the Microsoft Authenticator app within 14 days or risk being locked out of the tenant. It also blocks legacy authentication protocols.
4. Create an Emergency Access Account(s)
It is always wise to have a backup account(s) that you exclude from conditional access and MFA. There are several reasons you want to do this:
- MFA technical issues
- Provider outages
- You mess up a conditional access policy
- Your Active Directory domain is compromised, or administrative employee issues.
You must always have a way to get into your tenant.
An emergency account should not be used except when necessary. You want to create the account(s) in your Office 365 tenant. If you sync your on-prem Active Directory domain, don’t create the account in your on-prem AD. Make sure you assign this account(s) the Global Administrator role. Also, be sure the account(s) have a very complex and long password. It is always a good idea to change this password a few times a year and monitor the sign-ins for this account(s) often. Store this account(s) information in a very safe place with more than one administrative employee having access to the information.
5. Limit Admin Access
Limit admin access to ONLY what is needed to perform a role in your organization
The Global Administrator role should not be given to everyone that administers your Office 365 tenant. You should only have a few global admins, if possible. Microsoft recommends less than 5. It’s the security rule of the least access to perform a job function. For example, if you have an admin that only supports Exchange, then only give that admin the Exchange Administrator role.
Consider access reviews for those with Azure AD roles. If they are not using the access that they have, remove the access. You would need an Azure AD Premium P2 or E5 license to utilize Identity Governance in Azure AD.
Also, use generic accounts when setting up configurations in Office 365. You never want to use an employee’s username in case they leave the company. That can cause an admin nightmare.
Refer to the Microsoft article About admin roles in the Microsoft 365 admin center for more details.
6. User Password Policies
It is always a very good idea to have user password policies. It can be hard to explain the importance of a good password to our users. Even with MFA enabled, passwords should still be required to be strong and complex.
If you have an on-prem Active Directory domain that is synced with Azure Active Directory, then Azure AD will use the password policy you have set up in your on-prem domain unless you enable the EnforceCloudPasswordPolicyForPasswordSyncedUsers setting. Set up password policies that require numerical, alphanumerical, and special characters. They should be, at a minimum, 8 characters long. The password should be changed often, at a minimum, every 90 days. I recommend shorter than that even though it will make your users mad at you. Also, don’t let your users repeat passwords by setting a password history requirement.
If you have accounts only in your Azure Active Directory, then these accounts will be required to use the default Azure AD password policy. Not all settings in the default Azure AD password policy settings can be modified so you aren’t completely able to customize the policy to what you want. The default Azure AD password policy is listed below and lists which options can be changed.
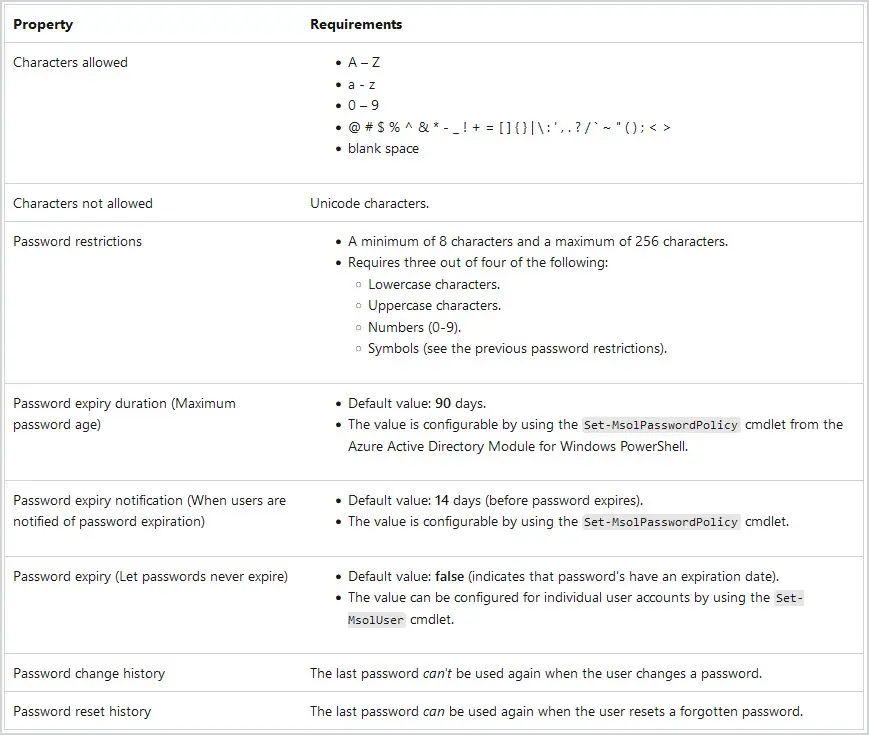
Refer to the article Password policies and account restrictions in Azure AD for more details.
7. User Settings
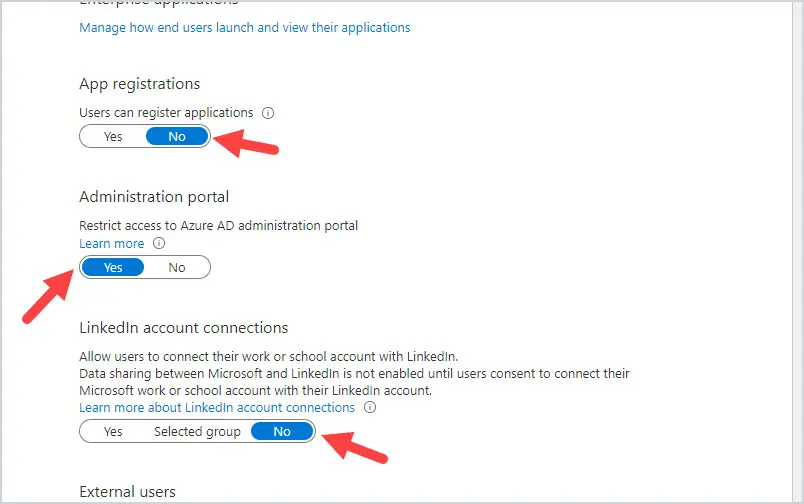
Turn off the ability for users to register custom-developed apps, access the Azure AD admin portal, and use their account to access LinkedIn. A regular user will not need to register custom-developed apps, nor access the Azure AD admin portal. Also, when you connect to LinkedIn, it shares company data on their behalf, which can include their profile data and contacts list.
Log into https://aad.portal.azure.com and click on Azure Active Directory and then User Settings.
Under App registrations, change Users can register applications to No. Under Administration portal, change Restrict access to Azure AD administration portal to Yes. Under LinkedIn account connections, change Allow users to connect their work or school account with LinkedIn to No.
8. User Consent to Apps
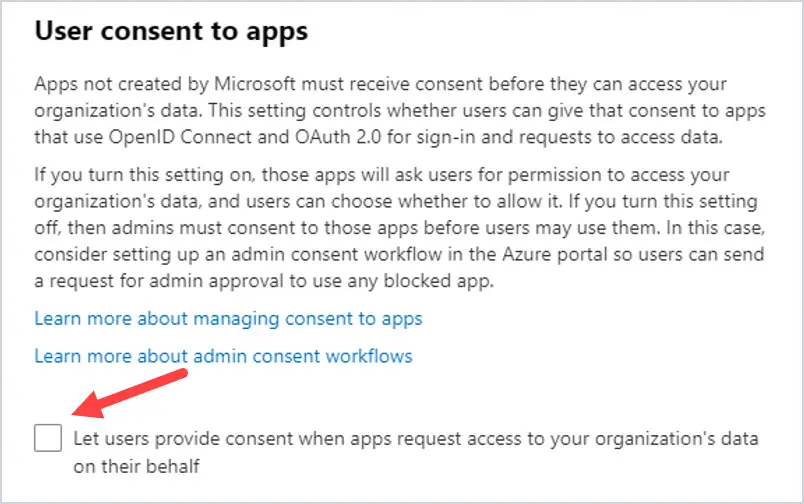
Turning off user consent prevents your users from sharing data with apps. The less data you share with other apps, the safer your data will be. Sharing data with just any app is not secure. Also, when you give users the ability to consent to sharing company data, this opens the door for the user granting permissions that could jeopardize the entire organization.
Login to https://admin.microsoft.com. Go to Settings then Org Settings, then User Consent to Apps. Turn off Let users provide consent when apps request access to your organization’s data on their behalf.
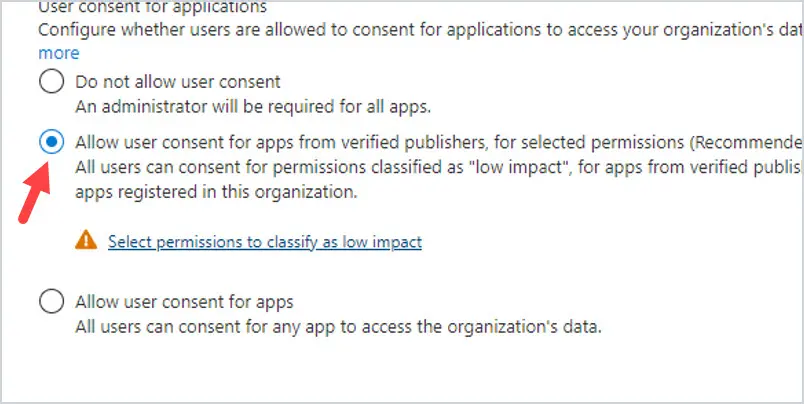
Now, you can set up a user consent policy to help your users be able to get apps that will help them, but just help to make sure they are legit apps.
Go to https://aad.portal.azure.com and select Azure Active Directory, then Enterprise Applications, then Consent and Permissions. Select Allow user consent for apps from verified publishers and click Save.
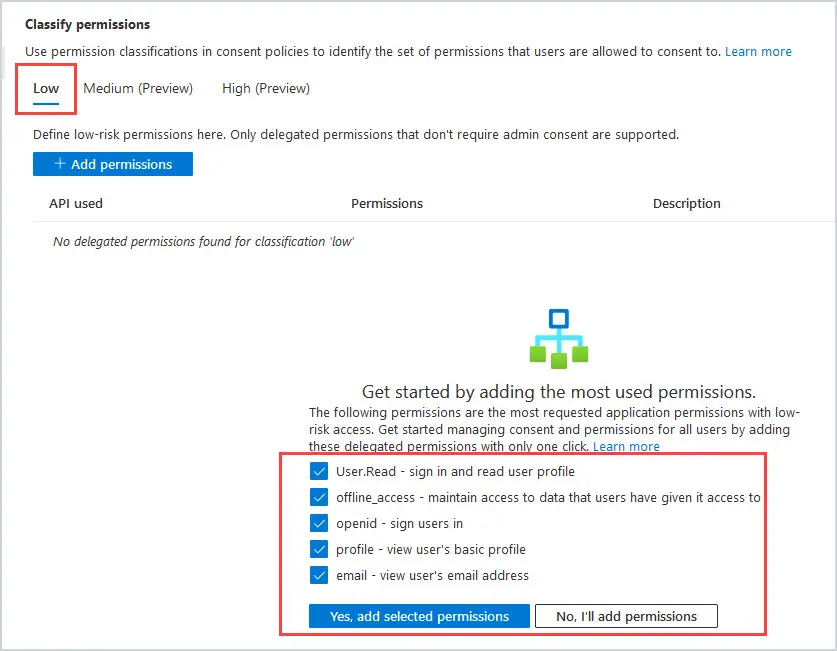
Now, we want to verify what permissions we are comfortable with our users giving the apps. Click on Select permissions to classify as low impact. Microsoft will recommend low-risk application permissions. Select them and then click Yes, add selected permissions
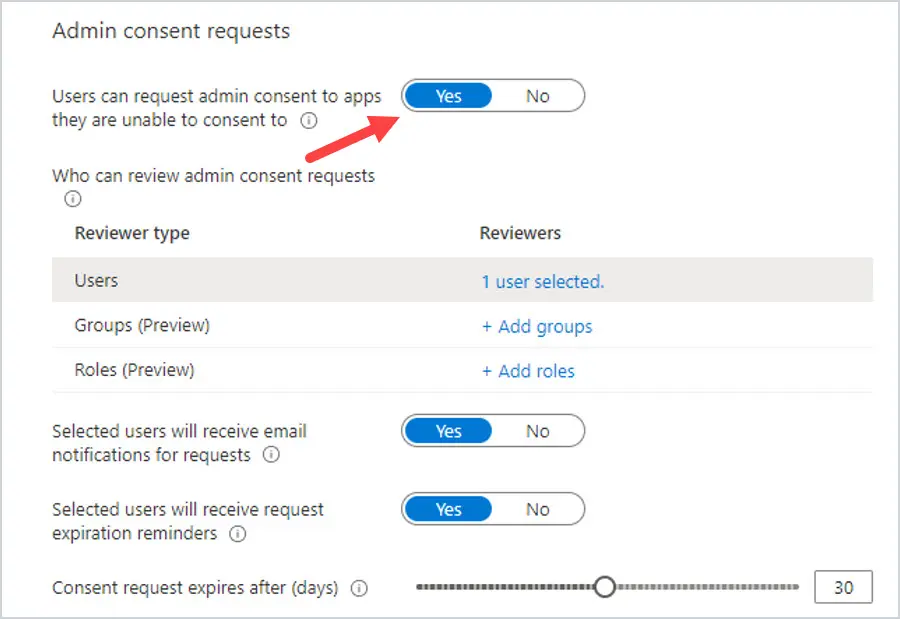
Now, go back to Enterprise Applications and select User Settings. Select Users can request admin consent to apps they are unable to consent to. Then select an admin that can review and approve these requests.
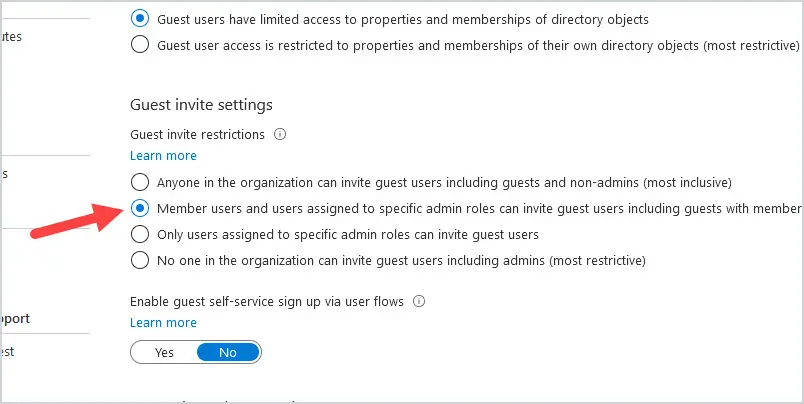
9. Manage External Collaboration Settings
These settings determine what access guest users have at the directory, tenant, and application levels. Guest users should not be able to invite other guest users to your tenant. Under Guest Invite Settings, change it to Member users and users assigned to specific admin roles can invite guest users including guests with member permissions.
To view these settings Log into https://aad.portal.azure.com and click on Azure Active Directory, external identities, and then external collaboration settings.
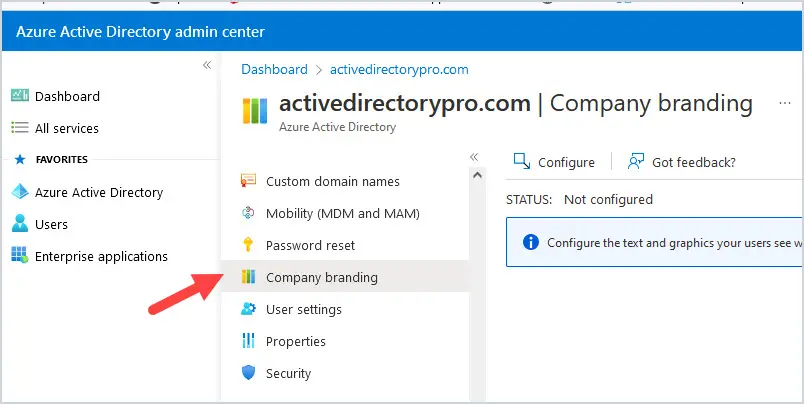
10. Customize Login Page
To help your users make sure they are not falling for a phishing attempt, you can customize the Office portal login page. You can change the logo and sign-in page text. Anything that you can add here to make it the most recognizable to your users will be beneficial. If you can add any type of text or branding that is not out there in the world to be easily copied would be the best option. It is easy for hackers to copy your company logo from your company website and make it look like your Office 365 login page.
Log into https://aad.portal.azure.com and click on Azure Active Directory then Company Branding. Click Configure at the top.
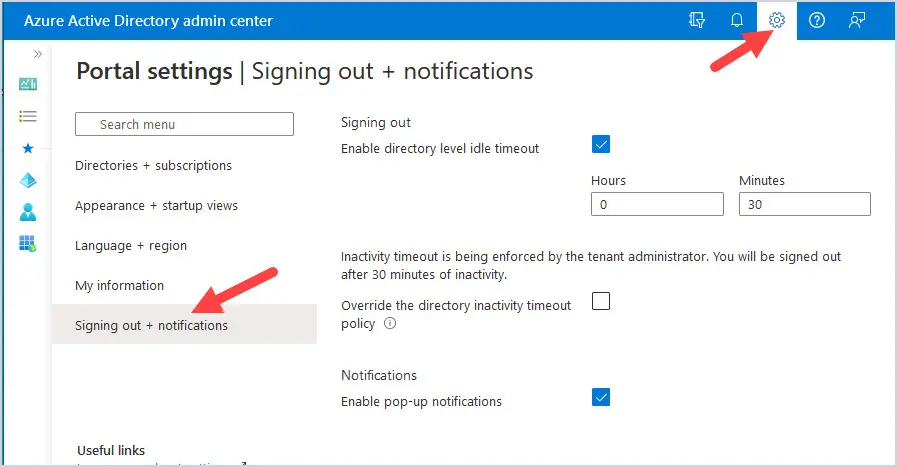
11. Enable Portal Timeout
While you should have limited access of users to the Azure AD portal, enabling a portal timeout isn’t a bad idea. It is set to Never sign-out by default. This is just an insurance policy in case of an admin not securing their computer.
Go to https://aad.portal.azure.com and select the Settings gear and then Signing Out + notifications.
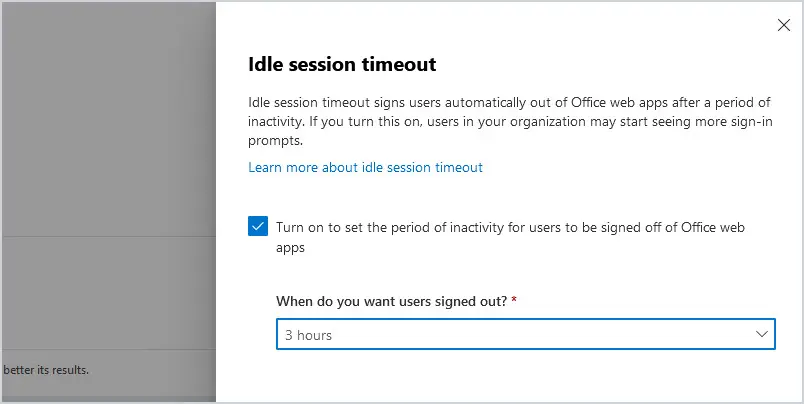
12. Idle Session Timeout
If you allow your users to access Microsoft 365 from any computer, you may consider an idle session timeout policy as an added security feature. Be careful with this one though because it can upset your users. Users will be notified that their session is expiring, but if they’ve stepped away from their desks for an extended period, it will sign them out of the web apps.
Go to https://admin.microsoft.com and select Settings then Org Settings, then Security & privacy tab, then Idle Session Timeout.
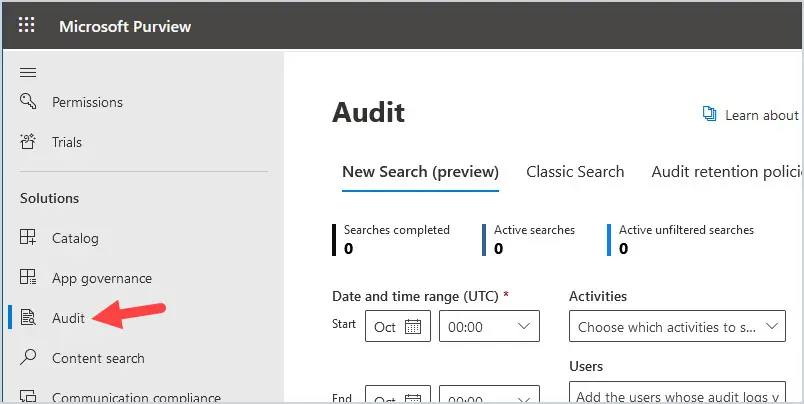
13. Review Auditing Policies
Auditing in Office 365 is turned on by default. Having logs of activity is your greatest asset when it comes to tracking a possible security incident. You can review user and admin activity. You can also create your own auditing policies if you want to track specific activities or keep logs for more than 90 days.
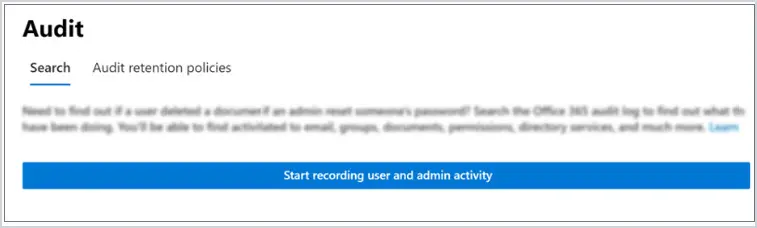
To verify auditing is turned on, log in to the Compliance admin portal by going to https://compliance.microsoft.com and click on Audit.
If Auditing is not turned on, a banner will display across the screen that says Start recording user and admin activity. Click the banner to turn on auditing.
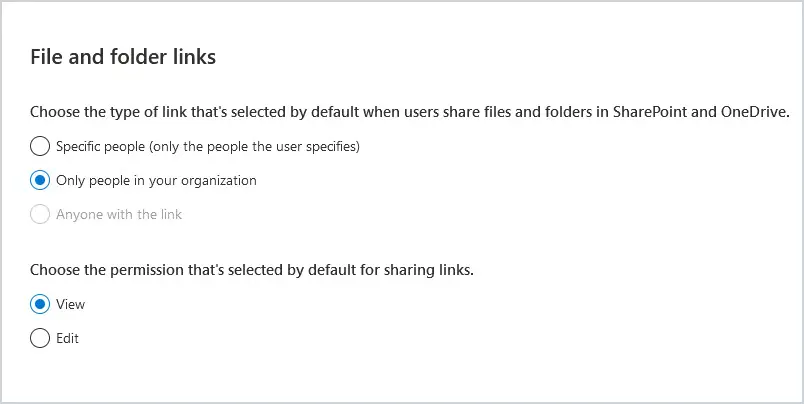
14. Manage Sharing in SharePoint and OneDrive
With site and file sharing, start out with the most restrictive and ease up only if necessary.
For example, if most users do not need to share their OneDrive files outside of your organization, then turn off external sharing and grant it to your users on as needed basis. If you find your users sharing files with only the same domains, then you can restrict sharing only to that domain.
With SharePoint, each site has its own sharing setting. Make sure that your tenant and site sharing settings are the same or your site setting is more restrictive than your tenant setting.
Ultimately, you must do what is best for your organization without it causing an admin nightmare.
At a minimum, you should change your sharing settings as they are set to the most permissive by default.
To change your sharing settings, log into https://admin.microsoft.com and select SharePoint then Policies, and then Sharing.
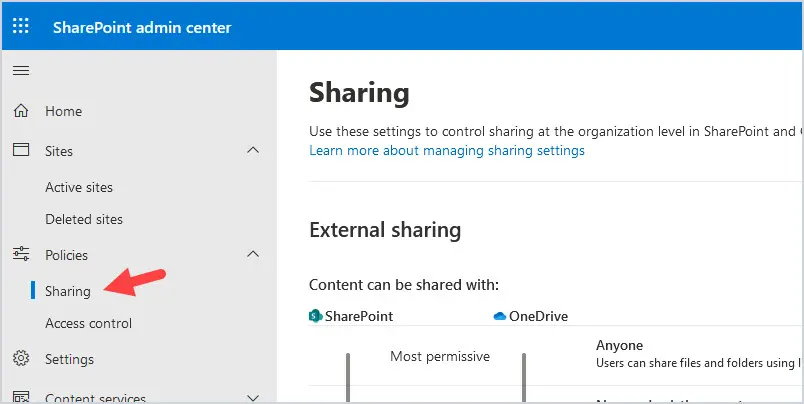
For file and folder links sharing defaults, choose “Only people in your organization” and “View” to force users to pay more attention on who they give access to and what type of access.
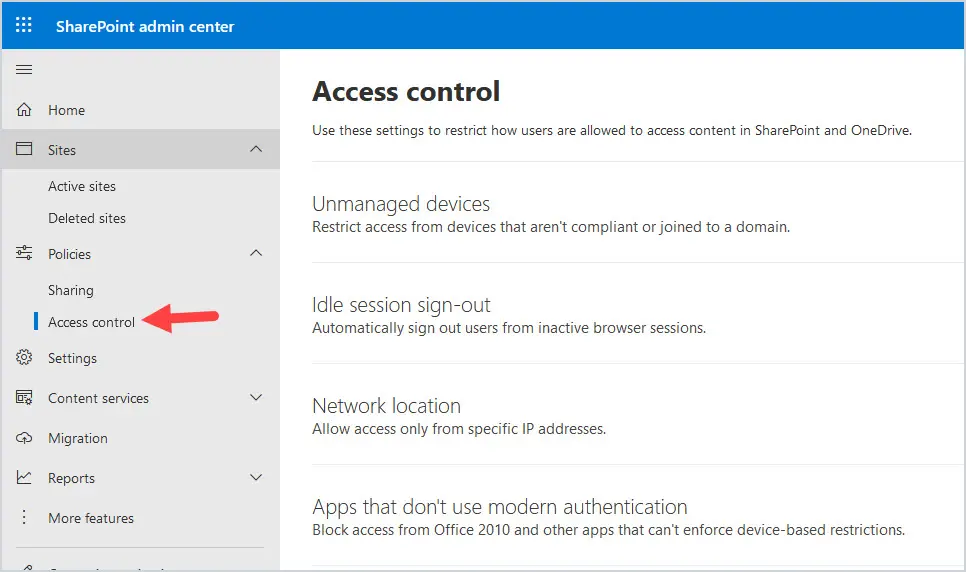
15. SharePoint Access Control
SharePoint access control allows you to set additional security features for accessing your SharePoint sites and OneDrive. You can set an idle time-out, lock it down to just specific IP addresses, block legacy authentication, and device access management. At a minimum, you want to block legacy authentication since legacy authentication does not support MFA.
Go to https://admin.microsoft.com and select SharePoint, then select Policies, then Access control. Click on Apps that don’t use modern authentication and select Block Access.
16. Limit Types of Files in SharePoint and OneDrive
OneDrive has several security measures to prevent ransomware, but it is still vulnerable. For additional protection, you can specify files that you don’t want synced from your OneDrive client to OneDrive online, as well as files you don’t want uploaded to SharePoint sites. There can be many different reasons you want certain files blocked from syncing to OneDrive online and SharePoint sites: For example, files you don’t ever want shared with an external source, files that may be very large in size and could affect bandwidth, common ransomware extensions, executable files, or music files.
Another security measure you may consider is to only allow syncing with trusted domains.
To change your sharing settings, log into https://admin.microsoft.com and select SharePoint then click on Settings, then OneDrive Sync.
Select Block upload of specific file types. Then add the files types you wish to block from syncing.

17. Implement Conditional Access Policies
Conditional Access policies make it easier to secure your tenant. There are a lot of different ways to do this, and the possibilities are many in helping keep your tenant safe. For example, one way to secure your tenant with a conditional access policy is to block specific countries so that they can’t get to your tenant.
Conditional Access policies can be quite powerful so make sure you always exclude at least one global administrator from the policy to prevent locking yourself out of your tenant.
You can create policies if you purchase the Azure AD Premium P1 license or have Microsoft 365 Business Premium licenses.
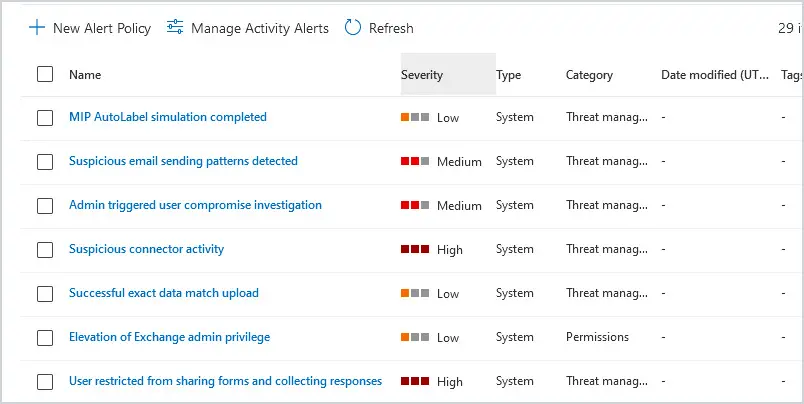
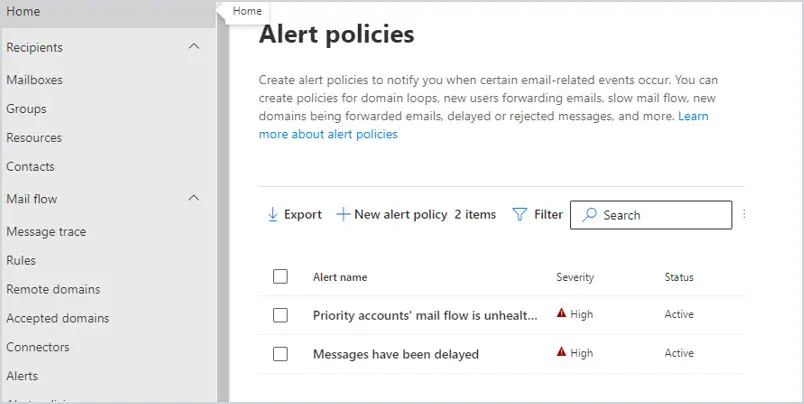
18. Review Alert Policies
There are many alerts that Microsoft has turned on by default. There are several different types of alerts, and they range from informational to high in severity. Review these alerts. When an alert is triggered, emails will be sent to the administrators to review.
You can add an alert or modify existing alerts. Go to https://compliance.microsoft.com and then Policies then under Alert, click on Alert Policies.
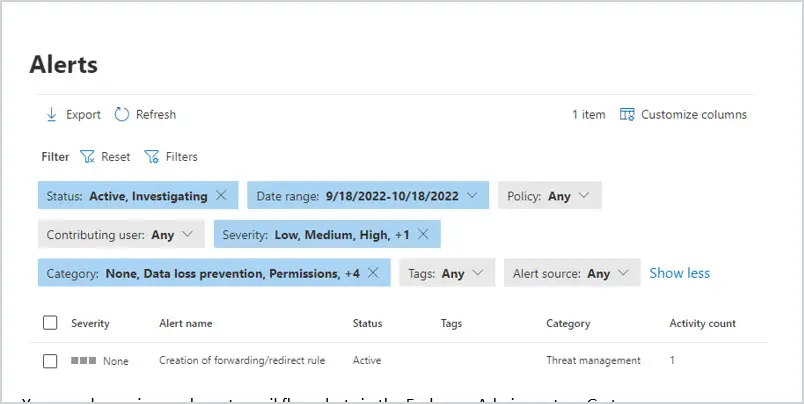
To review active alerts, go to https://compliance.microsoft.com and select Alerts. You can use filters to review specific events.
You can also review and create mail flow alerts in the Exchange Admin center. Go to https://admin.exchange.microsoft.com and click on Alert Policies. To review active alerts, click on Alerts.
19. Data Loss Prevention Policies
Consider creating DLP policies to protect sensitive data from being shared or compromised. I suggest creating a policy to prevent the storing and sharing of Personal Identifiable Information and Protected Health Information. DLP policies should be applied to Teams as it is very easy to share data within Teams, especially if you allow external access.
For those of us that must pay for Cyber Security Insurance, the least amount of data you store, the cheaper your insurance will be. It is a peace of mind that you don’t have to worry about an audit finding that information all over your SharePoint and OneDrive sites or Teams.
Sensitivity labels are a great feature with DLP policies, as well as the on-premises scanner. However, some features in DLP will require you to have a license for Microsoft Purview if you do not have an E5 license.
If PII or PHI needs to be retained, it should be in a high security, access-controlled environment and purged as often as possible.
Refer to the Microsoft article create a data loss prevention policy for more details.
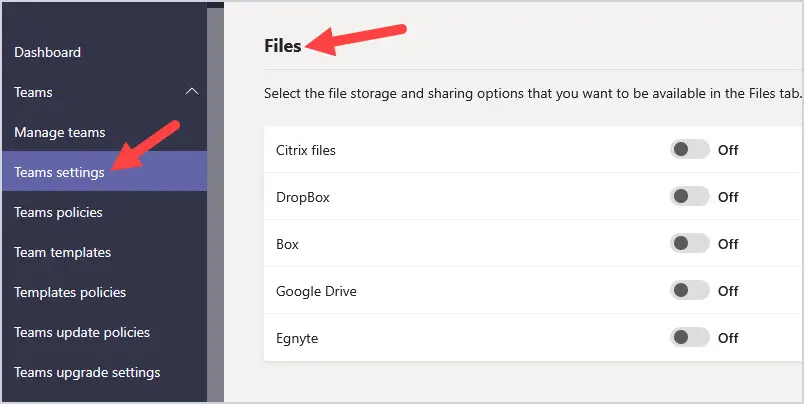
20. Team Settings
You can set basic settings in Teams that you want your users to have. One of the suggestions I have is for file sharing. I don’t like the idea of my users being able to use several different file-sharing platforms because you can’t control what files are on third-party file-sharing applications. I shut these off just because it opens another door for malicious files getting onto your network.
Go to https://admin.teams.microsoft.com and select Teams settings. Go to Files and turn off all options.
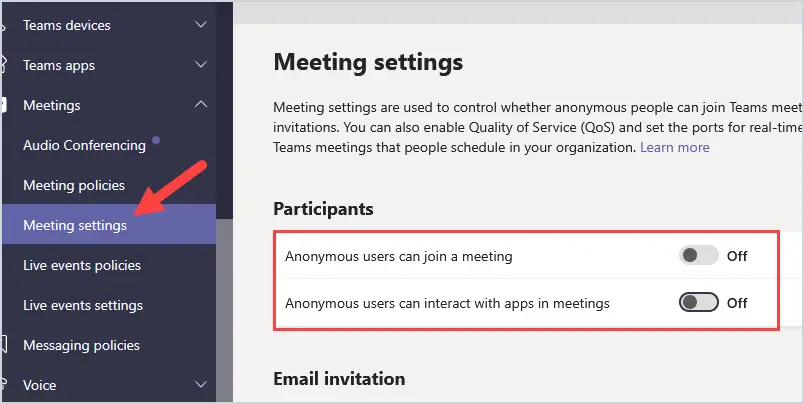
21. Block Anonymous users from joining Teams meetings
Anyone with the link to a meeting can join the meeting and not be required to identify themselves. It will simply show up as a Meeting guest for the user.
Go to https://admin.teams.microsoft.com and select Meetings, then Meeting settings.
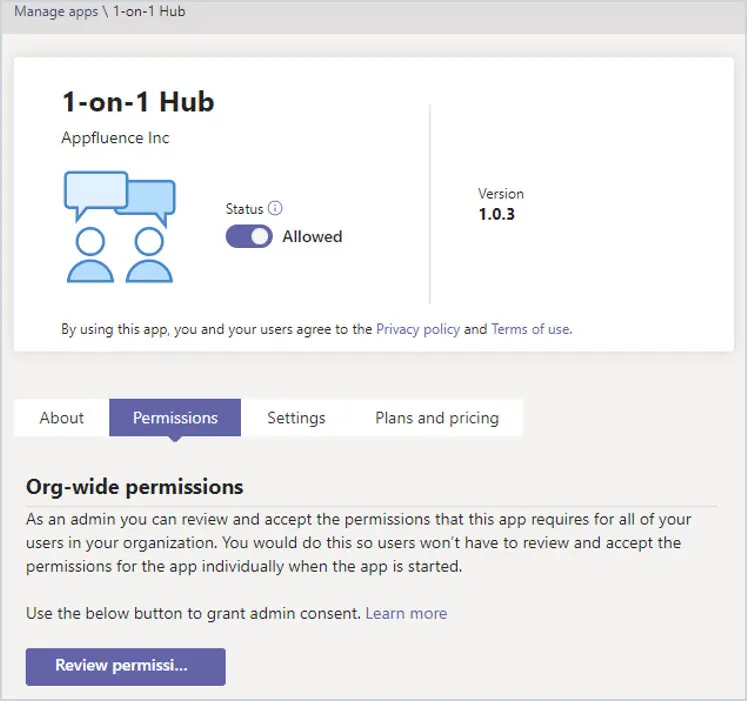
22. Manage Teams Apps
When you give users access to add apps, you let them share data to that app on their behalf and give the app permissions to your tenant. By default, all apps are allowed. At a minimum, I would limit third-party apps and custom apps unless you approve them.
Go to https://admin.teams.microsoft.com and go to Teams apps and then Permission policies. Click on the Org-wide app settings to limit third-party access.
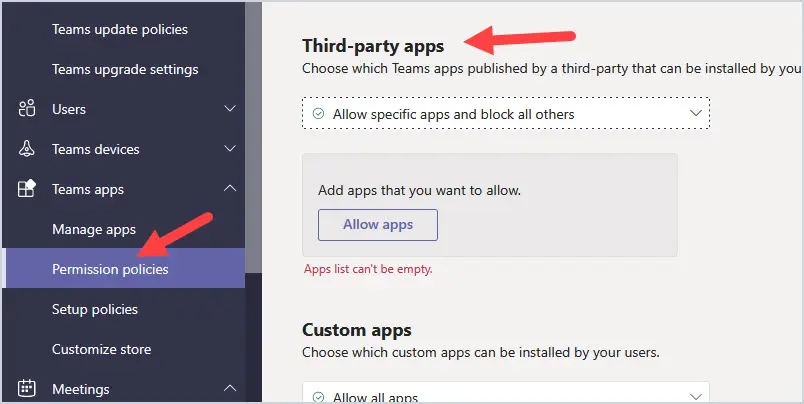
You can also go down through the list to review what permissions apps have by going to Manage apps and click on the app, then Permissions.
23. Configure DKIM, DMARC, and SPF in Exchange
Email is the most used tool in your organization, so of course it is going to be the biggest security threat. Configuring DKIM, DMARC, and SPF will help secure your email. These protocols are authentication techniques that will verify the legitimacy of your email domain by checking headers in mail messages. You create an SPF record in your DNS where you list the IP addresses that are permitted to send emails on behalf of your domain.
DKIM is your mail domains digital signature. DMARC is that added security when used with SPF and DKIM to ensure that mail being sent from your domain is safe. All organizations should implement these authentication methods in the fight against spam and phishing emails. In the grand scheme of email, it takes a single click in a single email to bring a network down. Anything we can do to help secure email is worth it.
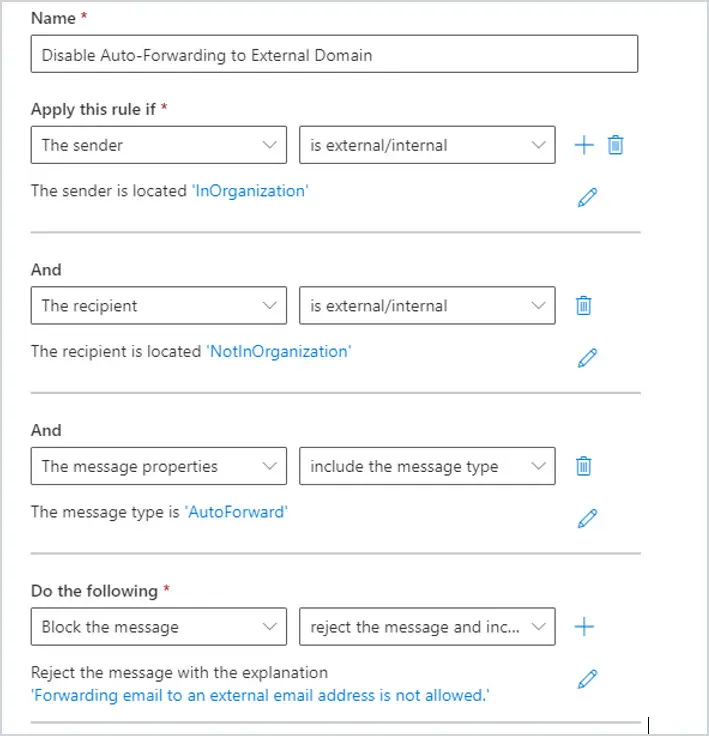
24. Disable Auto-Forwarding to External Domains in Exchange
One of the best safeguards is to block emails from being forwarded outside of your domain. If a user’s email is compromised, this will prevent the email from being forwarded to an outside source. You can do this with a simple transport rule.
Go to https://admin.exchange.microsoft.com and then Mail Flows, click on Rules. Add a rule and it should look like the picture below.
25. Put a Disclaimer on Emails from External Domains
To help your users be more vigilant before clicking on links and opening attachments from external senders, you can add a message at the top of emails from outside of your organization with a simple transport rule.
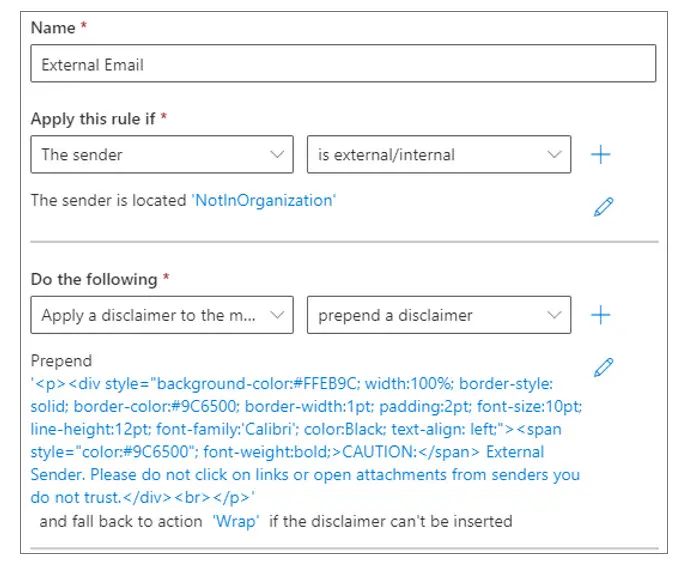
The text will show at the top of user emails like below.

Refer to the article add disclaimer to office 365 email for details and step-by-step instructions.
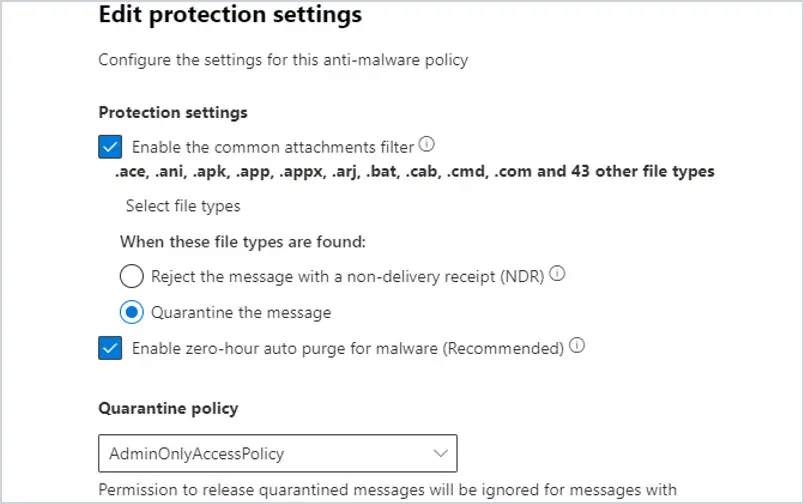
26. Consider blocking files that can run code
Older files like .doc and .xls can run code, yet they are still a popular format used by many organizations. These are common files in malware and ransomware attacks. Consider blocking these files. Force your users to convert these older files to newer formats. Verify your anti-malware filter for common file types is on.
Go to https://security.microsoft.com and select Policies & rules, then Threat policies, and then Anti-malware. Edit the default policy.
27. Enable Preset Security Policies in Exchange
In Exchange Online Protection, there are preset security policies that are not enabled by default unless you pay for Defender for Office 365. These policies apply all Microsoft recommended spam, malware, and phishing security settings. You cannot customize these settings except for excluding recipients. These policies do not protect outbound emails. Keep in mind these policies will take precedence over all custom and default policies. If you wish to use safe links and safe attachments, you will need to pay for Defender for Office 365.
To turn the Preset security settings on, go to https://security.microsoft.com and select Policies & rules, then Threat Policies, and then select Preset Security Policies.
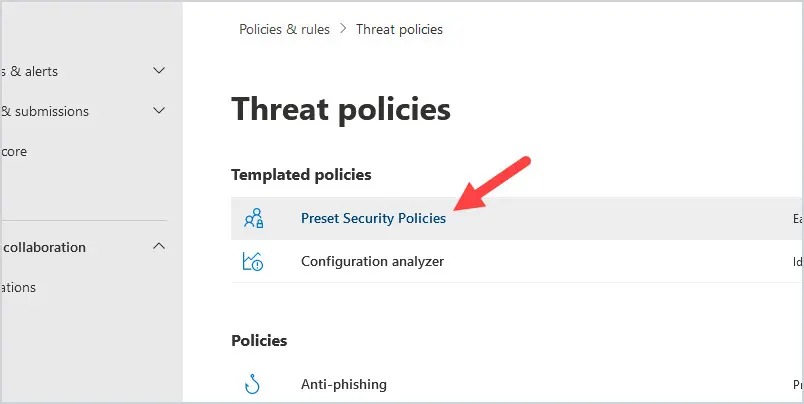
Then click on manage protection settings for the protection policy you want to enable.
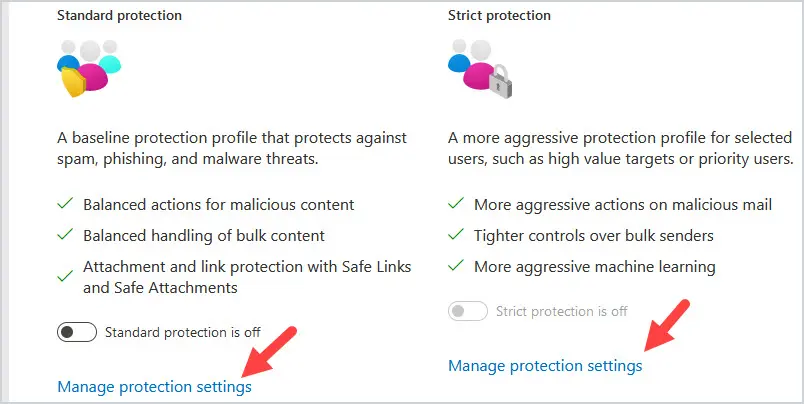
Specify who the protection applies to and click next. Select policy mode and click next. Then click confirm.
28. Whitelist Domains with Transport Rules
It is recommended to whitelist domains and emails using a transport rule versus the anti-spam policy. This is because it allows the domain to bypass spam filtering, which allows attackers that spoof trusted domains.
See my whitelist domain office 365 guide for step-by-step instructions.
I hope you enjoyed this article. I also recommend reading my tips on how to secure Active Directory.
Great Article!
Correct link for points 26 and 27 is https://security.microsoft.com/
Policies & rules menu is not available in Exchange Admin center.
Hi Marco,
Thanks for pointing that out, I have updated the article.