In this guide, you’ll learn how to add an email disclaimer in Office 365. An email disclaimer can also be referred to as an email tag or email banner message.
Table of Contents
- What is an email disclaimer?
- How to add email disclaimer to all external emails
- Append disclaimer to all outgoing emails
- Add email disclaimer to emails with specific words
- Add external email disclaimer using PowerShell
What is an Email Disclaimer?
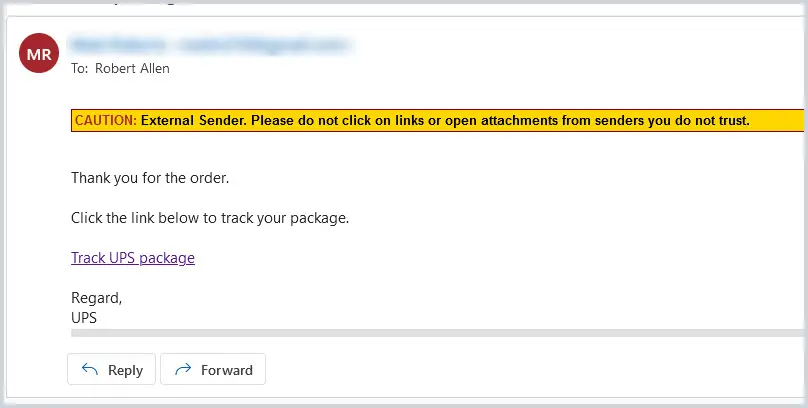
An email disclaimer is simply a label or message that is added to an email. This can be added to external emails, outbound emails, all emails or specific emails. A popular use case is to flag emails that were sent from outside your organization, see the example email below.
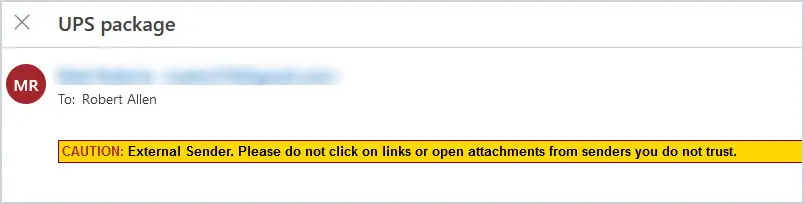
When you tag an email, you are giving information on the email. In this case, by tagging external emails, you are letting your users know to be more cautious or vigilant when opening any attachments or clicking on links.
Disclaimers can be very useful in identifying certain types of emails. You can tag emails that have specific wording. Some examples would be:
- If the email contains financial information, you can tag the email as containing sensitive information, so the user understands that the data in that email needs to be handled carefully.
- If the email contains common phrases that could be valid but need to be handled with caution. For example, an email contains the phrase update your password. This is a common phrase used in phishing emails but could possibly be legit.
Add an Email Disclaimer to All External Emails
In this first example, I’ll create an email disclaimer rule that applies to all emails received from an external sender (outside the organization).
Sign into Exchange Admin Center
Go to https://admin.exchange.microsoft.com and sign in.
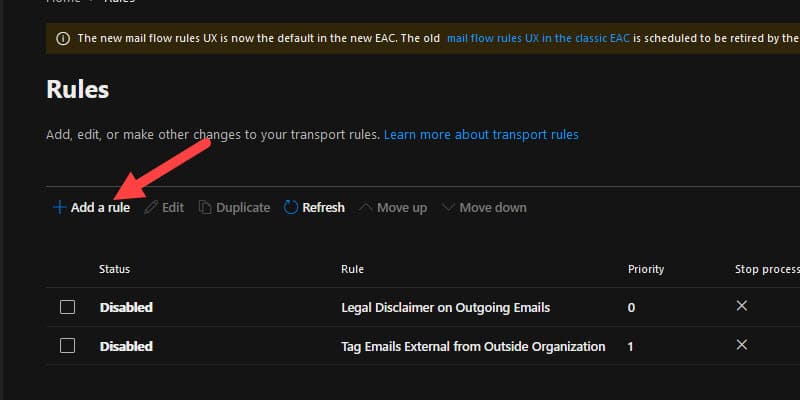
Add Mail Flow Rule
Go to Mail Flow, then Rules. Click on Add a Rule then Create a new rule.

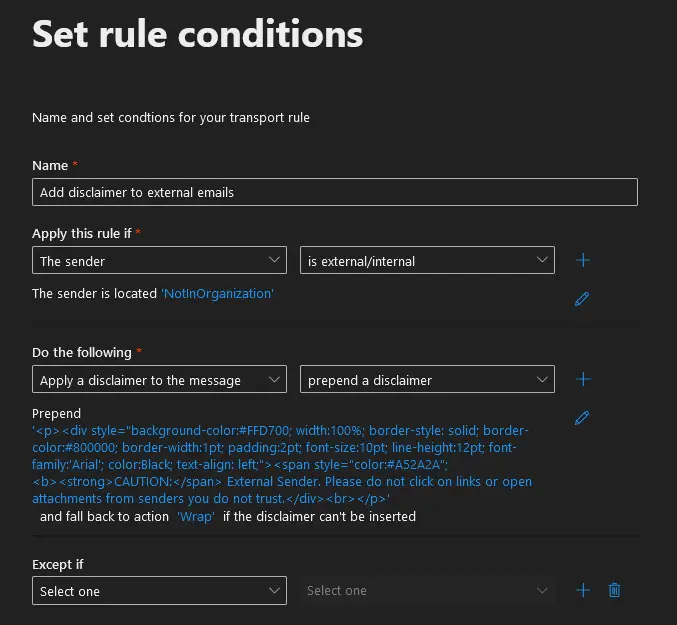
Set Rule Conditions
Name – Give the rule a descriptive name. For example, Add disclaimer to external emails.
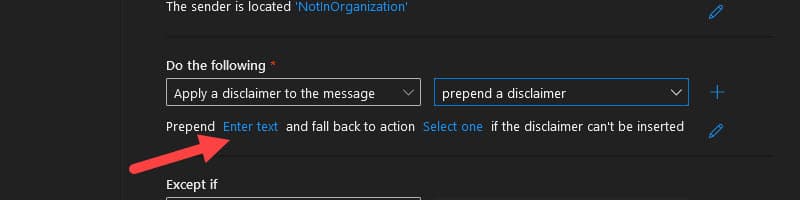
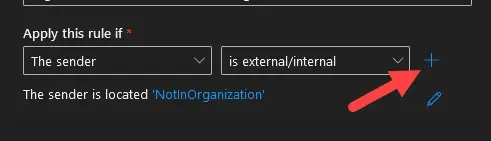
Apply this rule if – select The Sender and then is external/internal and select Outside the organization. The sender is located will show NotInOrganization.
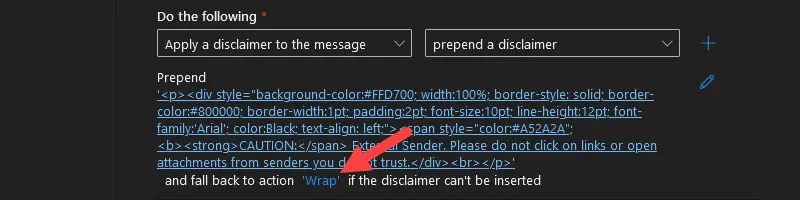
Do the following – select apply a disclaimer to the message and then select prepend a disclaimer. Click on enter text.

We are going to use simple HTML code to add color and change the font on the message to make it stand out from the rest of the text in the email.
You can copy and paste the HTML code below:
<p><div style="background-color:#FFD700; width:100%; border-style: solid; border-color:#800000; border-width:1pt; padding:2pt; font-size:10pt; line-height:12pt; font-family:'Arial'; color:Black; text-align: left;"><span style="color:#A52A2A"; <b><strong>CAUTION:</span> External Sender. Please do not click on links or open attachments from senders you do not trust.</div><br></p>Where it says Select one if the disclaimer can’t be inserted, you are going to choose wrap.
Your rule should look like the below picture:

Click Next.
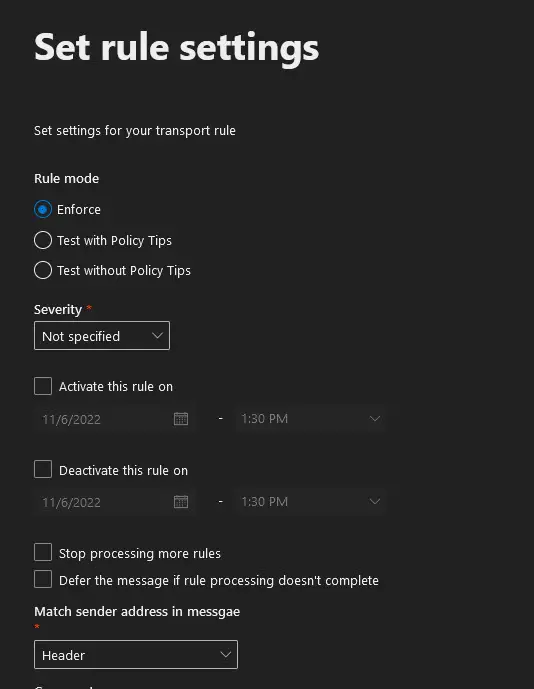
Set Rule Settings
The Rule Settings. Place in the priority that you want it to be in your transport rules list. The Rule mode should be Enforce. Make sure you don’t choose to stop processing more rules.

Click Next
Verify your settings and then click Finish. It will say Transport rule created successfully when complete. Click Done
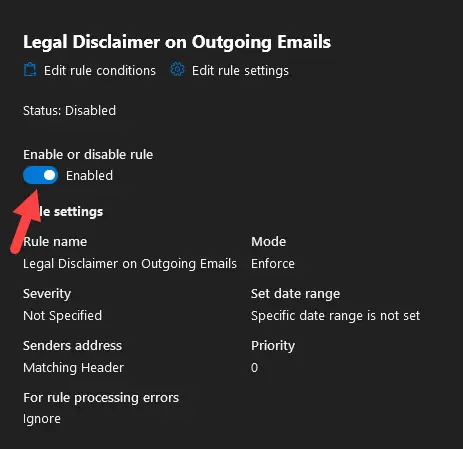
Enable Rule
Now you will need to enable your rule. Click on the rule you just created. Toggle the rule to Enabled.

It could take a couple of hours for the rule to start showing at the top of emails.
The text will show at the top of user emails like below.
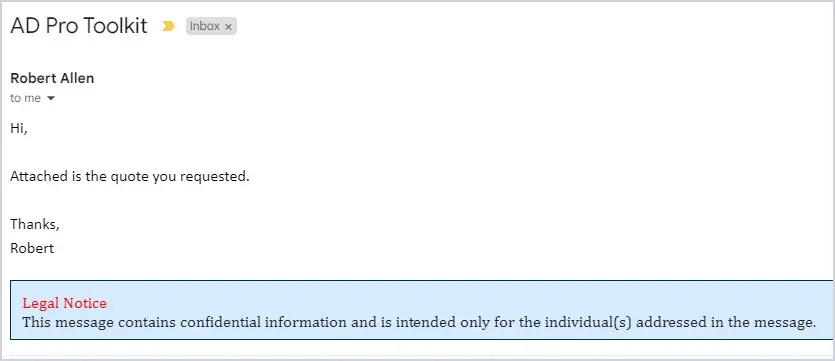
Append Disclaimer to All Outgoing Emails
For this example, we are going to apply a simple legal disclaimer on ALL outgoing messages. Appending a disclaimer will put it at the bottom of the email like the picture below.
These steps are very similar to the first example. I’m only going to show the differences, refer to the first example if you need complete steps.
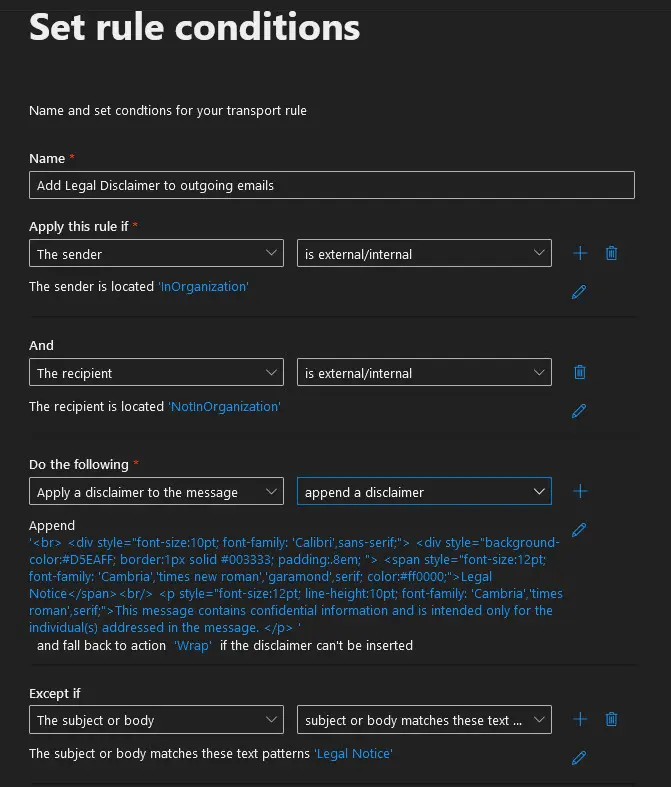
Apply this rule if – The recipient is external/internal and select “NotinOrganization”. Add an additional rule and select the sender is external/internal and select “InOrganization.
Do the following – Select apply a disclaimer to the message and select append a disclaimer.
Here is the HTML code for the append disclaimer.
<br>
<div style="font-size:10pt;  font-family: 'Calibri',sans-serif;">
<div style="background-color:#D5EAFF; border:1px solid #003333; padding:.8em; ">
<span style="font-size:12pt;  font-family: 'Cambria','times new roman','garamond',serif; color:#ff0000;">Legal Notice</span><br/>
<p style="font-size:12pt; line-height:10pt; font-family: 'Cambria','times roman',serif;">This message contains confidential information and is intended only for the individual(s) addressed in the message. </p>
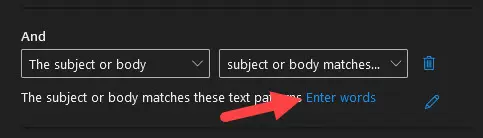
Now we want to add a condition so that the disclaimer isn’t applied to messages that already have it, such as when you are replying to someone. Under Except if, choose The subject or body and then select subject or body matches these text patterns. Click on Enter words.
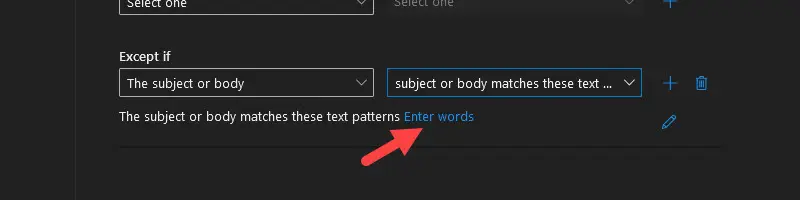
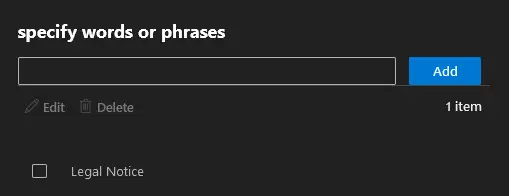
Put a phrase from your disclaimer. In my case, I am going to add Legal Notice as the words since that is in my disclaimer. Enter the words and click Add and then save at the bottom.
Your rule should look similar to this:
Once you have configured your rule, click Next.
Review rule settings and click next. Then click finish.
Enable the rule by clicking on the rule and then toggle to enabled.
Add Email Disclaimer to Emails With Specific Words
To expand on the basic rule above, you can apply this rule to certain emails based on the wording of the email. For example, if you only want to apply a disclaimer to emails that have specific words, you can add another condition by clicking the + sign to the right of the Apply this rule if*.
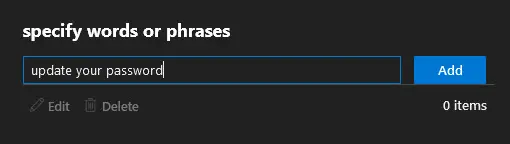
Under the And, select The subject or body and then select subject or body matches these text patterns. As an example, we are going to apply this rule if we get a lot of phishing emails that say “Update your password”. To specify this, click on Enter words.
Enter the words update your password and click add. Then click Save.
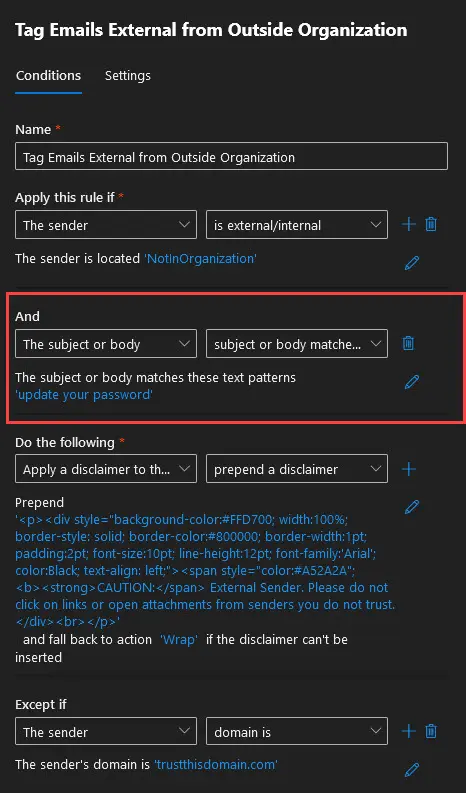
Now your rule would look like below. This will apply the disclaimer to all emails sent from outside the organization that has the phrase update your password but will not apply the Tag when sending to the domain trustthisdomain.com.
Add External Email Disclaimer Using PowerShell
Exchange Online Protection has a cmdlet that will enable tagging of external emails. This is not customizable. It simply adds a tag displayed as External on all emails from outside the organization. You can turn this on/off in Exchange Online using PowerShell.
First, connect to exchange online with PowerShell.
Type in the following command:
Set-ExternalInOutlook – Enabled $trueNOTE: This change can take up to 48 hours to display in all user emails.
To view the current setting of tagging, you can use the Get-ExternalInOutlook command.
Get-ExternalInOutlookYou can disable the feature for certain emails.
In this example, we are excluding the External tag for the email address admin@allowthisdomain.com. To add additional email addresses, just separate them out by a comma.
Set-ExternalInOutlook -AllowList @{Add=”admin@allowthisdomain.com”}To remove email addresses from the allow list, use the following command:
Set-ExternalInOutlook -AllowList @{Remove=”admin@allowthisdomain.com”}When users receive an email now, it will have the External tag at the top of the email like the picture below:

I hope you enjoyed this article, please post your questions or comments below.
Your article was so straight forward, thanks for making this so easy. I have applied a disclaimer for external emails via the mail flow rules, using your HTML script.
The only thing I have found is all external emails come in with the email body in bold. Is there any way of making it so the body of the emails are in normal text?