
In this guide, you will learn how to add and remove ProxyAddresses in Active Directory with PowerShell. I’ll also demonstrate how to add, change and remove ProxyAddresses with the AD Pro Toolkit.
In this article
- Add ProxyAddresses with PowerShell
- Bulk Modify ProxyAddresses with AD Pro Toolkit
- Get list of user ProxyAddresses
Add ProxyAddresses with PowerShell
To add ProxyAddresses with PowerShell you would use the set-aduser cmdlet.
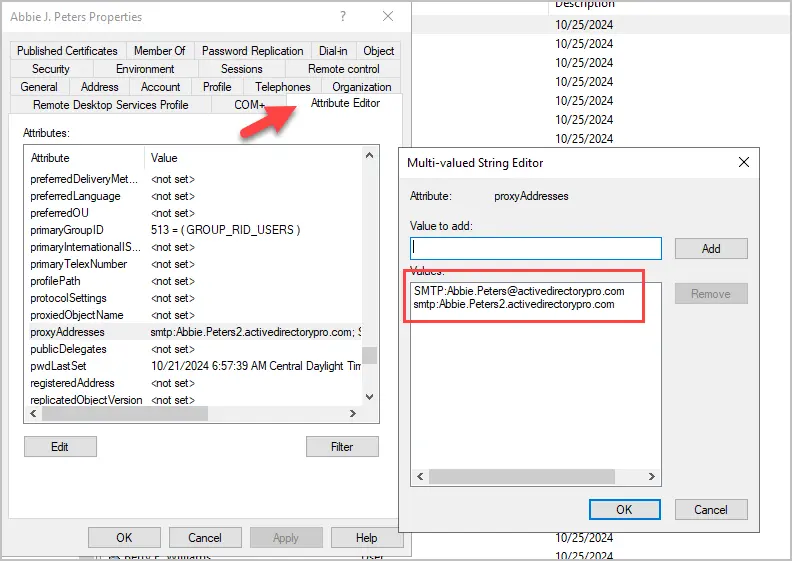
Set-ADUser Abbie.Peters -add @{ProxyAddresses="smtp:Abbie.Peters2.activedirectorypro.com"}In the above example, I’m adding a new proxyaddress to user Abbie.Peters.
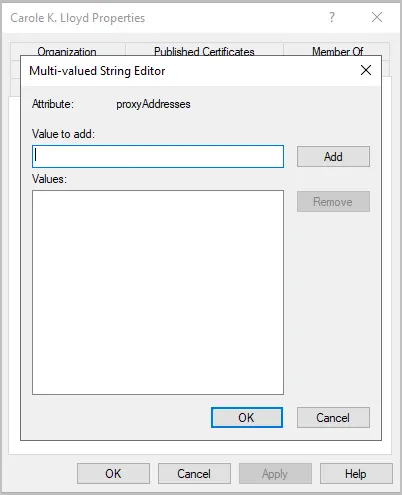
You can view the users proxyAddresses in Active Directory by clicking on the attribute editor and then the proxyAddresses attribute.
To remove proxyaddresses with PowerShell use the -remove parameter.
Set-ADUser Abbie.Peters -remove @{ProxyAddresses="smtp:Abbie.Peters2.activedirectorypro.com"}Bulk Modify ProxyAddresses with AD Pro Toolkit
If you need to modify the proxyAddresses for multiple users, then I would recommend the AD Pro Toolkit. This tool makes it easy to add, remove, and change proxyaddresses for multiple users.
Download AD Pro Toolkit and see how easy it is to update ProxyAddresses.
Example 1. Bulk Add ProxyAddresses
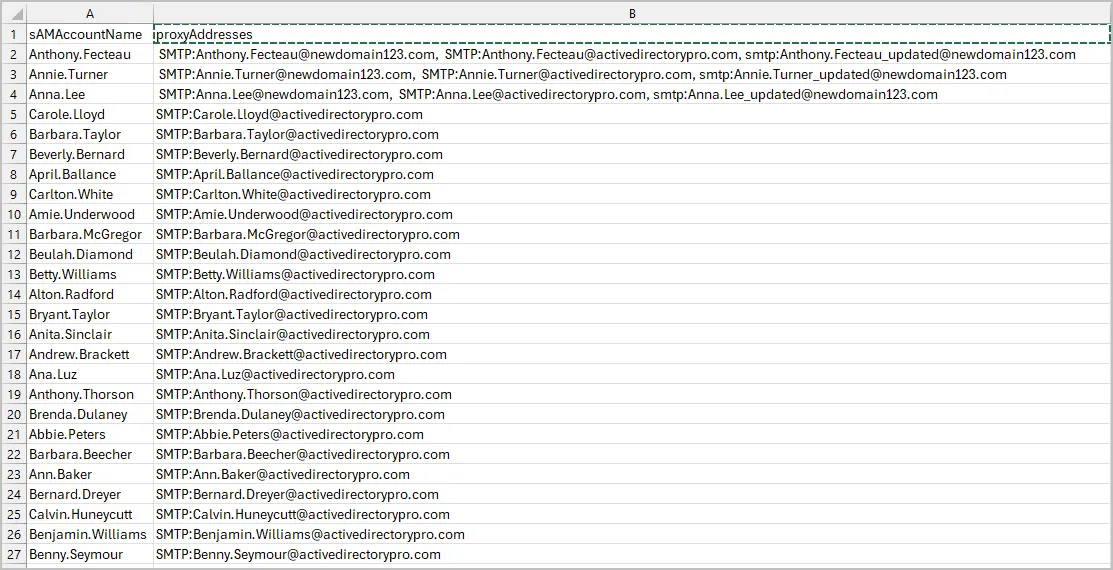
Step 1. Create a CSV file with two columns.
- sAMAccountName = The account you want to update
- proxyAddresses = The proxyaddresses you want to add. Separate with comma if adding more than one.
Tip! You can use the included AD User Export Tool to export a list of users to CSV file.
CSV Example.
Step 2. Run the Bulk Update Users Tool
Open the AD Toolkit and click on Bulk Modify Users. Select your CSV file and click run.
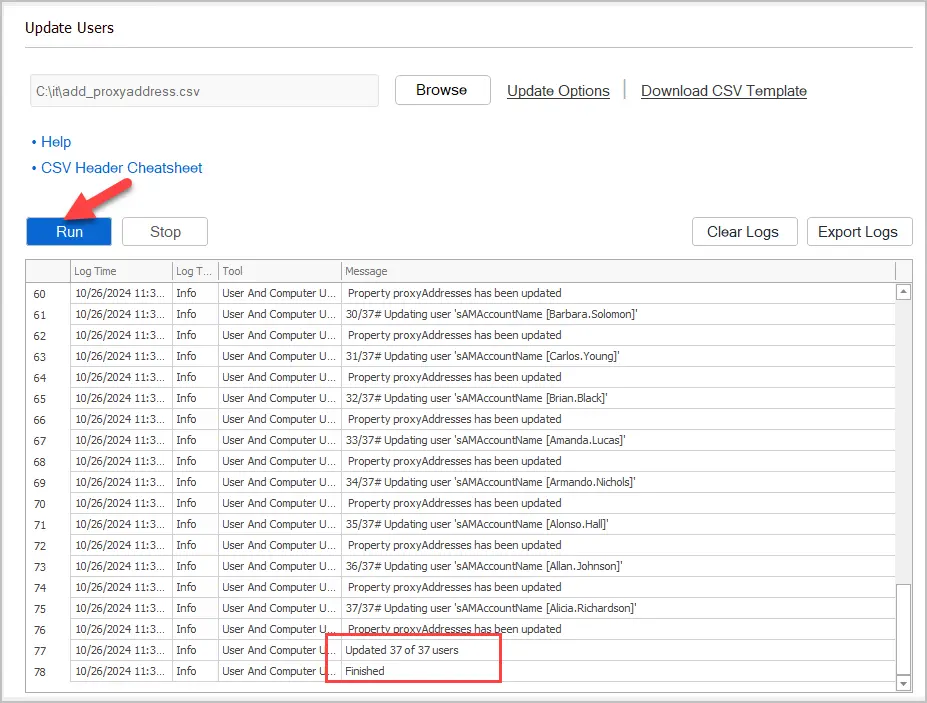
The tool will log everything on the screen. It will show you how many users were updated.
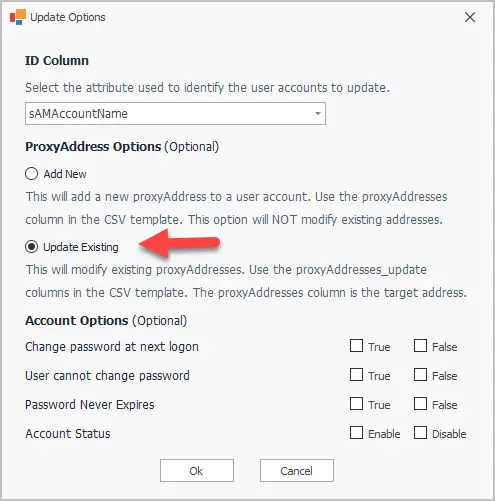
Example 2. Modify Existing ProxyAddresses
In this example, I’ll modify users ProxyAddresses.
Step 1. Create a CSV file with three columns.
- sAMAccountName = The account you want to update.
- proxyAddresses = The target proxyAddresses you want to change.
- proxyAddresses_update = This column will replace the target address. (the address in column b)
CSV Example.
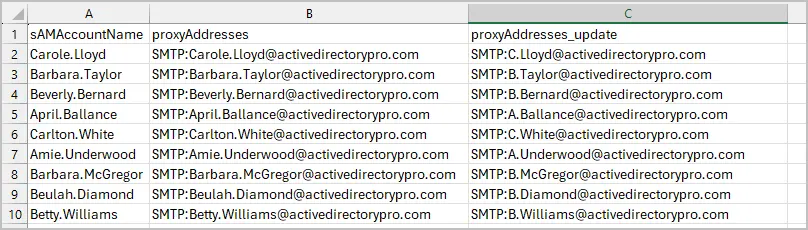
In the above CSV, the user Carole.Lloyd will have its proxyAddress SMTP:Carole.Lloyd@activedirectorypro.com updated to SMTP:C.Lloyd@activedirectorypro.com.
Step 2. Run the Bulk Update Users Tool
Open the tool and click on “Update Options” and select “Update Existing” under ProxyAddress Options. Click OK.
Next, select your CSV file and click Run.
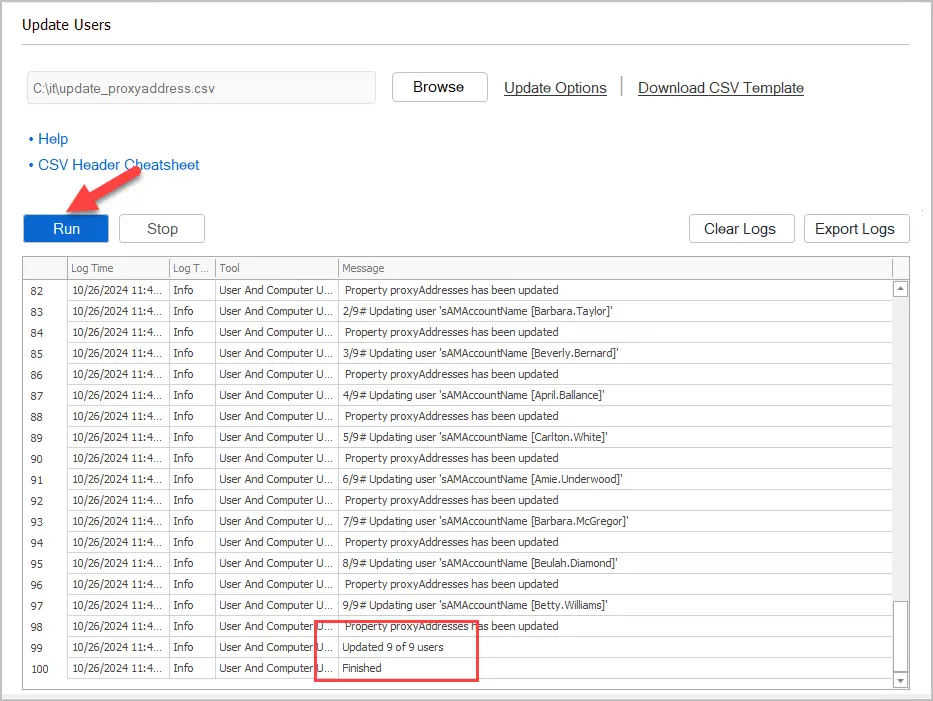
I’ll open one of the accounts to verify it updated the proxyaddresses.

It worked. The users existing address has been changed to SMTP:C.Lloyd@activedirectorypro.com.
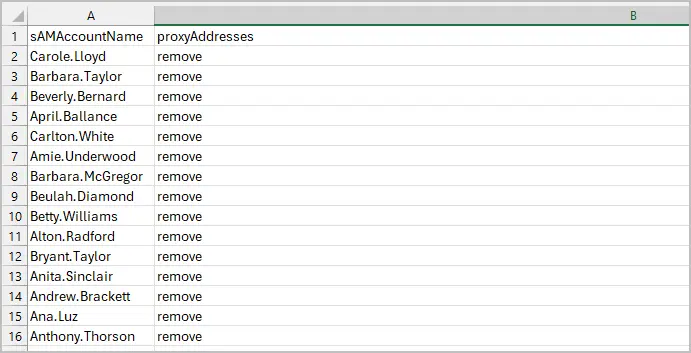
Example 3. Remove ProxyAddresses
Warning. This method will clear all users ProxyAddresses. I would first export the users and their ProxyAddresses to a CSV for a backup.
Step 1. Create a CSV file with two columns.
- sAMAccountName = The account you want to update
- proxyAddresses = Put the word remove in this column.
CSV Example.
Step 2. Run the Bulk Update Users Tool
Select your CSV file and click Run.
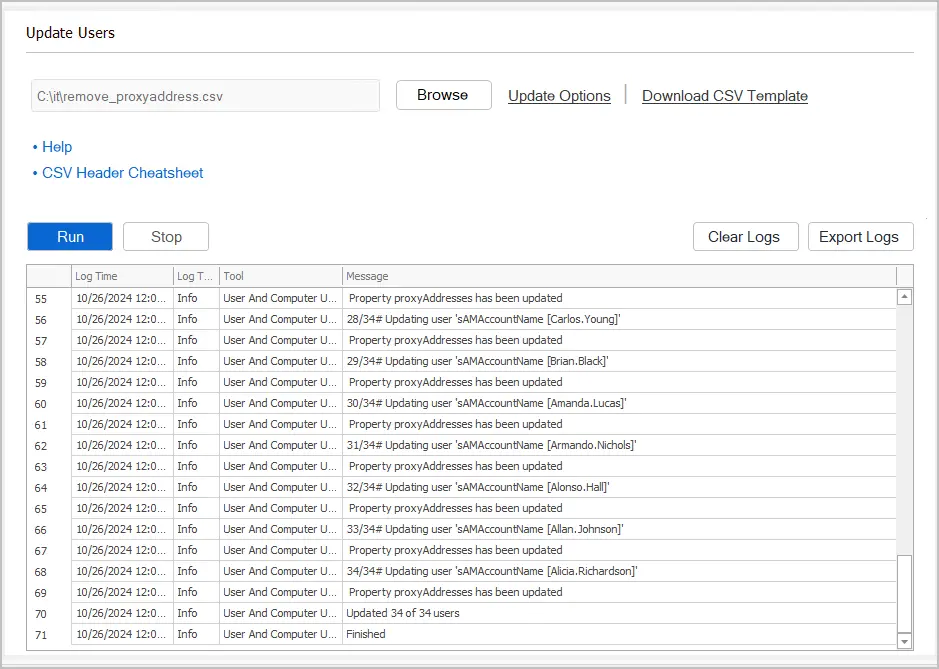
Now if I check one of the users all of their proxyAddresses should be removed.
Get a list of User ProxyAddresses
To get a list of all users proxyAddresses use the below PowerShell command.
get-aduser -filter * -properties proxyaddresses | select samaccountname, proxyaddresses
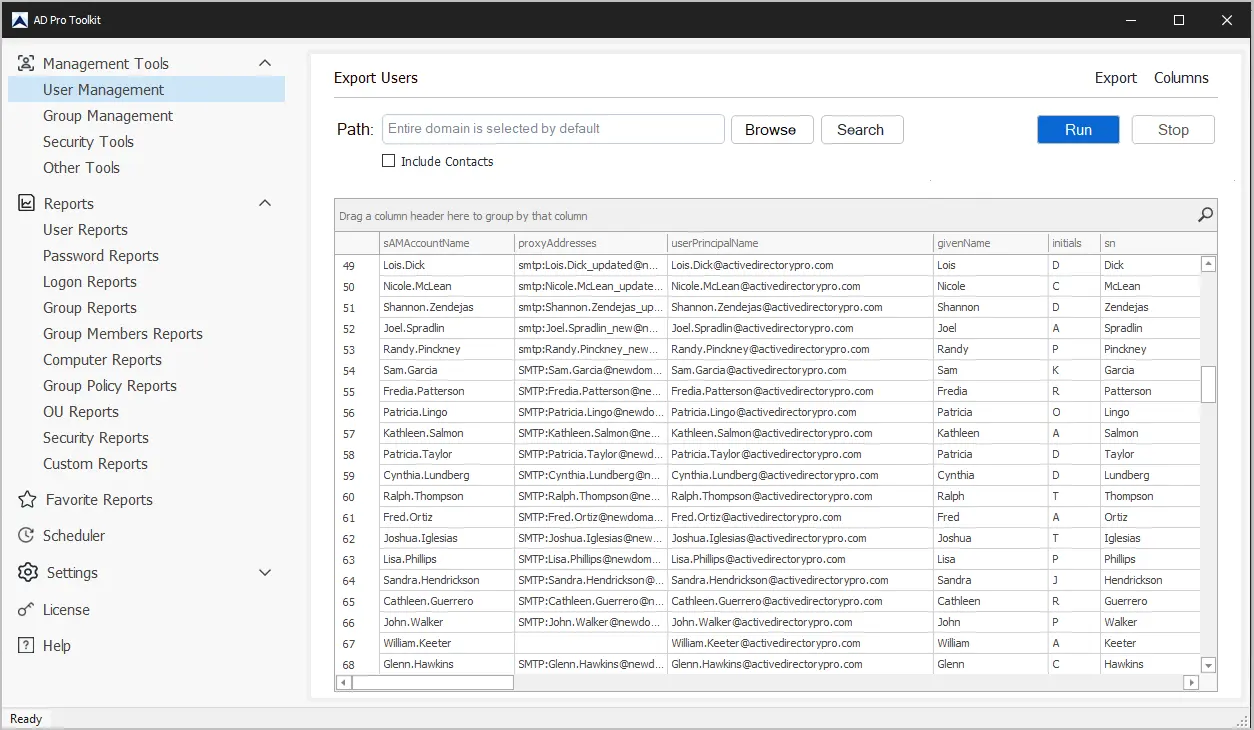
With the AD Pro Toolkit click on the Export Users Tool and click run.
If you are using Azure AD connect or Office 365 then knowing how to bulk update users ProxyAddresses attribute is a must. In this guide, I showed you multiple examples for updating single accounts, adding multiple addresses, and bulk updating a list of accounts from a CSV file
PowerShell is a great tool for making mass changes to Active Directory users but for those that want a GUI option, the AD Bulk User Update tool is a simple and easy solution.
Let me know in the comments below if you have any questions.

Hi Robert,
This tutorial is only for on-premise, right?
Is there a way to remove an address in “ProxyAddresses” for the Azure AD PowerShell module? I have the feeling it is locked and only modified in license updates.
The user does not have a license (and therefore no mailbox) so the Exchange Online Powershell module is not an option.
I could just add a license to the user and then change the E-Mail aliases in the EAC but then it would still be billed after I revoke the license?
Yes, this tutorial is for on-premise.
This was very useful, i need to readdress many proxy addresses as part of an acquisition and using EAP is not going to work.
What i noticed was that i ended up with two Primary SMTP addresses, so need to figure a way to overwrite the original primary SMTP.
With the GUI tool, you can use the remove option to remove all the proxy addresses then add them back with only the addresses needed. I’ve had several customers use this method.
Hi guys
if you want to insert multiple addresses in proxyadresses field , I modified the code and the csv like this:
csv:
samaccountname&Proxyaddresses&Proxyaddresses2&Proxyaddresses3
use1r&smtp:user1_email@domain.com&SMTP:user2_email_primary_email@domain.com&smtp:anotheralias_email@domain.com
code:
Import-Csv “C:\temp\deploy.csv” -Delimiter “&” | foreach {Set-ADUser -Identity $_.samaccountname -add @{Proxyaddresses=$_.Proxyaddresses -split “&”}
Set-ADUser -Identity $_.samaccountname -add @{Proxyaddresses=$_.Proxyaddresses2 -split “&”}
Set-ADUser -Identity $_.samaccountname -add @{Proxyaddresses=$_.Proxyaddresses3 -split “&”}}
with this , the code enter for each user 3 times to put the diferents proxyaddresses..
I hope someone will find it useful!
Thanks for this cool manual, but i run into different issues…
the most i was able to solve but one is pretty hard…
if i have multiple smtp adrresses for example: smtp:user1@ms.com,user01@ms.com
it will only set the first e-mail address but not all the others….
any idea how i could fix this?
thanks and regards
Not sure if you got this figured out but I would say that the second one is a violation because it doesnt have a proxy type. In this example we user SMTP then we separate the Proxy type from the address. So you can have many others SIP, X500, SMTP etc. So change your code to be smtp:user1@ms.com,SMTP:user01@ms.com.
Hello,
I’ve find what is the issue with the error “Cannot validate argument on parameter ‘Identity’. The argument is null.”
you must create a CSV with the comma “,” separator not “;”
and then change the comma separator between each smtp address by another character instead of “,” in my case I’ve used the character “&”, and then the command worked well.
So here is the command line: Import-Csv “C:\it\bulk-proxy2.csv” | foreach {Set-ADUser -Identity $_.samaccountname -add @{Proxyaddresses=$_.Proxyaddresses -split “&”}}
Hello, it states that you can remove proxy addresses by adding the word remove. I’ve tried updating, but it doesn’t seem to remove the proxy addresses. Do you have the syntax?
Are you getting an error?
Here is the link to Microsofts documentation and syntax
https://docs.microsoft.com/en-us/powershell/module/addsadministration/set-aduser?view=win10-ps
If i run manual PS … \users.csv” | foreach {Set-ADUser -Identity $_.samaccountname -add @{ …
it is successful in adding the proxyaddresses from the csv
When i use the ADBulkUserUpdate tool it removes all existing addresses and puts the csv proxyaddresses as a single entry when i use the same csv
I’ve updated the tool to append the proxyaddresses instead of removing and putting only what’s in the CSV. If you need to remove values you can add the word remove to the csv.
Planning to do a bulk roll out of 300 users. Can I update the spreadsheet and add a “mail” attribute? The email address isn’t using the same UPN suffix as the login domain so I would like to add the emails that will be used.
Sure you can modify the script and spreadsheet to add whatever you need.
Purchased your tool, but it doesn’t work. I have created the CSV exactly like you propose, and the tool can read the attributes in the file – but when I run it, I’m just told that it cannot update the attributes.
Why?
Hi Michael,
I sent you an updated version. Try it out and let me know if you still have issues.
Hi Robert, Can I get the updated version of user export / bulk update ? I need to update proxyAddresses .
Yup, I sent you a link.
Hi Robert. Can you please send me the link as well?
Hi Jhon,
What link?
Bulk update using CSV file fails. It seems parameter ‘Identity’ is missing:
“Set-ADUser : Cannot validate argument on parameter ‘Identity’. The argument is null.”
Very useful article. Thank you!
Hi!
When I use the command:
Import-Csv “C:\Temp\users.csv” | foreach {Set-ADUser -Identity $_.samaccountname -add @{Proxyaddresses=$_.Proxyaddresses -split “,”}}
I got the following error:
Set-ADUser : Cannot validate argument on parameter ‘Identity’. The argument is null. Provide a valid value for the
argument, and then try running the command again.
At line:1 char:64
+ … \users.csv” | foreach {Set-ADUser -Identity $_.samaccountname -add @{ …
+ ~~~~~~~~~~~~~~~~~
+ CategoryInfo : InvalidData: (:) [Set-ADUser], ParameterBindingValidationException
+ FullyQualifiedErrorId : ParameterArgumentValidationError,Microsoft.ActiveDirectory.Management.Commands.SetADUser
The csv file is prepared in the same way you described above. What am I doing wrong?
Looks like I have a type in my CSV. Change the CSV header from samacountname to samaccountname.
I get the exact same error.
Try to add -delimiter paramenter in import-csv:
Import-Csv “C:\temp\proxy_update_test0.csv” –Delimiter “;” | foreach-object….
seems to solve problem
Cheers
Merlinweb
The above multiple is not working with either the script or GUI Tool, script adds the value “Microsoft.ActiveDirectory.Manamgement.ADPropertyValueCollection”, GUI Tool adds all values on the same line.
When did you download the GUI tool? I recently updated it to fix the issue of putting the values on the same line. If you log in you can download the latest version.