Contents
Lesson 1 – Group Policy Basics
In this lesson, you will learn the basics of group policy, how it works and the difference between local GPOs and domain GPOs.
Lesson 2 – Group Policy Process Order
Learn about the four levels of group policy processing (Local, Site, Domain, and OU). This is very important to understand.
Lesson 3 – Managing Group Policies
In this lesson, I’ll walk through how to properly create a group policy object and an overview of the management console.
Lesson 4 – Group Policy Preferences
Group Policy Preferences allows you to deploy a default configuration with the option for users to alter the settings.
Lesson 5 – Group Policy Filtering
Learn how to filter group policy objects and exclude or include specific users and groups from a GPO.
Lesson 6 – Troubleshooting Group Policy
Learn how to troubleshoot group policy and use various client commands to verify and check GPO policies.
Lesson 1
Group Policy Basics
What is Group Policy?
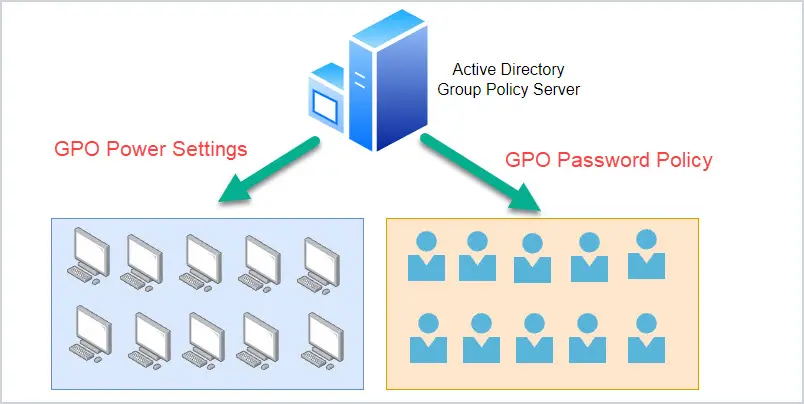
Group policy is a Microsoft Windows feature that allows IT administrators to centrally manage and configure the settings on Windows computers. Group Policy can manage operating system settings, applications, browsers, and user settings.
Group policy is used in Active Directory environments with domain-joined computers. It also works with Azure hybrid joined devices, but will not work with Azure-only devices.
Group Policy Benefits
The main advantage of using group policy is that organizations can apply a set of standard policies across all computers and users. This helps to ensure security and compliance needs are met. It also benefits the IT department by having a tool to easily configure computer and user settings.
Example Policies:
- Password Policy
- Screen Lock
- Power Settings
- Map Network Drives
- Install printers, software, desktop shortcuts, etc.
- Software restrictions (blocking access to programs)
Group Policy Definitions
Here are some common group policy terms you need to be familiar with.
Group Policy Objects (GPOs) = A group policy object is a collection of policy settings. A GPO is applied to the domain, or an OU to target users, computers, or the entire domain. You will spend most of your time working with GPs.

Group Policy Management Console (GPMC) = This is the management console used to manage group policy and GPOs. This is installed on the Active Directory server but can also be added to other computers by installing the RSAT tools.
Local Group Policy = Local group policies are policies that apply to a single computer and are managed locally on a computer. You can access the local GPO with the gpedit.msc console. These policies apply to only the computer you edit them on. Domain policies take precedence over local policies.
Domain Group Policy (DGP) = Domain group policies are managed centrally and can be applied to multiple computers and users. DGPs will be the focus of this guide.
User Configuration Policies = Each GPO has a user configuration and computer configuration section. The User configuration policies only apply to users.

Computer Configuration Policies = The GPO computer configuration policies apply to the computer, not the user.

How Does Group Policy Work?
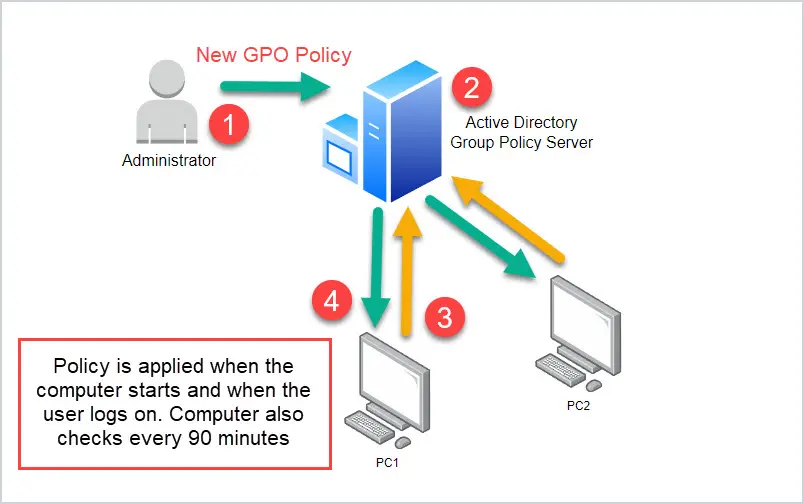
Group policy works by an Administrator creating a policy that applies to users or computers. The computer or user downloads the policy and applies its settings to the computer.
Below is a typical use case for using group policy and how group policy works. You are an administrator and you need to ensure all computer screens lock after 15 minutes of inactivity.
- The administrator uses the Group Policy Management Console to create a new GPO. The GPO has policies to lock the computer screen after 15 minutes of use.
- The administrator applies the new GPO to the entire domain. This means all computers in the domain will get the policy.
- The computer checks and applies new GPOs on startup and when users log on. Computers also check for new GPOs every 90 minutes.
- The GPO policy is downloaded and applied to the computer or user.
If you want to follow along with this guide you might want to build a test environment. This will allow you to create, modify and delete GPOs without breaking your production environment. Refer to my article on building an Active Directory test environment for step-by-step instructions.
Lesson 2
Group Policy Process Order
It is very important to understand the order in which group policies are applied. It is even more important to understand the order of precedence. This will be critical in group policy design and troubleshooting.
GPO Processing Order
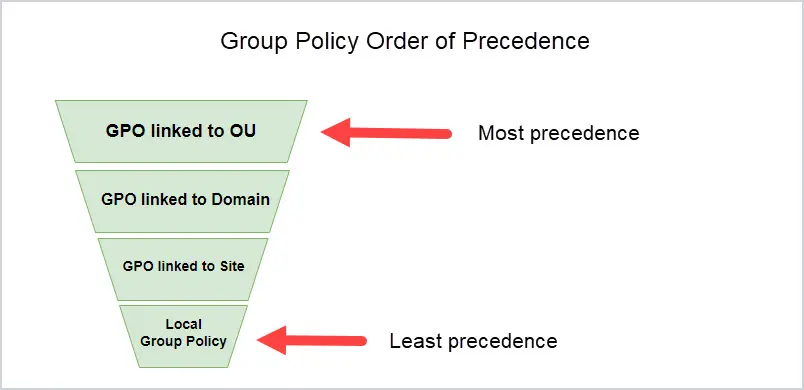
GPOs are processed in the following order:
- Local Group Policy Object
- GPO linked to Site
- GPO linked to the domain
- GPO linked to an Organizational Unit
Group Policy Order of Precedence
The GPO that applies last has the most precedence. What this means is if two policies have the same settings, the GPO with the most precedence will be applied. This is because it is applied last and will overwrite the other policy settings.
Let me walk through an example to better illustrate what this means.
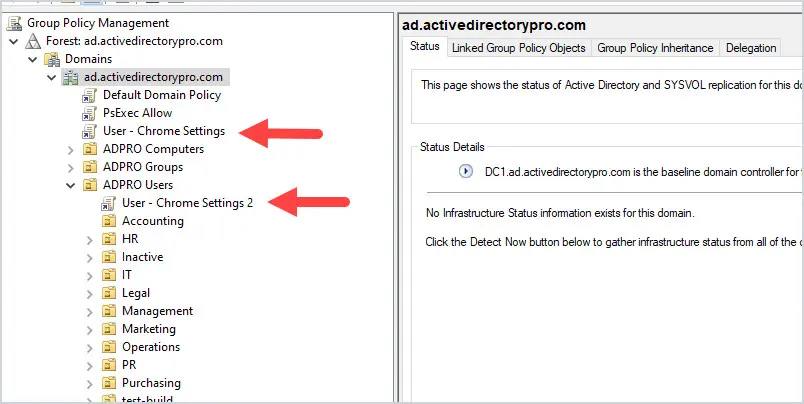
I have two GPOs, the name and policy settings are below.
- User – Chrome Settings = This GPO sets the home page to google.com. This GPO is applied to the Domain.
- User – Chrome Settings 2 = This GPO sets the home page to bing.com. This GPO is applied to an OU.
Screenshot example below.
Can you guess which home page will be applied?
It will be bing.com.
The “User – Chrome Settings 2” GPO has the most precedence because it was applied last.
So remember, for any GPOs that have conflicting policy settings, the GPO with the most precedence will win.
Domain group policy objects will always overwrite any local policies because they have more precedence.
Lesson 3
Managing Group Policies
In this lesson, you will learn how to create group policies. I’ll demonstrate how to create a GPO that applies to users and a separate GPO that applies to computers.
Group Policy Management Console Overview
When managing group policy you will utilize the built-in group policy management console (GPMC). The GPMC is located in the start menu -> Windows Administrative Tools.
I’ll go over the basics of the GPMC. (Refer to the picture below).
- Domains = This will list your domains and OU structure. Notice it does not list any Active Directory containers, that is because GPOs can only be linked to the domain and OUs.
- Linked GPOs = If any OU has a linked GPO it will be listed under the OU. For example, you can see my “ADPRO Computers” ou has a PsExec Allow policy linked.
- Group Policy Objects = This section will list all GPOs, linked and unlinked.
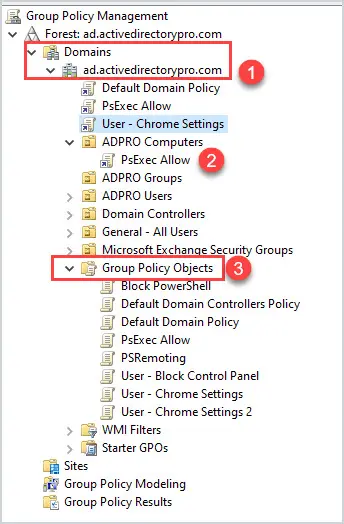
Don’t worry about “WMI Filters” or “Starter GPOs”.
When you select a GPO you will get the GPO details on the right side of the screen.
- Scope = The scope shows you all the locations the GPO is located in. Below is the Security filtering (covered in section 5)
- Details = Shows basic details on the GPO like when it was created and last modified.
- Settings = Displays what policies are configured for the GPO
- Delegation = Lists the permissions of the GPO. You typically do not need to modify these settings.
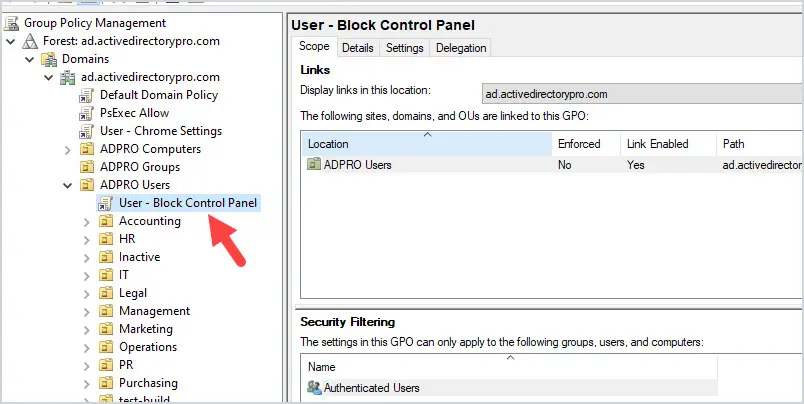
That really covers the most common settings you need to manage group policy. Next, I’ll walk through creating a new GPO.
New GPO Example 1: Block Access to the Control Panel for All Users
In this first example, you will create a new GPO to block access to the control panel for all users.
First, open the group policy management console.
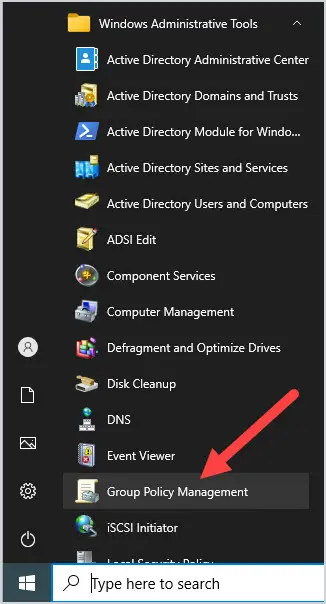
Find the organizational unit that contains your user accounts, for me, this is my “ADPRO Users” OU.
Right-click the OU and select “Create a GPO in this domain, and Link it here“
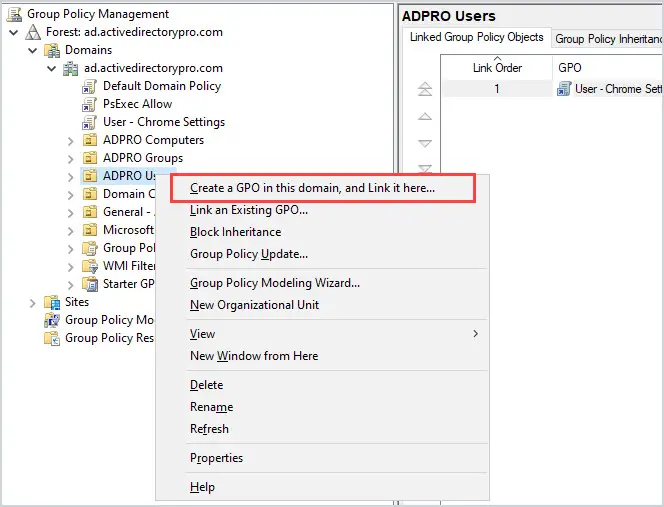
Give the new GPO a name. For example, User – Block Control Panel.
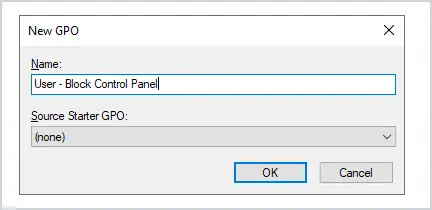
At this point, there is a new GPO linked to all the users but the GPO has no policies set. Right-click on the GPO and select edit.
Browse to User Configuration -> Policies -> Administrative Templates -> Control Panel
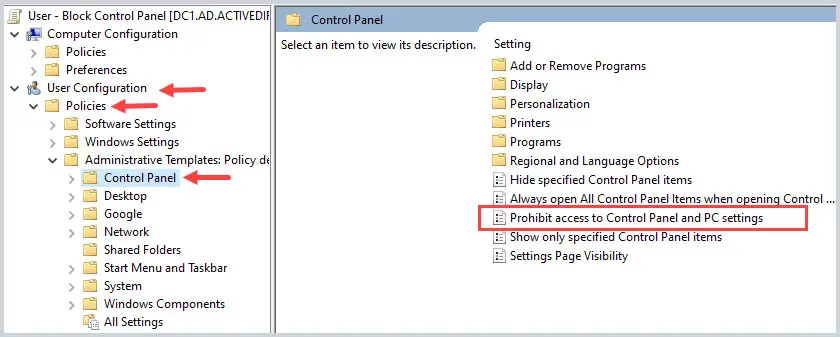
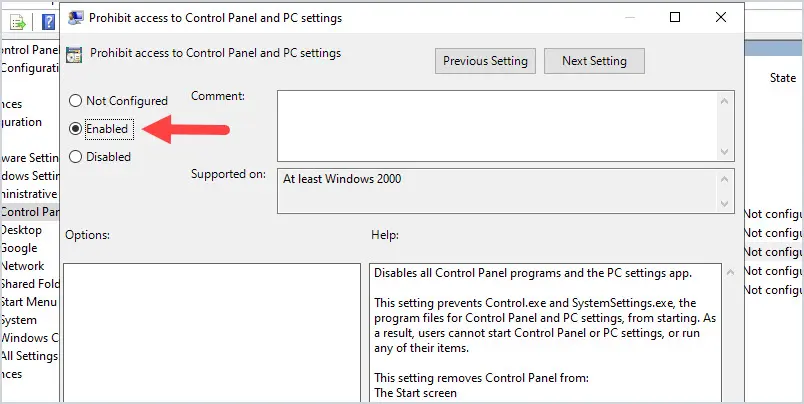
Right-click the policy and select “Edit”.
Change the policy setting to “Enabled” and click “OK”.
To verify the GPO is working, reboot a computer and log in with a domain user account.
When you try to open the control panel you should get a pop up message like the one below.
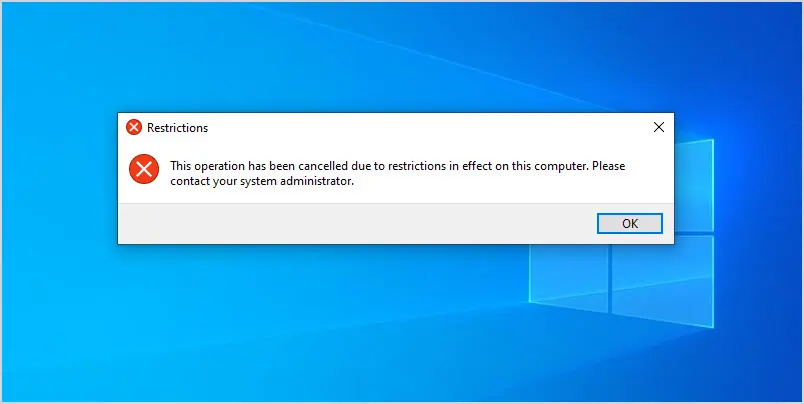
Remember this was a user configuration and only applies when a user logs into the computer. In the next example, I’ll go over a computer GPO.
New GPO Example 2: Create a Logon Banner (Legal Notice)
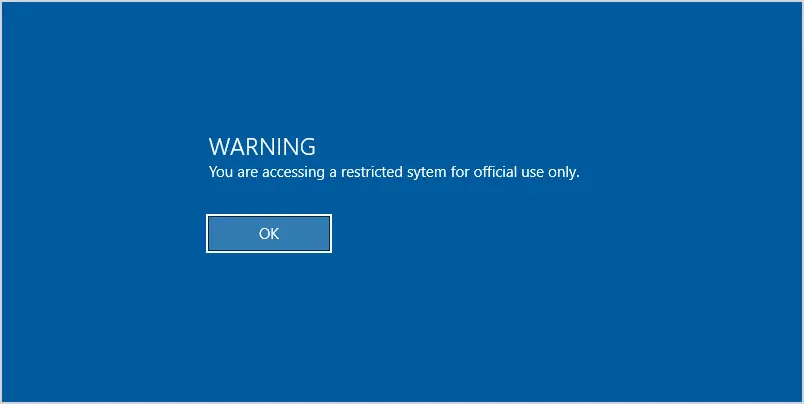
In this example, you will create a new GPO that presents a banner message to users before logging into a computer. Many organizations require this for legal purposes. This will be a computer configuration GPO.
First, determine the OU that contains the computers you want the policy applied to. In my domain, all computers are located in the “ADPRO Computers” OU, all sub-OUs will inherit this policy.
Right-click the OU and select Create a GPO in this domain, and link it here.
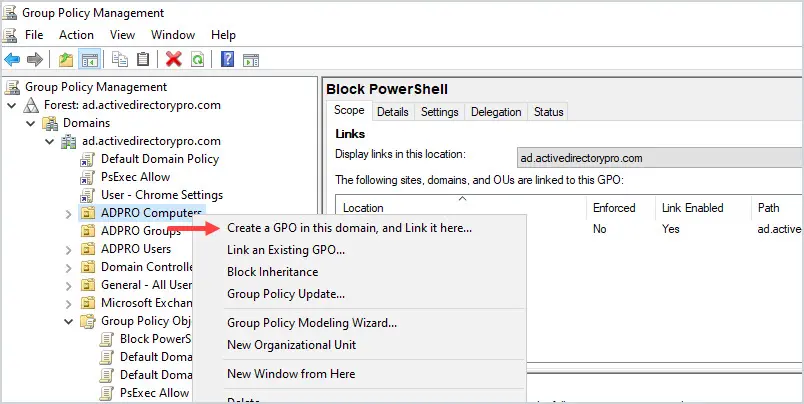
Give the new GPO a name, for example Computer – Logon Banner.
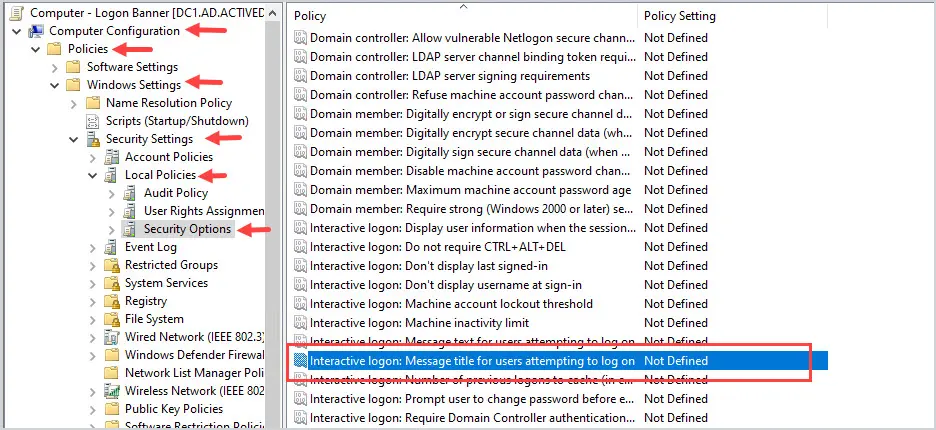
Browse to Computer Configuration -> Policies -> Windows Settings -> Security Settings -> Local Policies – > Security Options.
On the right open the policy “Interactive logon: Message title for users attempting to log on”.
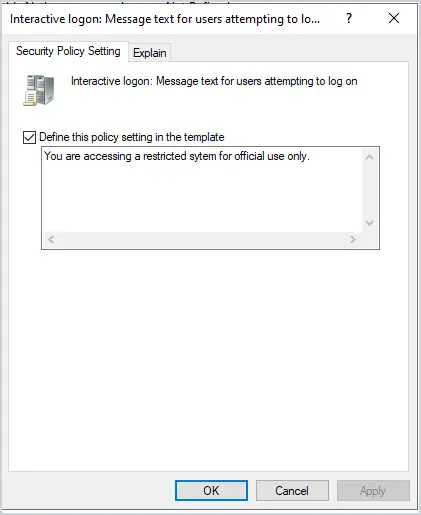
Now select “Define this policy setting” and enter your message. This message is often provided by HR or your legal department.
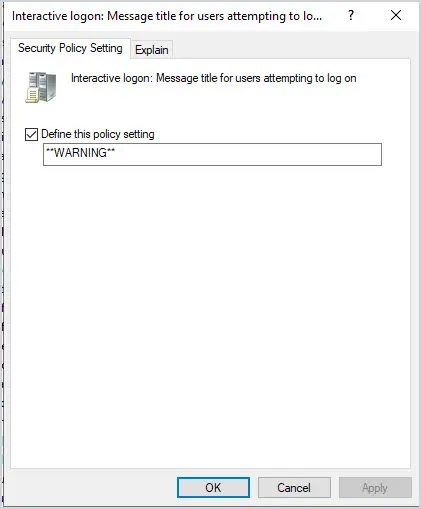
Next, open the policy “Interactive logon: Message title for users attempting to log on” and enter a title for the banner.
Next, reboot a computer, and when you logon you should be prompted with the GPO logon banner message.
Nice Work!
If you followed this lesson then you just created two GPOs, one for users and one for computers.
Pretty easy right?
How do you know where a GPO is linked?
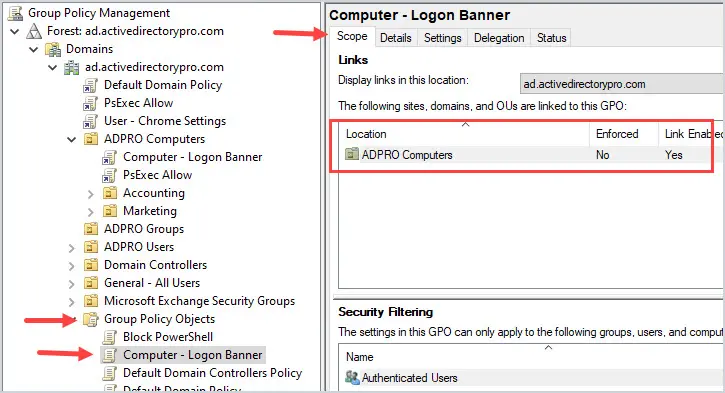
Open GPMC, to go Group Policy objects, select the GPO and look at the scope settings. This will tell you where in the domain the GPO is linked to (what objects it applies to).
In the screenshot below, you can see the Logon Banner GPO is linked to my ADPRO Computers OU. So this GPO will apply to all devices in this OU and any sub-OU.
For more group policy examples refer to the article Most Useful GPO Examples for Security. This article lists 23 GPO examples that help to improve security in any network.
Lesson 4
Group Policy Preferences
Group policy preferences are used to set an initial configuration but allows users to change them. For example, a GPO preference can create a shortcut on the user’s desktop but allow the user to delete it.
GPO preferences differ from policy settings because users cannot modify the policy settings. For example, in lesson 4 we created a logon banner, this was a policy setting and the users can not change it.
GPO Preferences are primarily used for:
- Mapping Network Drives
- Installing Printers
- Installing Software
- Add desktop shortcuts
- Modify registry settings
Item-Level Targeting
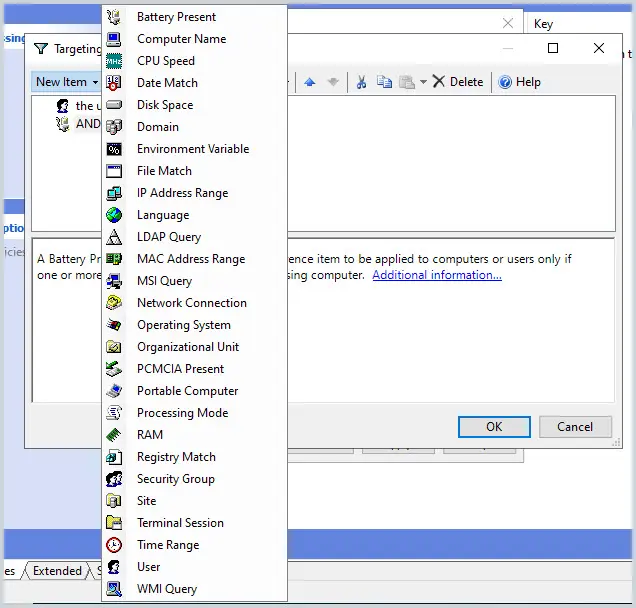
GPO preferences include a filtering option called “Item-level targeting”. Item-level targeting gives you granular control over what objects (which users or computers) the GPO is applied to.
Some examples of item-level targeting:
- Target computers with a specific operating system
- Target a security group
- Target computers by IP address
- RAM, CPU Speed.
Here is a screenshot of all the items.
Create a GPO Using Preferences and Item-level Targeting
In this example, we will create a new GPO using preferences that will add a desktop shortcut. We will also use item-level targeting to apply the GPO to a security group only.
First, create a new GPO and link it to your user’s OU.
Edit the GPO and browse to User Configuration -> Preferences -> Windows Settings
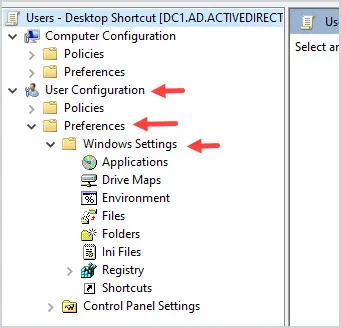
Right-click on Shortcuts, select New, and then shortcut.
See the screenshot below for shortcut settings.
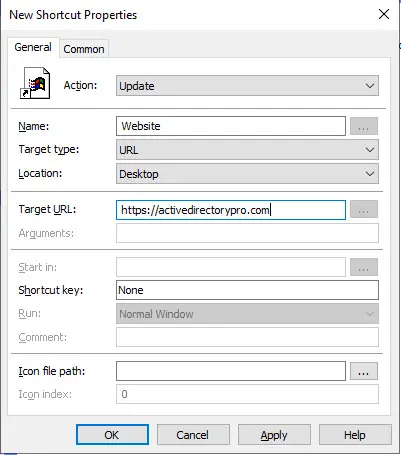
I linked this GPO to all users, if a user logged in they will see a shortcut on the desktop.

But what if you don’t want the shortcut on all user’s desktops?
With GPO preferences you can use item-level targeting to limit which users the GPO is applied to.
For this example, I’m going to limit the desktop shortcut to a security group.
I created a group called “gpo_desktop_shortcut” and added a few users from various departments.
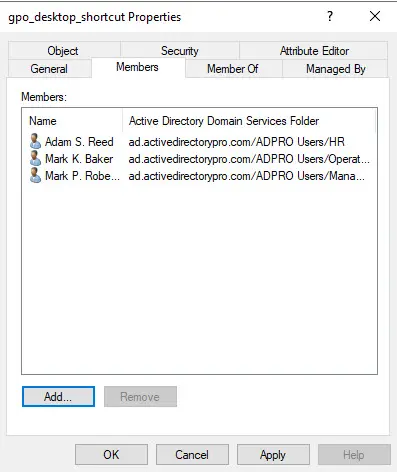
Go back to the GPO settings and click on “Common”.
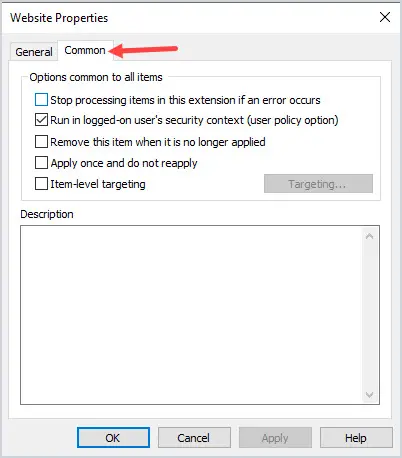
Next, select “Item-level targeting” and click the “Targeting” button.
Click on “New Item” from the drop-down menu select “security group”.
Select the group you want to target and click ok.
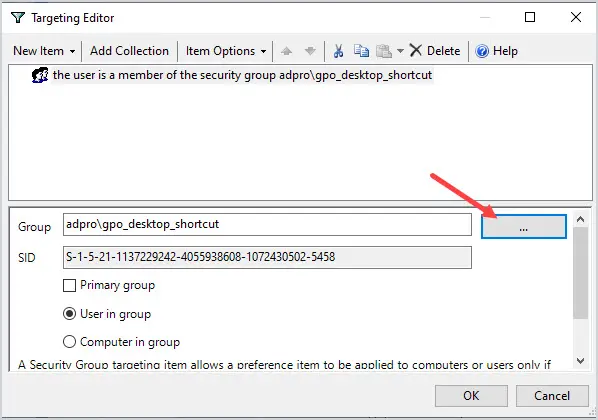
That is it!
Now the GPO will only apply to the users in the security group.
Remember item level targeting only works with GPO preferences. To filter other GPOs you can use security filtering which I’ll cover in the next lesson.
Lesson 5
Group Policy Filtering
Group policy security filtering is something that doesn’t get enough attention.
Group policy security filtering lets you control what users and computers a GPO is applied to. For example, if you don’t want certain computers to have a screen lock policy you can use security filtering.
Each GPO has a security filtering section and by default, all authenticated users have the right to apply the GPO.

How to Exclude Users From a GPO Using Security Filtering
In this example, I’m going to use security filtering to exclude users from a GPO. I’ll use the control panel policy I created from a previous lesson.
I have the “User – Block Control Panel” policy that is applied to all domain users.

Some users called the helpdesk and are very upset they can’t access the power options from the control panel.
The boss approved the access so I need a way to exclude these users from the policy.
No problem.
I’ll create a security group, add the approved users and use security filtering to deny the group access to the GPO.
In the GPO click on the Delegation tab.
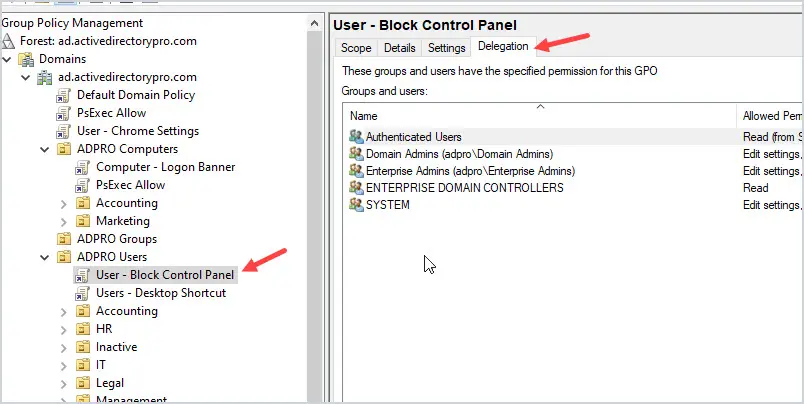
Click the Advanced button in the lower right corner.
Click Add and add the security group.
For the permissions Select “Deny” for “apply group policy”.
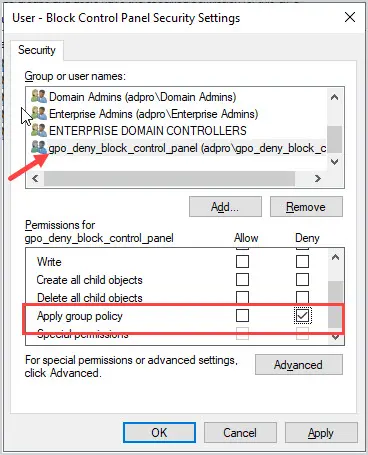
All done.
Now any member of this group will be denied the GPO. In this example, the user will be denied the group policy that blocks access to the control panel which enables the user to access it.
How to Apply a GPO to Specific Users or Computers with Security Filtering
In this example, I’ll use security filtering to apply a GPO to a specific group of users.
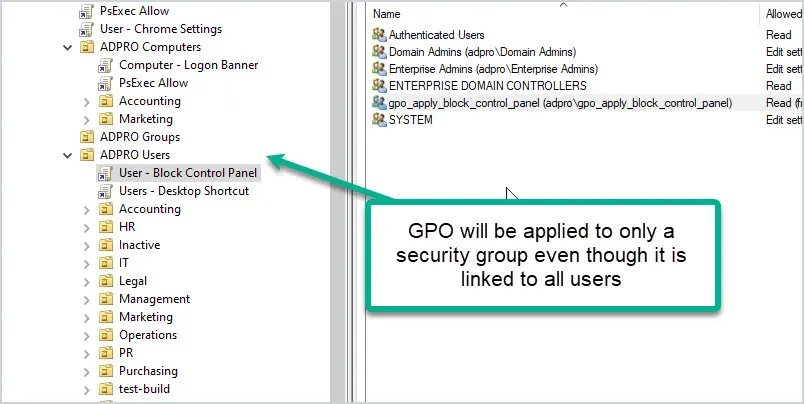
First, create a security group for the users or computers you want the GPO applied to.
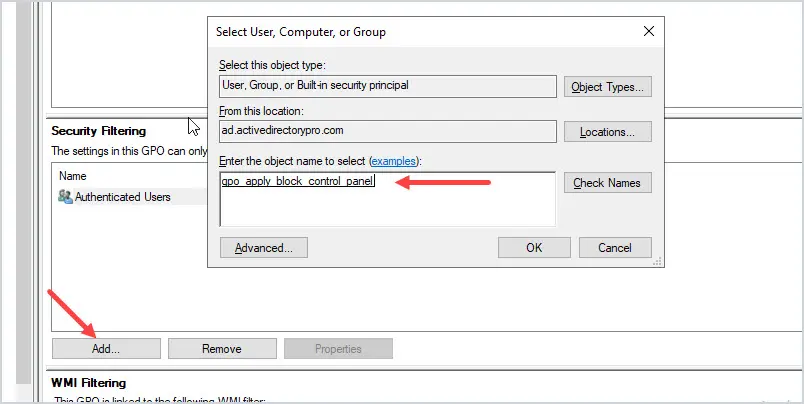
Go to the GPO and then Security Filtering.
Click the “Add” button and select your group.
Next, click on the delegation tab at the top of the GPO.
Click the “Advanced” button in the lower right.
For “Authenticated Users” uncheck “Apply group policy”. But make sure “read” is still checked.
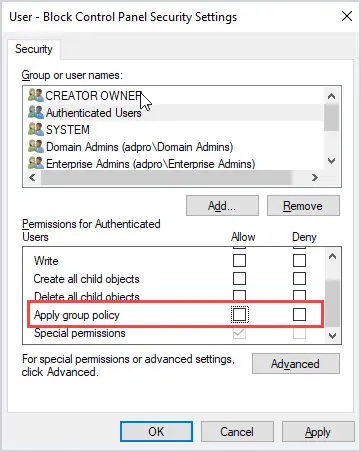
Done.
Now the GPO will only be applied to the added security group.
That completes lesson 5. In the last lesson, I’ll show you how to troubleshoot group policy.
Lesson 6
Troubleshooting Group Policy
In this lesson, you will learn how to troubleshoot group policy.
First, here are some quick tips that often lead to group policy issues.
- Stuffing too many settings into one big GPO
- Using block inheritance
- Using loopback processing
- Changing delegation permissions
- Poor OU design.
Don’t make group policy complicated, keep it simple and you can avoid most GPO issues. For more tips refer to my GPO best practices guide.
Group Policy Troubleshooting Steps
1. Run gpupdate command
On a computer that has GPO issues, log in and run the gpupdate /force command. The /force command reapplies all policy settings.

The command should return with no errors. Sometimes running this command can resolve or force a GPO to apply. Depending on the policy it may prompt you to reboot before the policy goes into effect.
2. Check sysvol acccess
From a client computer test access to the sysvol directory.
Click on start then type in the UNC path to your domain controller. My domain controller hostname is DC1 so the UNC path is \\DC1. Click on SYSVOL, your domain and then policies. You should see a list of folders with random numbers and letters, these are the GPOs.
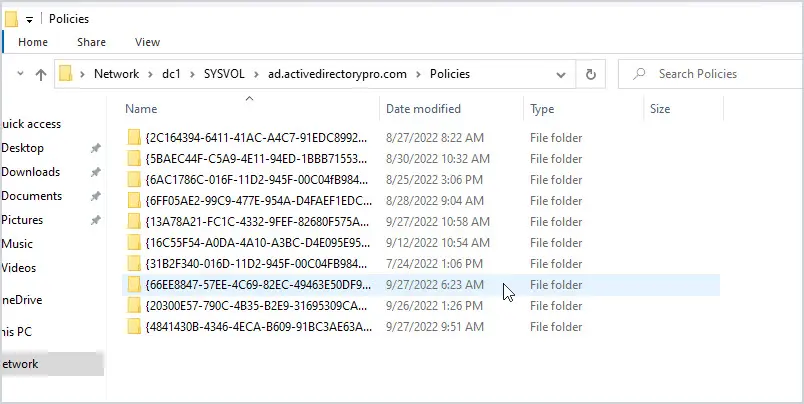
If you don’t see or cannot access this folder then that will prevent GPOs from working.
Make sure you test the sysvol access by hostname and not IP address.
3: Check event logs
On the client computer check the system event logs. The event logs can provide details as to why a GPO failed. The below example is an error from a GPO that tried to install the chrome browser.
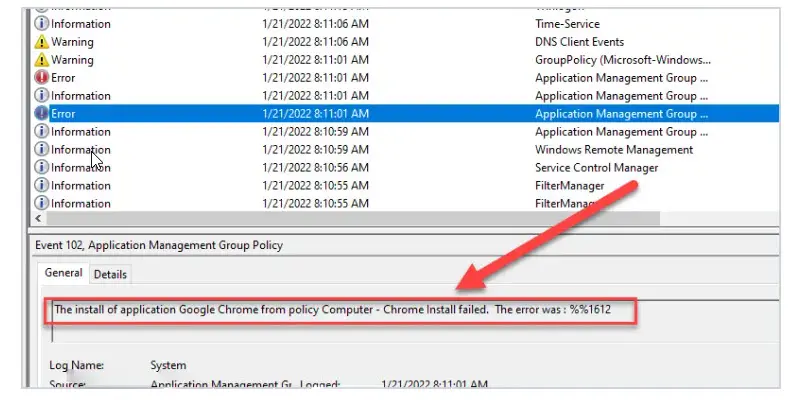
4. GPResult command
The gpresult command will show you which group policies are applied to a user and computer. This is a great command for GPO troubleshooting, it is the best option to determine which GPOs are being applied. You will need to know which GPOs you are expecting to see, which you can determine from the GPMC.
To see computer policy GPOs you must run the command prompt as administrator.
From the command prompt run gpresult /r.
The command should return the computer settings and the applied group policy objects.
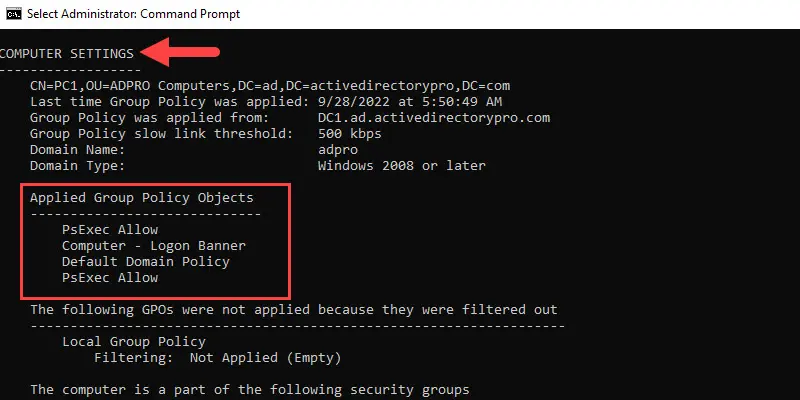

In the screenshot above you can see 4 GPOs are applied to the computer.
Now close the command prompt and run it as a regular user. For example, I’m logged in as user “Adam.Reed”.
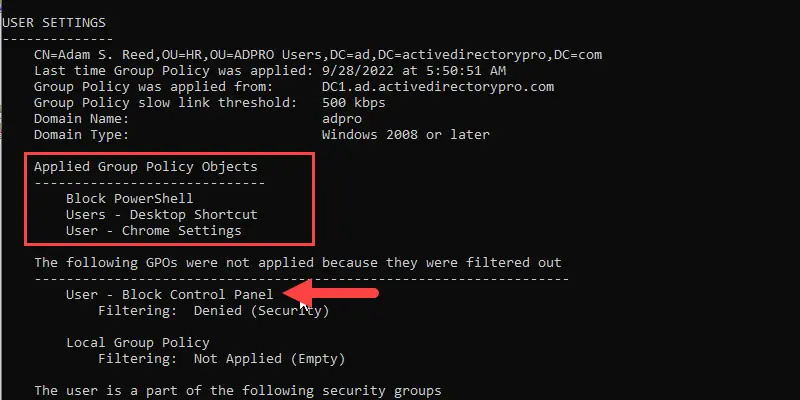
In the screenshot above you can see 3 GPOs are applied to the user Adam Reed but one was not applied due to security filtering.
5. Using RSOP (Resultant Set of Policy).
Only use this command if you have verified the GPOs are applied with the gpresult command.
This command will show you what policy changes are being made from the applied GPOs. So again it’s not going to help you if the GPOs are not even being applied. There are several steps to using this command, you can refer to my RSoP guide for complete instructions.
6. GPO order of precedence
Maybe you have no errors, all GPOs are applied as expected but the policy is still wrong.
Did you check the GPO order of precedence in the management console?
Remember the last GPO applied takes precedence. Another way to think of it is the GPO that is closest to the object (user or computer) wins.
I hope you enjoyed this group policy guide. If you have comments or questions post them below in the comment section.
Recommended Reading:
Thank you for the write up! It was very helpful, clear, and informative.
You are welcome!
Robert,
After countless days reading articles on the internet with so much mixed information I came across your website. I can’t even explain how much easier you made this process. Your explanations are direct and on point. Simple to understand and follow. Thank you from ALL of us who have struggled to understand portions of the Active Directory. GREAT work!!!
Hi,
Thanks for the feedback. Yea lots of junk on the internet.
Awesome Robert. Best and easiest explanation. Appreciate.
I enjoyed this thank you
Thank you for a great article
You’re welcome!
hi Robert,thank you so much for explaining so well for known folders migration to OneDrive i need to createlocal GPO for a test machine please i would appreciate if you can help
Hi,
You can use the Local Group Policy Editor on the local test machine.
Great article. Finally something that I can fathom without losing half of my brain cells. Thank you.
Thanks for the feedback
Great tutorial, really good material. Thank you very much for going to all this trouble.
Possible typo?
“Linked GPOs = If any OU has a linked OU it will be listed under the OU.”
Should this be:
“Linked GPOs = If any OU has a linked GPO it will be listed under the OU.”
Yes, it has been updated. Thank you.
Honestly, speaking you make it like 1 + 1 = 2! Thank you for amazing explanation!
😎
Hey Robert,
Thank you for writing this article. This is a great article. It is simple, clear and understandable!!
No problem.
Hey Robert. Thanks so much for the education. Truly appreciate you.🙏🏾 Could you please enlighten me on how to deploy a default lock screen and logon image to user accounts? I’ve created and and enable lots of GPOs for users in my organization but I’ve faced complication with “lock screen and logon image.”
Try the steps in this guide for the lock screen.
https://activedirectorypro.com/group-policy-lock-screen/
I’ll work on creating a guide for the logon image.