In this tutorial, you will learn how to enable the Active Directory Recycle bin on Windows Server.
I’ll show you how to enable it through the GUI as well as with Powershell.
The AD recycle bin comes in handy when you accidentally delete an AD object and need to restore it.
Active Directory Recycle Bin Benefits
The AD Recycle bin allows you to quickly recover deleted objects without the need to restore an Active Directory backup.
The recycle bin feature preserves all link valued and non link valued attributes. This means that a restored object will retain all its settings when restored.
By default, a deleted object can be restored within 180 days. This time is controlled by the Deleted Object Lifetime (DOL) which can be set on the msDS-deletedObjectLifetime attribute.
In addition, its default value is the same as the Tombstone Lifetime.
Confused?
Just remember the default setting to restore a deleted object is 180 days.
If you want a deeper dive into these settings then check the AD Recycle Bin guide from Microsoft.
Related: Dcdiag: How to Check Domain Controller Health
Steps to Enable the AD Recycle Bin on Windows Server
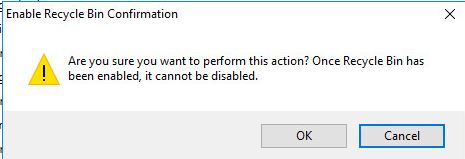
Note: Once you enable the Active Directory Recycle Bin you can’t turn it off.
Follow these simple 3 steps:
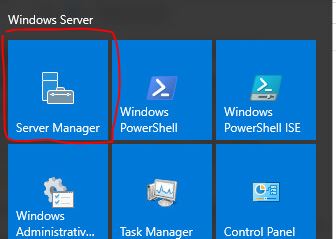
Step 1: Open Server Manager
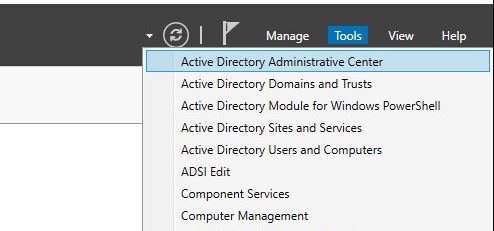
Step 2: Open the Active Directory Administrative Center
From the Server Manager go to tools and select Active Directory Administrative Center
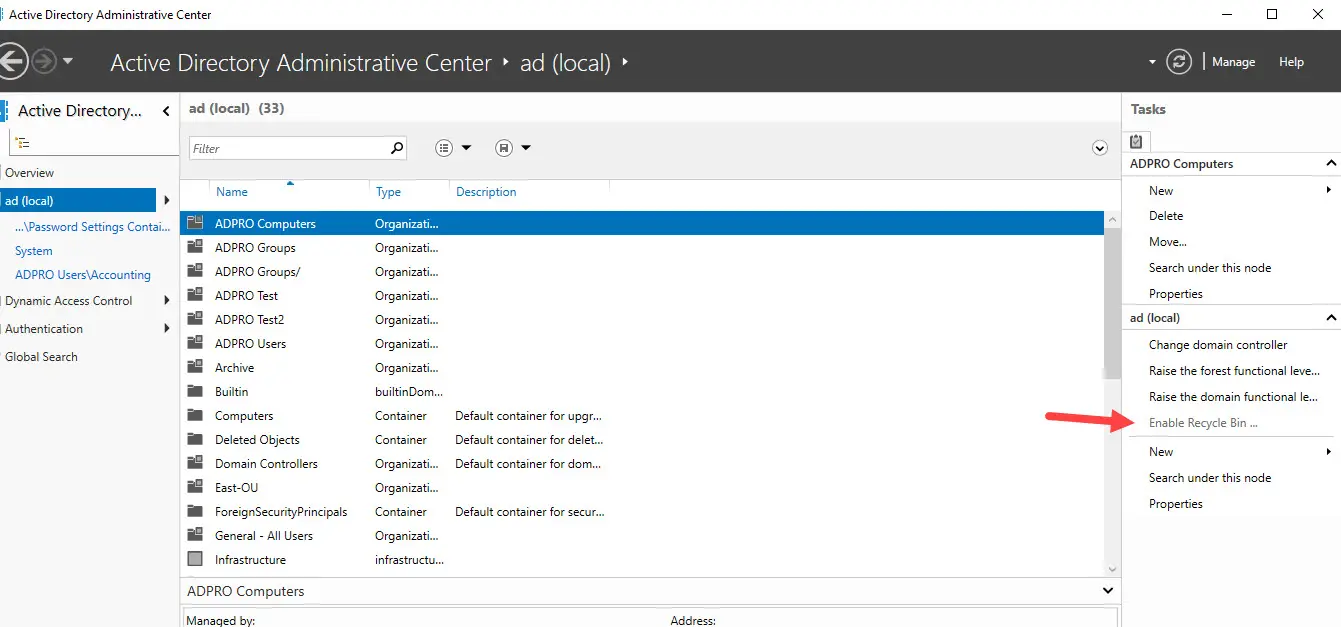
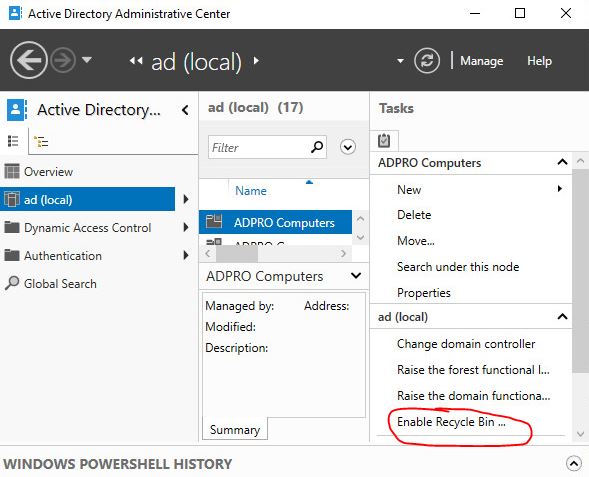
Step 3: Enable Recycle Bin
Within the Active Directory Administrative Center click on your local domain then click on “Enable Recycle Bin”
Click OK to confirm
Click OK on the next pop up
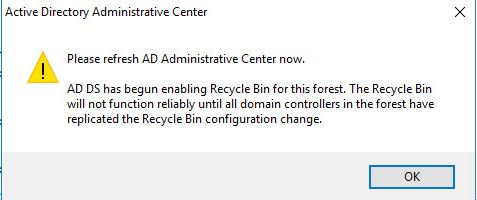
All done, AD recycle bin is now enabled.
Enable AD Recycle Bin with PowerShell
Follow these steps to enable the recycle bin with PowerShell
Step 1. Logon to your Domain Controller
Step 2: Load the AD Powershell module
Import-module ActiveDirectory
Step 3: Run the following cmdlet to enable the Recycle Bin
Enable-ADOptionalFeature 'Recycle Bin Feature' -Scope ForestOrConfigurationSet -Target <your forest root domain name>
Here is an example using the ad.activedirectorypro.com domain.
Enable-ADOptionalFeature 'Recycle Bin Feature' -Scope ForestOrConfigurationSet -Target ad.activedirectorypro.com
How to Verify AD Recycle Bin is enabled
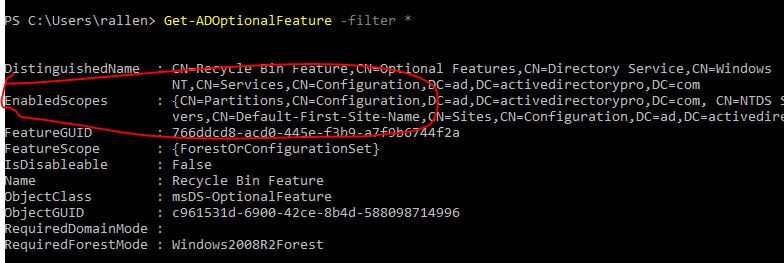
Use this Powershell command to verify it is enabled
Get-ADOptionalFeature -filter *
Notice the enabled scope, if it was not enabled the scope would be empty.
This is great, Robert. However, Can you show me how to permanently delete users or objects from the Recycle Bin? The delete option is greyed out.
Are there any downsides/negatives of enabling the recycle bin. Reason for asking is because it says once enabled it cannot be disabled. Thanks
I’m not aware of any downsides to turning this on.
If you enable on erver 2008 or 2012, you cannot elevate the function level of the domain to 2016 (on 16, 19 or 22).
I’ve tried to see if there’s a valid reason for this, but there doesn’t appear to be, and no fix at this time.
All DCs must be >= the desired functional level. A domain with a DC running 2008 cannot elevate past 2008. Same with 2012. There is no 2019 nor 2022 functional level. Hope this helps.
Nice Article thanks Alot!
Awesome and useful! Appreciated
No problem
Thank you!
Thank you! This helps a lot!
Wow , So easy to understand through this page. Thanks and Keep going.
Thanks Nikki. More tutorials on the way. I’m planning to add more video tutorials for Active Directory tasks. Stay tuned.
Lifesaver 🙂
Great
Helpful dude.. Thanks a lot
very gooooooooooooood,thank you
You’re welcome, bahamin.