Looking for a list of robocopy examples and useful commands? Then look no further.
Robocopy has many command line options and it can be overwhelming to know which commands to use. In this guide, I’ll show you the best robocopy commands and examples.
Let’s get started.
1. Test A File Copy Without Any Real Changes
You can test a file copy with the /l command. This is a great way to test a command without making any real changes, it will show you what it would have done.
Here is an example.
robocopy c:\share c:\it\dst /lYou can see below this command would have copied one directory.

I’ll run another test and include the /e option.
robocopy c:\share c:\it\dst /e /lThis time the test showed it would copy a bunch of files and directories.
The /l is a great command to help you understand what it would have done without making any real changes.
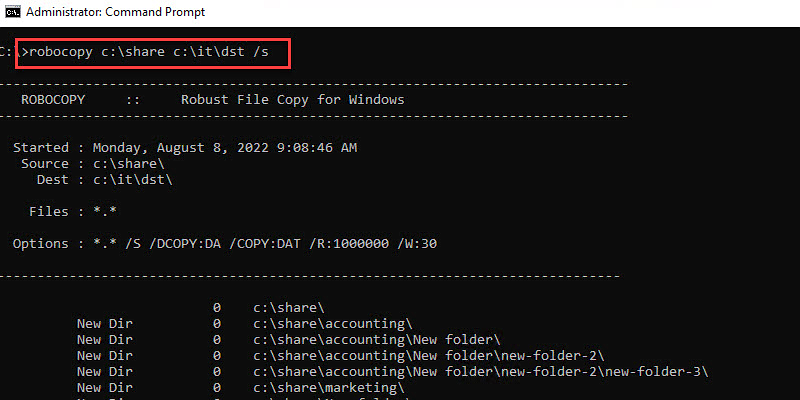
2. Copy Contents Exclude Empty Subdirectories
In this example, I’m going to copy all the files and folders from c:\share to the folder c:\it\dst on the same computer. This will exclude any empty subdirectories.
robocopy c:\share c:\it\dst /sHere is a screenshot from my computer.
Here is a screenshot showing the comparison between the source and destination folders.
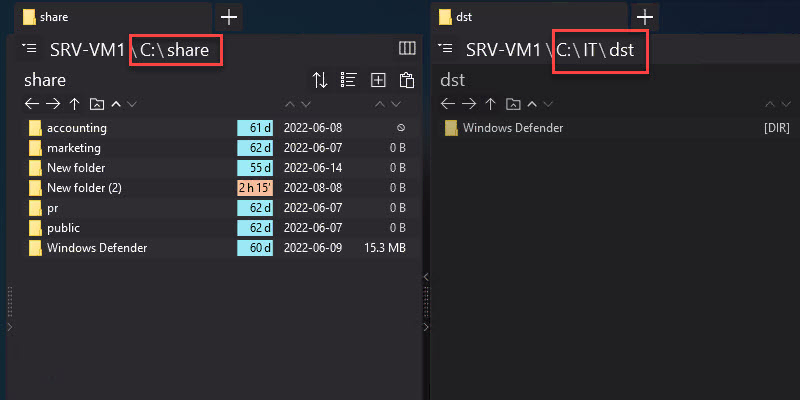
Why did robocopy only copy the “Windows Defender” folder? Because the other folders are empty, the /s command will exclude subdirectories that are empty.
3. Copy Contents Include Empty Subdirectories
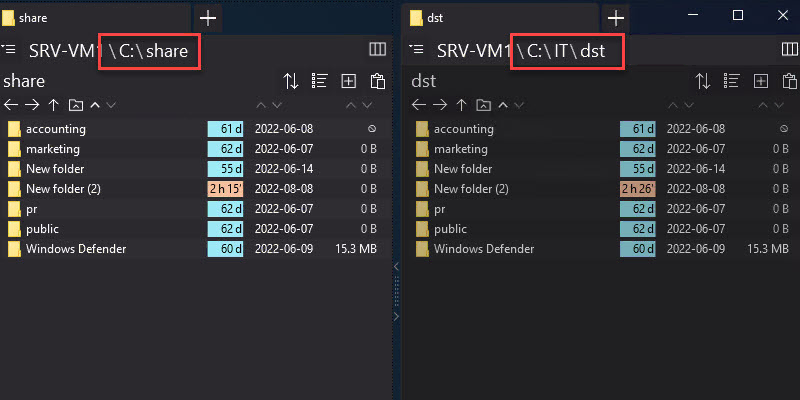
In this example, I’m going to copy all the files and folders from c:\share to the folder c:\it\dst on the same computer. This time I will use /e command to include empty subdirectories.
robocopy c:\share c:\it\dst /eHere is a screenshot of the command from my computer.
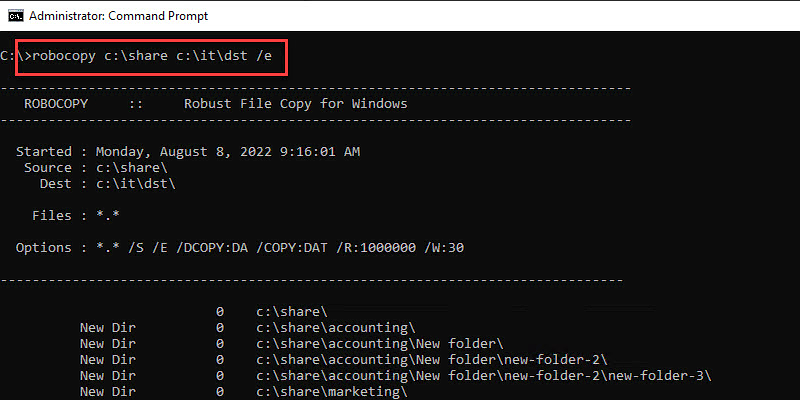
Here is the folder comparison. This time the destination folder looks just like the source folder.
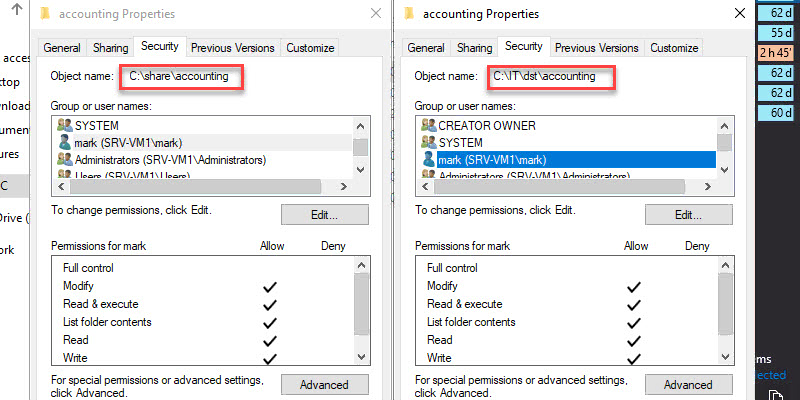
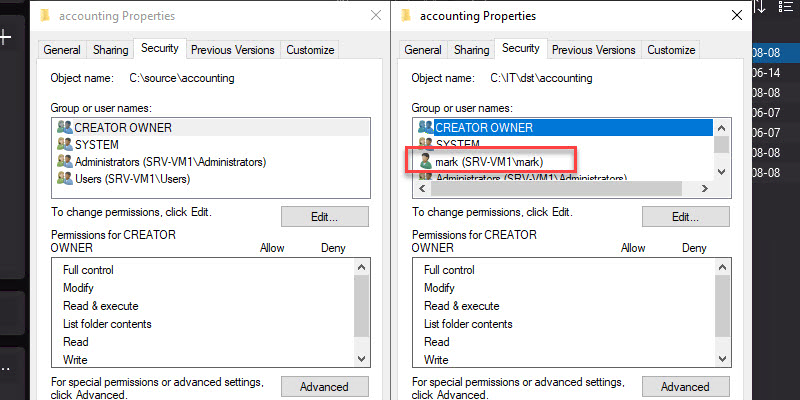
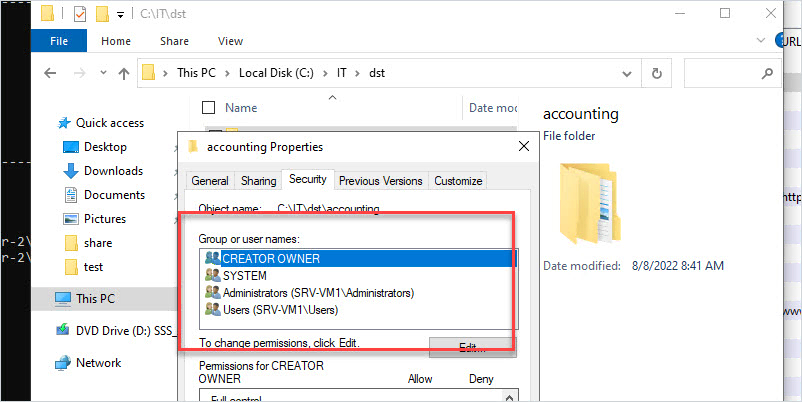
4. Copy Contents With Security (ACL Permissions)
If you have modified the permissions on files and folders and want to keep those permissions, you need to use the /copy:DATS option. This does not copy owner information, see example 4 to include the owner.
robocopy c:\share c:\it\dst /e /copy:DATS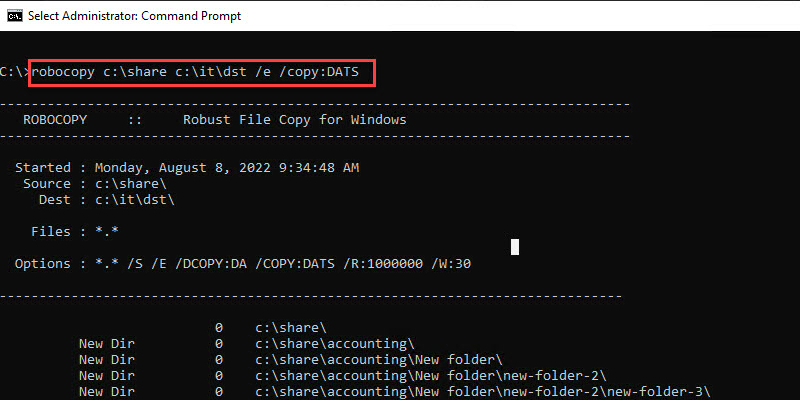
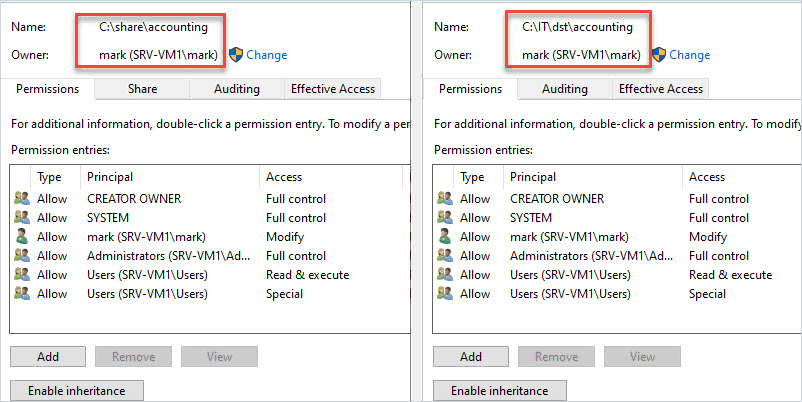
Here is a screenshot comparing the permissions on one of the folders. On the source, I modified the permissions on the accounting folder. You can see these permissions copied over to the destination folder.
5. Copy Files With Security Including Owner
To include the owner of a file or folder use the /copy:DATSO command.
robocopy c:\share c:\it\dst /e /copy:DATSOHere is a screenshot showing the owner information was copied over to the destination folder. Without this command, the folder would inherit the owner information.
6. Copy All File Information
To copy all file properties use /copyall, this is equivalent to /copy:DATSOU. I prefer to use /copyall instead of listing each property type.
robocopy c:\share c:\it\dst /e /copyallThis will copy the following file properties.
- D – Data
- A – Attributes
- T – Timestamps
- S – NTFS access control list (ACL)
- O – Owner information
- U – Auditing information
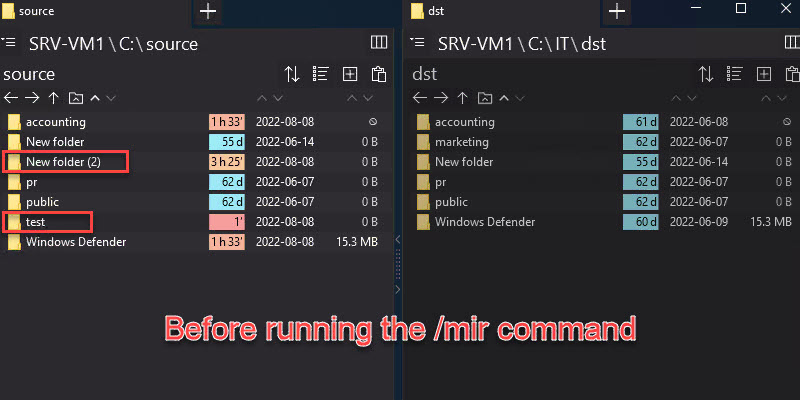
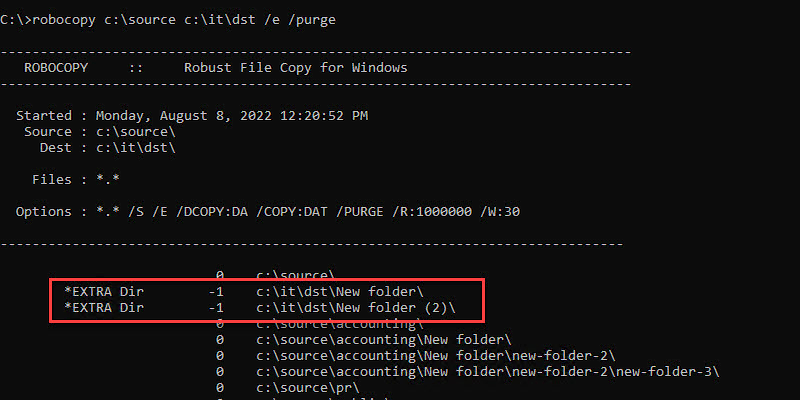
7. Mirror Source and Destination Directory
This command will mirror the source and destination directory. Whatever changes you make in the source directory will be mirrored in the destination. For example, if you add/remove a folder in the source, the same will occur in the destination.
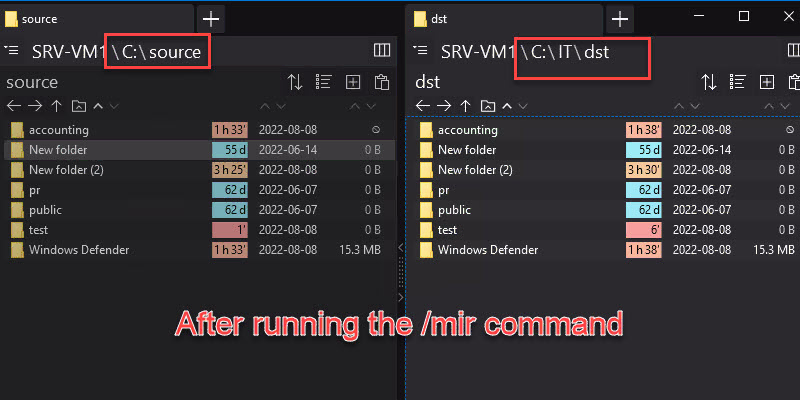
robocopy c:\source c:\it\dst /e /mirBelow is a screenshot before I run the /mir command. You can see the source and destination are different.
After I run the /mir command the destination will be the same.
The output of the /mir command will show you what changes there are between the source and destination.
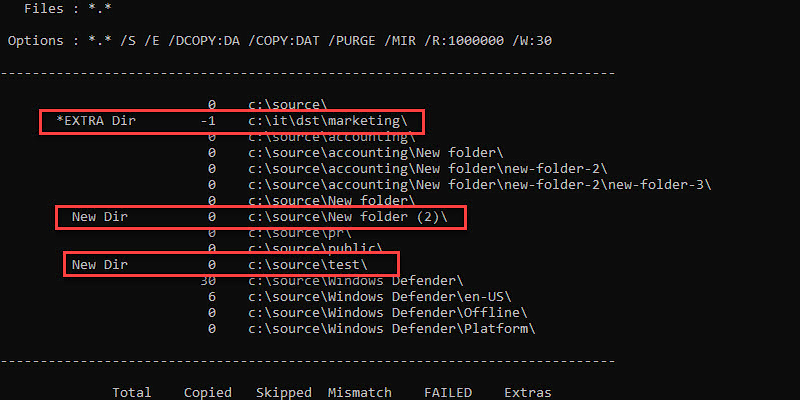
The above is saying the destination had an extra directory “Marketing” so it was removed. It then was missing two directories “new folder (2)” and “test” so it added these.
8. Mirror Directory With All File Properties
The previous example does not mirror the source directory file properties (ACL, owner, timestamp, etc). To mirror and include file properties use this command.
robocopy c:\source c:\it\dst /e /mir /copyallFor example, I’ll remove the user “Mark” from the ACL on the souce\accounting” folder. Now the source and destination are different.
After running the /mir /copyall command, “mark” will be removed from the it\dst\accounting folder.
9. Purge Files and Folders From The Destination Directory
If you have deleted a bunch of files/folders from the source and want to remove them from the destination folder, use the /purge option.
robocopy c:\source c:\it\dst /e /purgeThe output will show you the folders it removed.
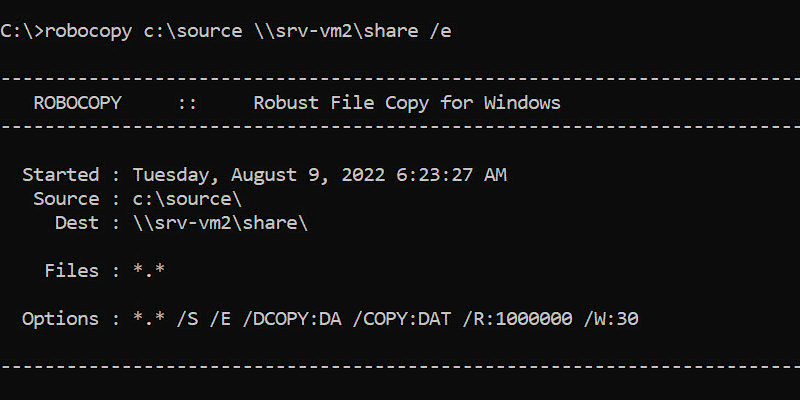
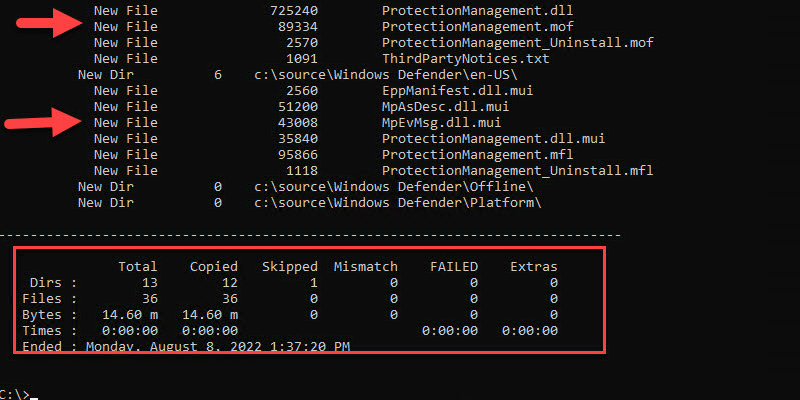
10. Copy Files Over The Network
Copying files over the network is the same as copying locally. There are some additional commands that can help with the transfer of files over the network, I’ll go over these next. It is best to use the UNC path instead of a mapped driving when copying to a remote device.
robocopy c:\source \\srv-vm2\share /z /eThe above command copies files from my local computer to another server. The /z option copies files in restartable mode. If the copy gets interrupted, robocopy can pick up where it left off.
11. Copy Files Over the Network with File Properties
If you want to copy the ACL and other file properties use /copyall. To copy just the ACL you can use /copy:DATS.
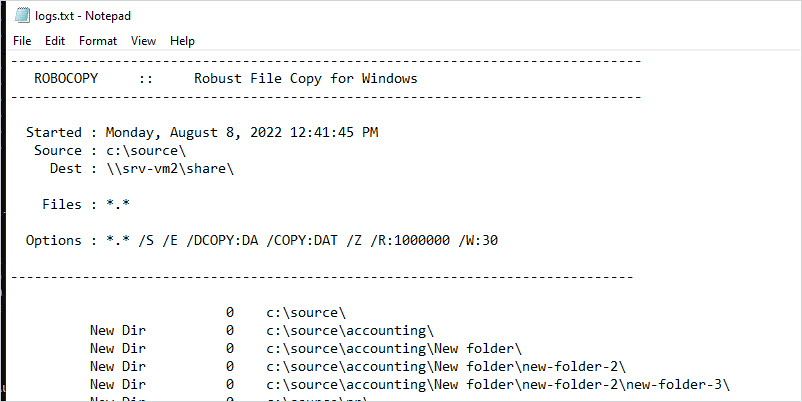
robocopy c:\source \\srv-vm2\share /z /e /copyall12. Save Output to a Log File
To write the robocopy output to a log file use /log:logfile. This will overwrite the log file each time you run the command.
robocopy c:\source \\srv-vm2\share /z /e /log:c:\it\logs.txtHere is a screenshot of the logfile. When running large jobs or migrations you definitely want to include a log file.
13. Append To An Existing Log File
Use the /log+:logfile command to append an existing log file. This will be added to the log file each time you run robocopy.
robocopy c:\source \\srv-vm2\share /z /e /log+:c:\it\logs.txt14. Multi-threaded File Copy (Increase Copy Speed)
By default, robocopy will use 8 threads. To increase the threads use the /mt command. The below example will use 32 threads.
robocopy c:\source \\srv-vm2\share /z /e /mt:32You will need to test this setting and see what thread count works best on your network and computer.
15. Include Verbose Logging
Verbose logging will show skipped files. If you are copying critical files or migrating to a new server I would include verbose logging in the output or even better, include it in a log file.
robocopy c:\source \\srv-vm2\share /vInclude verbose logging with a log file.
robocopy c:\source \\srv-vm2\share /v /log:c:\it\logs.txt16. Specify Retries On Failed Copies
The /r command specifies the number of retries on failed copies. This is recommended on large file copies and when copying over the network. Network file copies can get interrupted, the /r will auto-retry the copy for any failures.
robocopy C:\source C:\it\dst /LOG+:c:\it\robolog.txt /MIR /copyall /z /w:1 /r:2 17. Copy Files By File Type
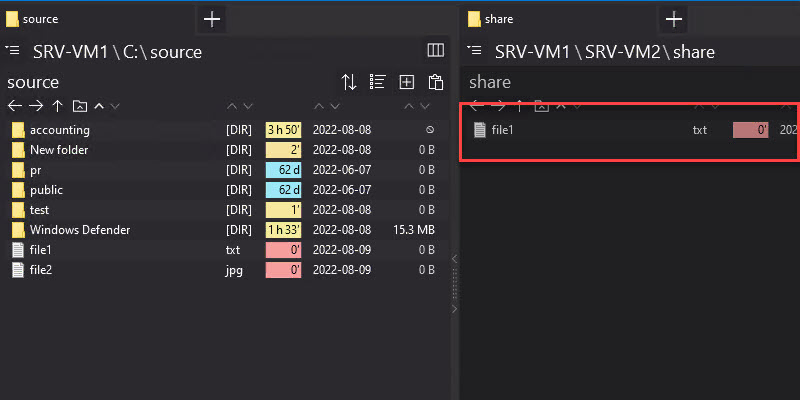
If you need to copy specific file types use the command below. In this example, I’m going to only copy files that are a txt file type.
robocopy C:\source \\srv-vm2\share *.txtBelow you can see robocopy only copied the file1.txt file to the destination directory.
If I wanted to copy all images that are jpg type I would use *.jpg.
18. Copy Files That Start With
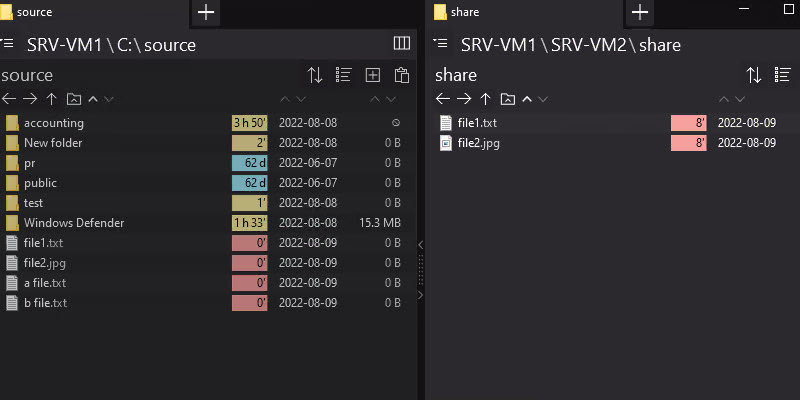
You can copy files that start with a specific character or word. For example, I will copy all files that start with the word “file”.
robocopy C:\source \\srv-vm2\share file*You can see below the command only copied the two files that had “file” in the name, everything else was skipped.
19. Exclude a Directory
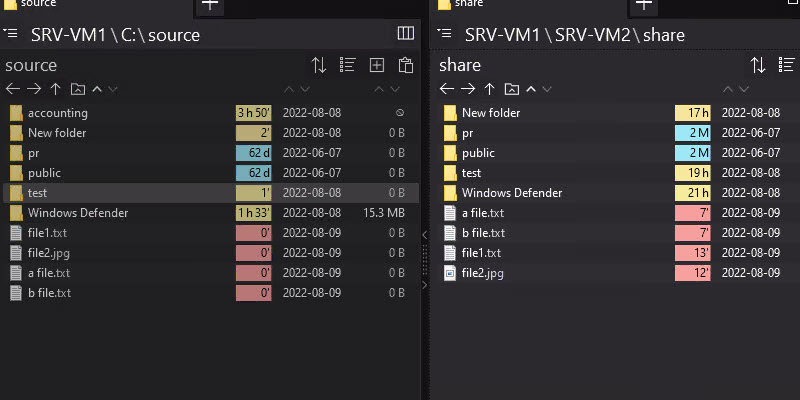
To exclude a directory use the /XD option.
robocopy C:\source \\srv-vm2\share /XD /e "c:\source\accounting"In this example, I’m going to copy everything except the “accounting folder”. You can see below the destination does not include the “accounting” folder.
20. Copy Files That are at least 14 Days Old
This will copy files that have a timestamp that is at least 14 days old.
ROBOCOPY C:\source \\srv-vm2\share /minage:1421. Copy Files with Specific Size
This will copy files that do not exclude 2000 bytes.
robocopy C:\source \\srv-vm2\share /S /MAX:2000You can also use /min, to specify the minimum file size.
That is my list. To learn more about the many robocopy commands check out the Microsoft Syntax documentation.
Do you have any robocopy examples to share? Let me know in the comments below.

This article is just WOW!. The best article I have found. It explains well than the Microsoft article. Thanks
ROBOCOPY: quirky behavior after DAYLIGHT SAVINGS TIME
I love using ROBOCOPY to perform my file backups but just after DAYLIGHT SAVINGS TIME occurs it appears to no longer perform a DIFFERENTIAL backup. Instead, ROBOCOPY starts copying as if it were the very first time. I know there is a ‘DST’ optional flag available but when using it, DST appeared to have no influence on the execution (i.e., it still treats my copy as if it were the very first time). This adds a lot of time since my ROBCOPY has many files in many subdirectories.
So my questions are:
1) why does DAYLIGHT SAVINGS TIME force ROBOCOPY to start as if it had never performed a copy on my files before?
2) what is the purpose of the DST flag?
3) how can I get ROBOCOPY to treat copying my files the same way as if DAYLIGHT SAVINGS TIME had not occurred?
Thanks,
Dan
Hello. I just have gotten in touch with Robocopy and your article is amazing. It helps me lot to understand.
I am currently viewing a robocopy scheduled job with the options (lets call them option 1) /MIR /V /NP /R.10 /W:30. The log file always shows options (lets call option 2): *.* /V /S /E /DCOPY:DA /COPY:DAT /PURGE /MIR /NP /R:10 /W:10. Viewing the log file, it says that many files are always changed and optimized every ten minutes. I may change 2 to 7 files each week. At the end in the log file, it says that no file was changed but skipped. This output confuses me a bit because one given information should exclude the other given information.
My question is: does the robocopy scheduled job work as defined by option 1 or option 2? Can you provide me come clues or insight experience what I can check and do? 🙂
Simple and to the point for your clear writeup. Helpful to include script or link creating basic task schedule in windows. Thanks
how we can validate the checsum of the copied file to make sure we have copied everybit of source to the destination.
Roboxopy does not have a checksum option. You might try xxcopy it has a verify switch.
PowerShell also has the get-filehash command.
Hi!
I use robocopy for backup different data from server to local machine using RDP and using key /z, /ipg, and using UNC-path. But i can’t understand how working /ipg key. Different values no matter. With bandwidth 100 Mbit/s and any /ipg i get about 3 Mbit/s. Without /ipg copying owns full bandwidth and RDP often looses the link then backup stops.
I know what it isn’t the best way to backup but i use what i can.
I don’t ask about help though if you can to advise something i will glad.
That’s robocopy expression in powershell file .ps1
$SourceDir = “c:\DataForBackup”
$DestinationDir = “\\tsclient\D\Backup”
robocopy $SourceDir $DestinationDir /s /z /r:2 /dcopy:da /copy:dat /xx /ipg:3
Hi, any help here would be greatly appreciated. how to I get to following to output to a log file:
robocopy . . test.slg /l /s /fp /ndl /v /MIN:10000 | findstr /I /L /C:” same”
the purpose of the command above is to give me a list of all files in the directory run it from of a file called “test.slg” that is greater than 10000 bytes.
It appears to be working but i need to write the results to a file.
/Log:C:\Log\robocopy-mylog.txt
Will write a log file called “robocopy-mylog.txt” to C:\Log\ directory on the server you run the command on
🙂
It is one of the best examples I’ve seen. I learned a great deal. Thank you
I’m having a great deal of difficulty getting my results to match yours (and five other sites covering robocopy). I’ve now spent about 3 hours typing essentially the same thing and not getting consistent results at all.
Can you give me an example of which command or example you are having issues with?
It was really a great article. Thank you!
The best Robocopy article I’ve ever found. Thanks heaps Robert!
Perfect and great examples just what I needed 🙂