In this post, I will demonstrate how to change the IP address on a domain controller.
Before you change the IP address it is very important to run through a checklist. Any changes to a domain controller can disrupt services and impact business operations. See my checklist below.
For this demonstration, I have the following settings.
- DC1, IP Address 192.168.100.10
- DC2, IP Address 192.168.100.11
- DC3, IP Address 192.168.100.12
I’m going to change the IP on DC2 to 192.168.100.15. If you are changing to a different subnet there are additional things to consider that I go over in the checklist.
Pre-Change Checklist
I recommend reviewing each item on this checklist before making changes. I’ve migrated many domain controllers from small to large networks and these steps have been a lifesaver. If you do this often you will probably come up with your own checklist.
Do You Have Multiple Domain Controllers?
It is best practice to have multiple domain controllers and backup Active Directory for disaster recovery reasons. I do not recommend making major changes to domain controllers if you have a single domain controller. If you have multiple DCs and the change breaks the server you can still operate from a secondary DC.
You can get a list of all domain controllers in your domain with this command:
Get-ADDomainController -filter * | select hostname, domain, forest
Check FSMO Roles
Does the DC hold any FSMO roles? Easily check with this command:
netdom query fsmo
Below you can see all my FSMO roles are on DC1.
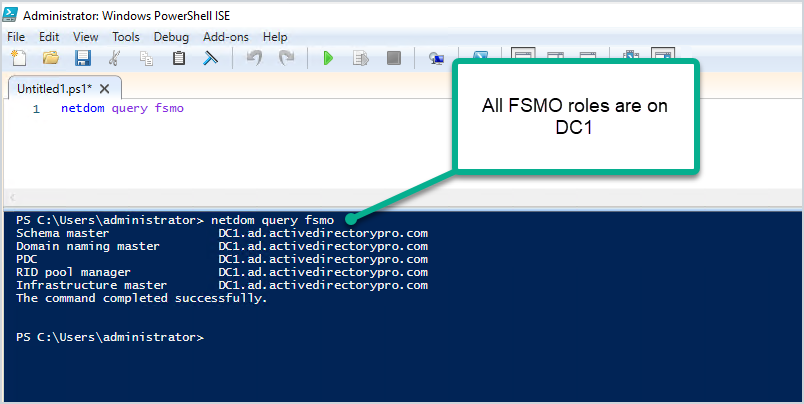
To help avoid disruption to authentication services you could move the FSMO roles to another domain controller that is on the same site. Keep in mind you would need to move any services that are manually configured to the server.
I’m making changes to DC2 which has no FSMO roles running on it.
Check Installed Roles and Features
I recommend checking what services are running on the server, you don’t want to change the IP and then have something break because you didn’t know it was a DHCP server or a web server.
- Check the control panel for installed software
- Check the installed roles and features
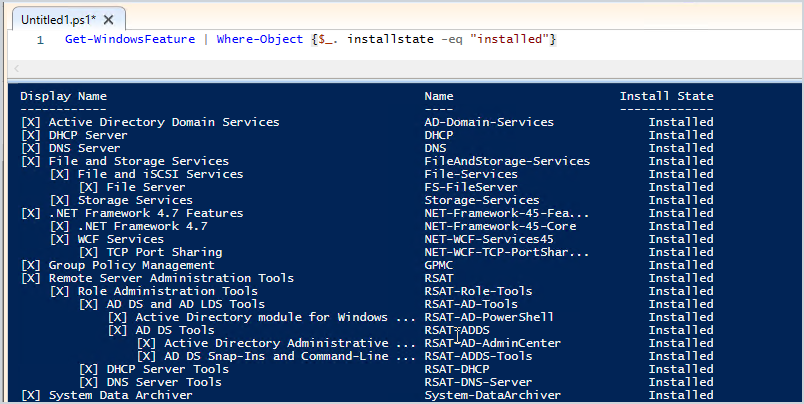
You can quickly check the installed roles and features with this command:
Get-WindowsFeature | Where-Object {$_. installstate -eq "installed"}
Below you can see my DC2 server has some critical services running on it including DHCP and DNS. I’ll need to consider this when changing IP addresses.
Find Devices Pointing to the Domain Controller with Wireshark
Wireshark can help you identify what systems are pointing to your domain controller for various services like DNS, DHCP, and so on. This might be the most important pre-change step.
Useful Wireshark filters:
- dns
- dhcp
- ldap
- DCERPC
Here is an example:
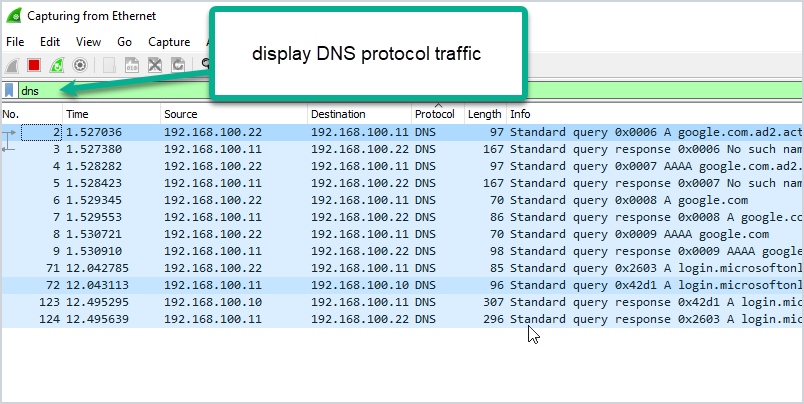
The packet capture shows that system 192.168.100.22 is using DC2 for DNS. I’ve done a large migration of domain controllers before and used Wireshark to help identify systems that are still pointing to old domain controllers. From experience, you will probably be surprised at how many systems are hardcoded to your DCS.
Check Domain Controller Health
You need to check that your domain controller is healthy before making the change. Any issues could result in replication issues, DNS issues, and so on. I’ve got a complete guide on how to use dcdiag its actually very easy to use. Just open the command prompt on your server and run the command.
dcdiag
Check The Health of DNS
By default, dcdiag does not test DNS. Use this command to run a complete test on DNS.
dcdiag /test:dns /v
Make sure the server passes all tests and the name resolution SRV record is registered.
Run Best Practice Analyzer
The best practice analyzer can find configuration issues according to Microsoft best practices. The BPA tool is not always accurate so you need to double check its findings. Also, any errors or warnings do not mean your migration will fail. It can just help you find any major misconfigurations according to Microsoft best practices.
Here is a scan from my DC2.
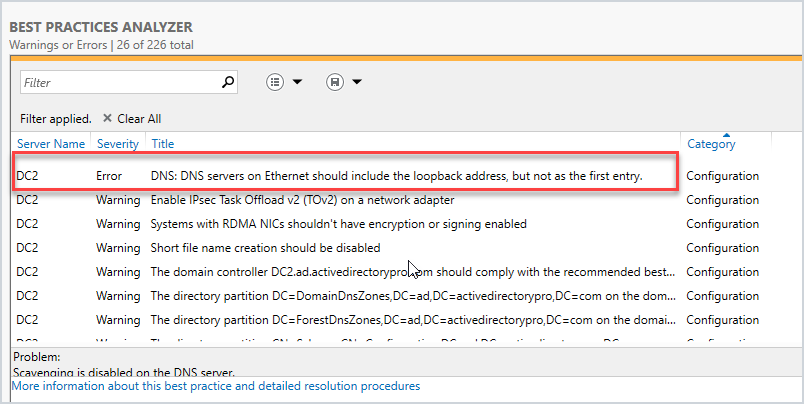
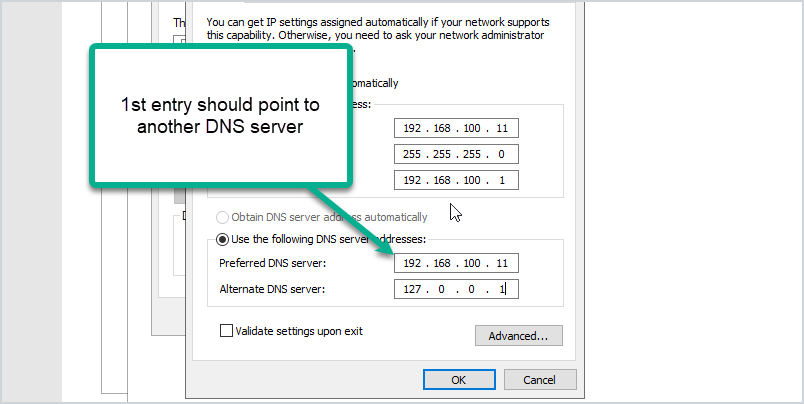
I’ve got a warning that the loopback address is not included on the ethernet adapter settings. The best practice is to point the preferred DNS server to another DNS server (not itself).
Here is an example of how it should be configured:
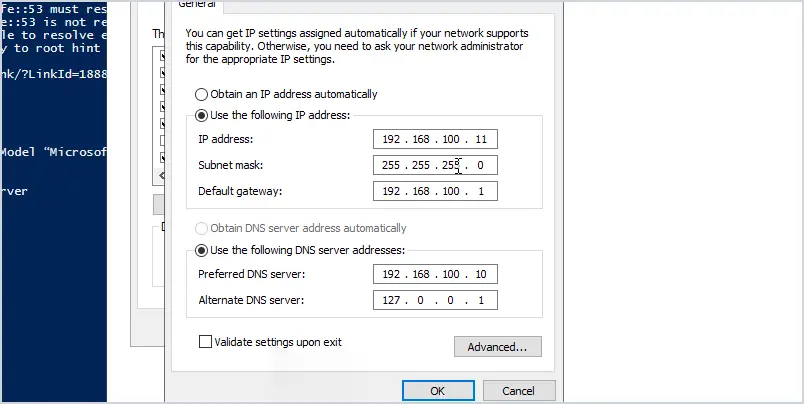
My DC2 IP address is 192.168.100.11. You can see I set the preferred DNS to another domain controller (DC1) and the alternate is set to the loopback address. This is Microsoft’s best practice.
Again any warnings or errors the best practice analyzer finds doesn’t mean your migration will fail. But to help avoid any potential migration issues I recommend running this tool and reviewing the scan results. It might even fix some issues you weren’t aware of.
Are You Changing Subnets?
If you will be changing to a new subnet then consider the following:
- If the server also runs DHCP you will need to update the helper address on your switch or firewall.
- Add the new subnet to Active Directory sites and services.
Check Firewall Rules
Are there any firewall rules that will need to be updated? This could be your network firewall and windows based firewalls. I typically have rules on the network firewall that limit network access for critical servers like domain controllers. I would need to update the firewall rules to permit traffic to the new DC IP.
Plan & Schedule the IP Change
I recommend making this type of change during your maintenance window. No matter how much you prepare for changes there is always a potential for something going wrong. You need to have a maintenance window to allow time to resolve any issues. Don’t forget to communicate these changes with your team ahead of time.
How to Change the IP Address of a Domain Controller:
Here are the steps to changing the IP Address on a domain controller.
- Log on locally to the server (console access, don’t RDP or use remote access).
- Change NIC TCP/IP settings
- Change IP Address
- Change subnet mask (if required)
- Change Default gateway (if required)
- Preferred DNS server (should point to another DC in the same site)
- Alternate DNS server (should be the loopback address 127.0.0.1)
- After changing the IP run ipconfig /flushdns to remove local cache
- Run ipconfig /registerdns to ensure the new IP is registered by the DNS server
- Run dcdiag /fix to ensure service records are registered.
Video Tutorial
Done. Nice work!
Post Change Checklist:
- Update DHCP settings if DC server is also DNS server
- If subnet address changed then make sure AD Sites and services is updated
- Update clients that use static ip address
- Update other DCs nic settings (if needed)
- Run commands dcdiag and dcdiag /test:dns /v to check for issues.
- Verify DNS is working, you can do this with nslookup.
- Test authenticating to the DC. You can do this by manually settings a client IP DNS settings to the IP of the DC or using PowerShell and specify the authentication server.
- Continue to monitor old IP with wireshark – This can be done by a span port or assign the DCs old IP to a computer with wireshark installed. This is useful to help find systems that are still using the old IP of the DC.
- Update firewall rules if needed.
- If a client system is having issues try to flush the local dns cache with ipconfig /flushdns command
- Changing the IP address on the DC should not affect any shares on the server as long as DNS is updated.
I hope you found this article useful. You might also like to check out my guide on running an Active Directory health check.

Very useful guide, Robert. Thank you! Do you have similar post for changing the host name of a Domain Controller?
From my research most recommend to not rename a domain controller. If you must here is some documentation from Microsoft.
https://techcommunity.microsoft.com/t5/core-infrastructure-and-security/rename-dc-to-preserve-old-name-and-ip-address/ba-p/850935
Thank you Robert. Great piece of work!!
Hi Robert, I’ll be changing one of my domain controllers it’s IP. I found your steps and will be using it. Great thanks for it from The Netherlands. 😉
hi Robert, thank you for sharing. for important and key steps here.
😀