In this guide, you will learn how to give OneDrive access to another user in Office 365. I’ll show you how to give access using the 365 Admin Center and by using PowerShell.
Some common reasons for this:
- An employee has left the company and you need access to their OneDrive Files
- An Employee is on vacation and you or another employee needs access to their files.
Let’s get started!
Step 1. Grant OneDrive Access Using SharePoint Admin Center.
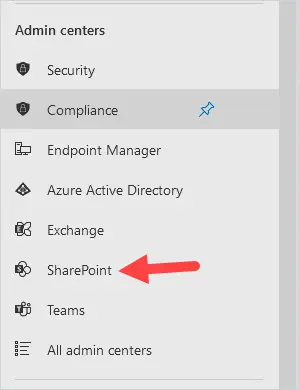
1. Log into the Microsoft 365 Admin Center and select Sharepoint under Admin Centers.
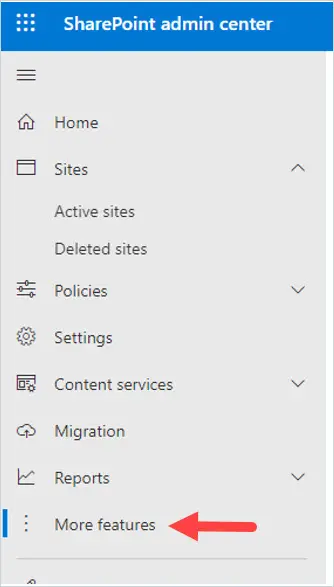
2. In the left-hand side of the screen, select More Features.
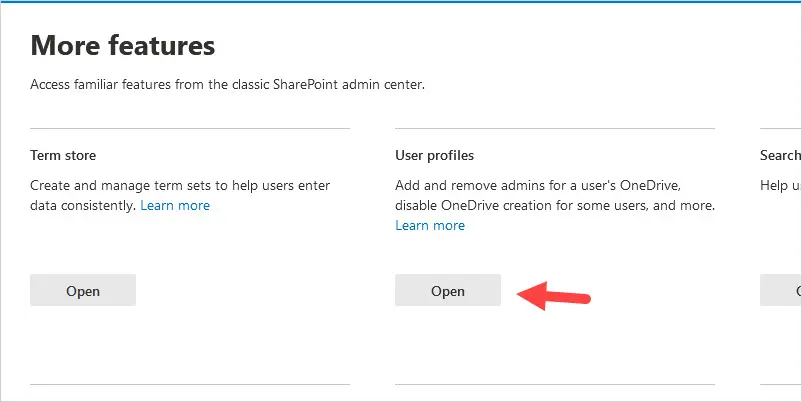
3. Click on Open under User Profiles.
4. Click on Manage User Profiles under People.

5. Click in Find profiles and type in the name of the employee to whose OneDrive you are going to give access to.
For example, I’m going to give employee Jack Ackles access to the employee ABC User’s OneDrive. So, I’m going to enter in ABC User and click on Find. The profile will show up below Active Profiles.

6. Click on the profile and select Manage site collection owners.

7. Where it says Site Collection Administrators, type in the name of the person you want to give access to. I’m going to type in Jack Ackles. Then click on the checkmark to check names.
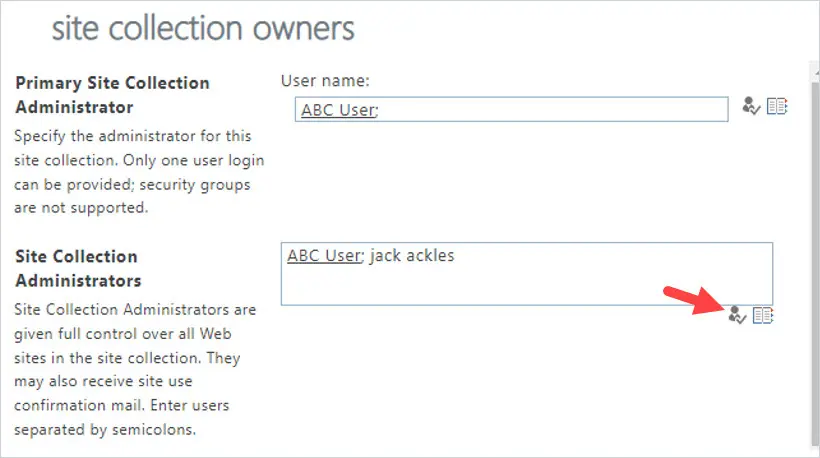
8. Once the system verifies the user, the name will be underlined. Click Ok at the bottom to save changes.
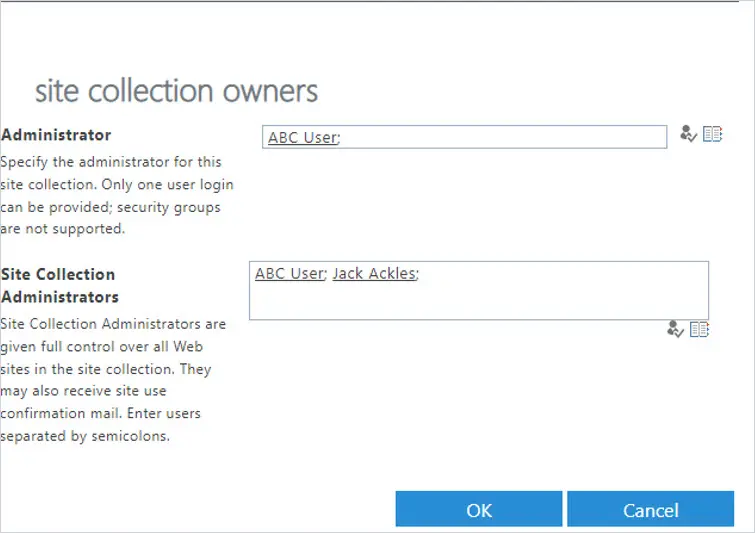
Now you need to send the user the OneDrive URL to access it. In this case, I’m going to send Jack Ackles the OneDrive URL for the user ABC User. Move to step 2 to locate the OneDrive URL.
Step 2. Locate the OneDrive URL
You can locate the OneDrive URL in a couple of different ways.
Method 1 – Back under the SharePoint Admin Center – click Open on User Profiles (Step 5 above), find the user profile, click on the user profile, and select Manage Personal Site. Copy the URL.

The user’s OneDrive account will open.
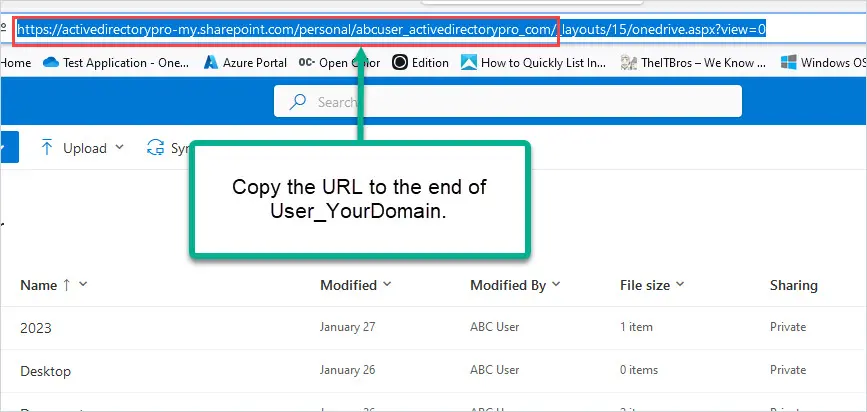
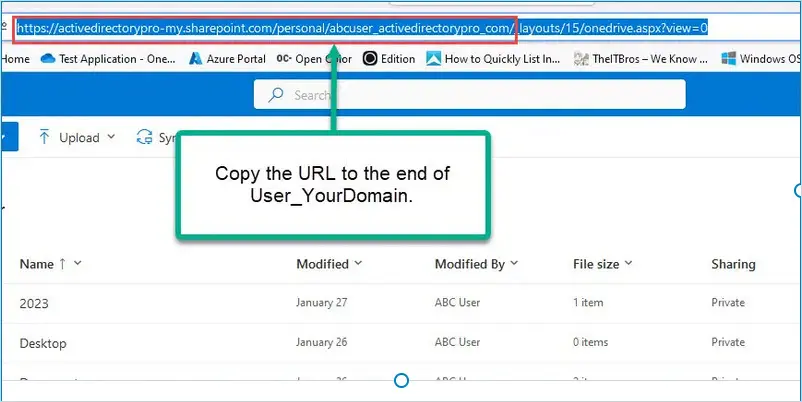
Do not copy past the user_yourdomain portion of the URL.
For example, the ABC users’ OneDrive URL is.
https://activedirectorypro-my.sharepoint.com/personal/abcuser_activedirectorypro_com/_layouts/15/onedrive.aspx?view=0But I just need to copy the below URL to send to user Jack Ackles.
https://activedirectorypro-my.sharepoint.com/personal/abcuser_activedirectorypro_comMethod 2 – Log into Microsoft 365 Admin Center, from the left menu click on Users. Click on the User, then select the OneDrive tab. Click on Create link to files under Get access to Files.
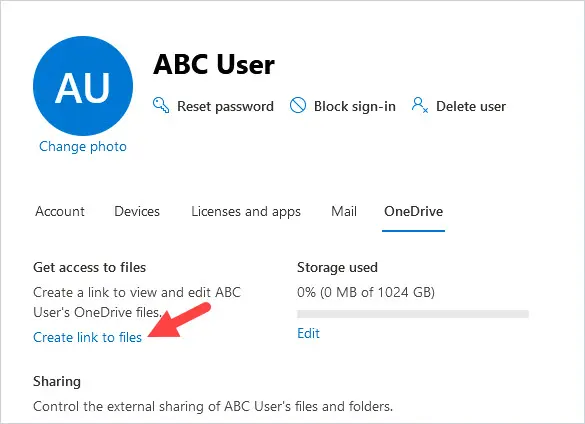
Copy the URL displayed and send it to the user that you gave access to. In this case, I’m going to send the link to Jack Ackles since I gave him access to ABC User’s OneDrive.
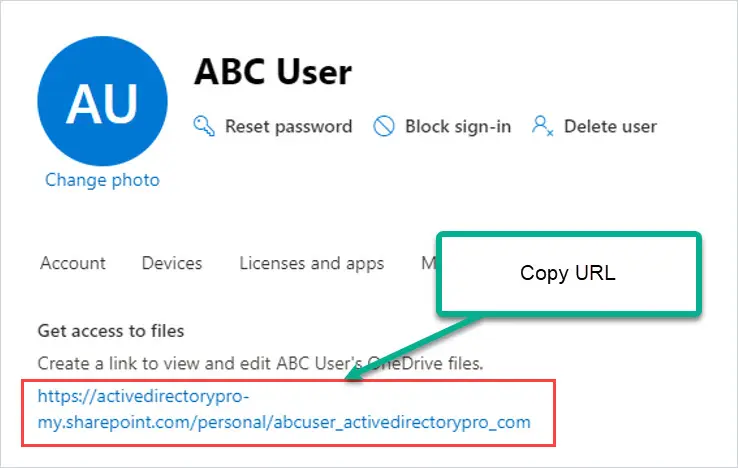
Once you share the OneDrive URL with the user they should be able to access the other user’s OneDrive files. If an employee is no longer employed you might want to move OneDrive files to Another OneDrive account. This is often requested so that the new employee will have the previous employee’s files.
That completes the steps for giving OneDrive Access to another using the 365 Admin center. Next, I’ll walk through giving another user access by using PowerShell.
Give OneDrive Access to Another User with PowerShell
1. To complete these steps you will need to install the SharePoint Online Management Shell. If you already have the module installed skip to the next step.
To install the module run the command below.
Install-Module -Name Microsoft.Online.SharePoint.PowerShell
2. Connect to SharePoint Online using your Admin site URL. Your site url should be your domainname-sharepoint.com. You can also view it by going to the 365 Admin center and clicking on SharePoint.
Connect-SPOService -URL https://activedirectorypro-admin.sharepoint.com3. To get the URL of a OneDrive user, we are going to use the Get-SPOSite cmdlet.
Example 1. In this example, I am looking for OneDrive URL’s only that contain the name “Jack”.
Get-SPOSite -IncludePersonalSite $true -Limit all -Filter "Url -like 'jack'" | Select -ExpandProperty Url
Example 2. In this example, I am looking for OneDrive URL’s only that contain the name “ABC”.
Get-SPOSite -IncludePersonalSite $true -Limit all -Filter "Url -like 'ABC'" | Select -ExpandProperty Url
4. Next we are going to use the Set-SPOUser cmdlet to give access.
In this example, I am giving Jack Ackles access to ABC User’s OneDrive.
Set-SPOUser -Site https://activedirectorypro-my.sharepoint.com/personal/abcuser_activedirectorypro_com -LoginName jack.ackles@activedirectorypro.com -IsSiteCollectionAdmin $true
Set-SPOUser -Site https://activedirectorypro-my.sharepoint.com/personal/abcuser_activedirectorypro_com -LoginName jack.ackles@activedirectorypro.com -IsSiteCollectionAdmin $falseRevoke Access to OneDrive Using SharePoint Admin Center
1. Log into the Microsoft 365 Admin Center and select SharePoint under Admin Centers.
2. In the left-hand side of the screen, select More Features.
3. Click on Open under User Profiles.
4. Click on Manage User Profiles under People.
5. Click in Find profiles and type in the name of the employee to whose OneDrive you want to remove access. For example, I’m going to remove Jack Ackles access to the employee ABC User’s OneDrive. So, I’m going to enter in ABC User and click on Find. The profile will show up below Active Profiles.
6. Click on the profile and select Manage site collection owners.
7. Where it says Site Collection Administrators, remove the name of the person you want to revoke access. I’m going to remove Jack Ackles. Click Ok at the bottom to save changes.

