Import Users into Active Directory from CSV
In this guide, you will learn how to import users into Active Directory from a CSV file using the AD Pro Toolkit. With the Toolkit all you need to do is download the included csv template and fill out the requires fields to easily create new accounts.
Table of Contents
- How to Import Active Directory Users from CSV
- Supported Attributes
- Add Additional Attributes to the CSV
How to Import Active Directory Users from CSV
Step 1. Download CSV Template
From the left menu click on “Create Bulk Users”.

Click on “Download CSV Template”.

- This CSV includes an example of two user accounts.
- The CSV template includes 33 user attributes. This covers the most common attributes for creating new accounts.
- Additional attributes can be added to the template (see the section Add Additional Attributes for details)
Step 2. Modify the CSV Template with User details
Open the CSV template and enter the account details. The below columns are required; all other fields are optional. You can delete the columns you don’t need.
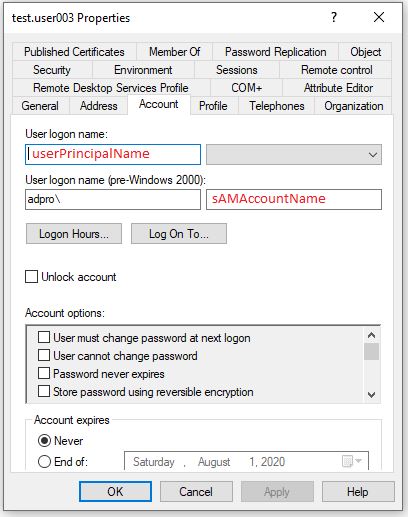
- SamAccountName = This will be the users logon name.
- password = users password. Make sure it meets your password requirements.
- givenName = First name
- sn = Last name
CSV Example

Tips
- Remove unused columns: You can remove any column from the CSV you don’t need. This can make working with the CSV template much easier. Just make sure you have the 4 required columns listed above; all other columns can be removed.
- CSV Cheat Sheet: Use the CSV Cheat Sheet from the resources section if you do not understand the column names in the csv template.
- Run a small test import: Run a small test import first (1-2 accounts) to ensure the CSV is correct and the accounts import as needed.
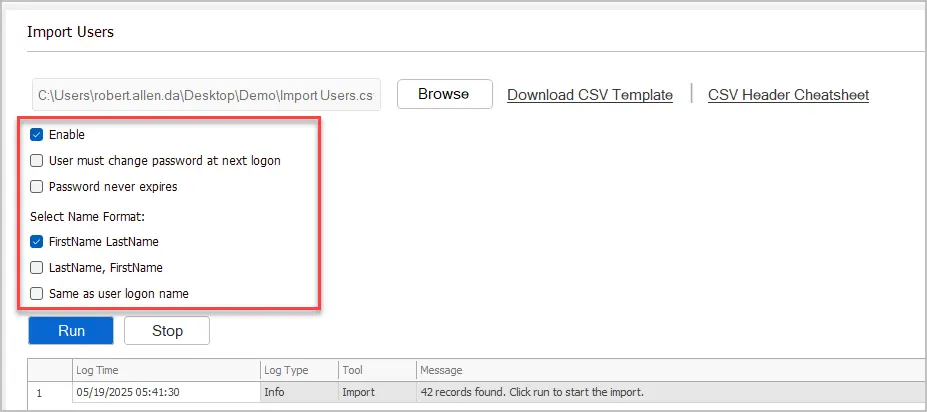
Step 3. Run the Bulk Create Users Tool
At this point you should have a csv file filled out with your user details. Now you are ready to start the import process.
- Click on “Bulk Create Users”.
- Click “Browse” and select your csv file.
- Enable or disable any of the following options.

- Enable: This will enable or disable the account when it is created (enabled by default)
- User must change password at next logon: This option will require users to change their password at first logon.
- Name format
- FirstName LastName: Sets the name format to FirstName + LastName
- LastName, FirstName: Sets the name format to LastName, + FirstName
- Same as user logon name: Sets the name format to logon name (samaccountname)
- Click “run” to start the import.

Supported Attributes
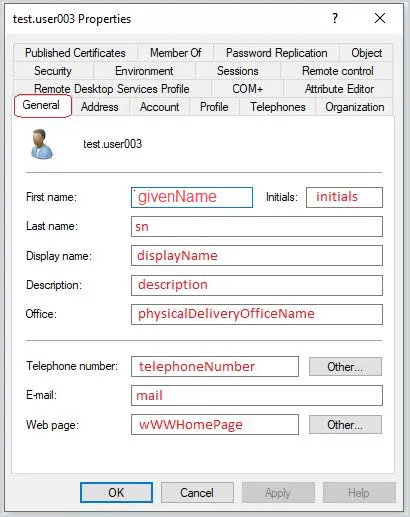
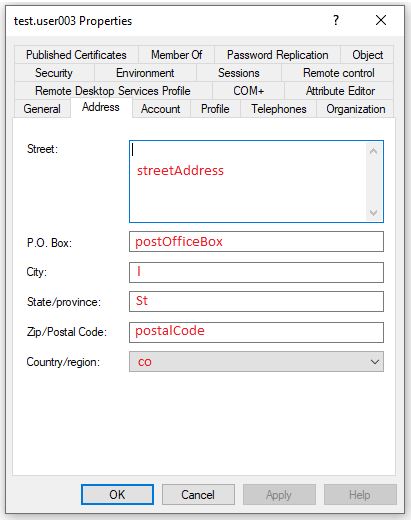
The csv file uses the LDAP name which can be different than the fields you see in Active Directory users and computers.
For example, in the csv to set the users First name you would enter that in the givenName column. Below are some screenshots that show the ldap to Active Directory names.
General Tab
Address Tab
Account Tab
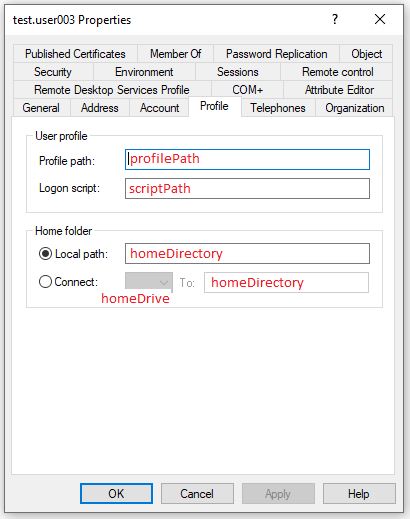
Profile Tab
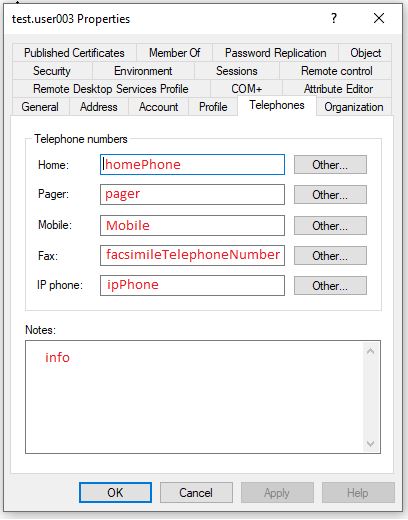
Telephones Tab
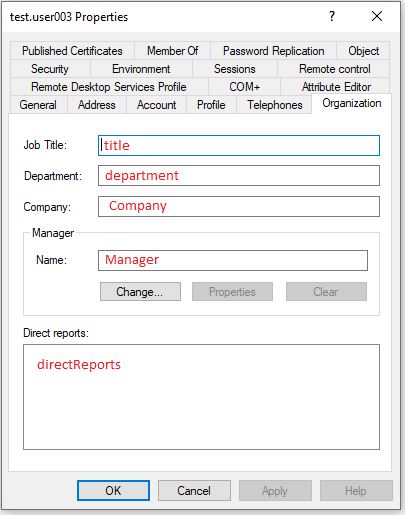
Organization Tab
| LDAP Name | Active Directory Field | Description |
|---|---|---|
| sAMAccountName | User logon name (pre-windows 2000) | This will be the users logon name |
| password | N/A | The users password |
| ou | N/A | The organizational unit you want the account created in. |
| memberof | The groups you want the user added to. | |
| userPrincipalName | User logon name | The user logon name under the account tab. |
| givenName | First name | The users first name |
| initials | initials | The users initials |
| sn | Last name | The users last name |
| displayname | Display name | The users display name |
| description | description | The description field on the general tab |
| physicalDeliveryOfficeName | Office | The office field on the general tab |
| telephoneNumber | Telephone number | The Telephone number on the general tab |
| E-mail on the general tab | ||
| wwwHomepage | Web page | Web page on the general tab |
| streetAddress | Street | The users Street field on the Address tab. |
| postOfficeBox | P.O Box | Users P.O Box on the address tab |
| l | City | |
| st | State/province | |
| postalCode | Zip/Postal Code | |
| c | Country | |
| profilePath | Profile path | |
| scriptPath | Logon script | |
| homeDirectory | Home folder > local path | |
| homePhone | Home | |
| mobile | Mobile | |
| ipPhone | IP phone | |
| title | Job Title | |
| department | Department | |
| company | Company | |
| employeeid | N/A | |
| employeenumber | N/A | |
| manager | Manager | |
| proxyAddresses | N/A |
Add Additional Attributes to the CSV
You can add additional user attributes to the CSV file; you just need to know the LDAP name. You can find the LDAP name by opening the attribute editor in Active Directory Users and Computers. You could also use PowerShell to list all user account properties.
To see the attribute editor, you first need to enable the advanced features in Active Directory Users and Computer
Click view from the top menu then select advanced features.

Now when you open an account you will see the attribute editor tab.
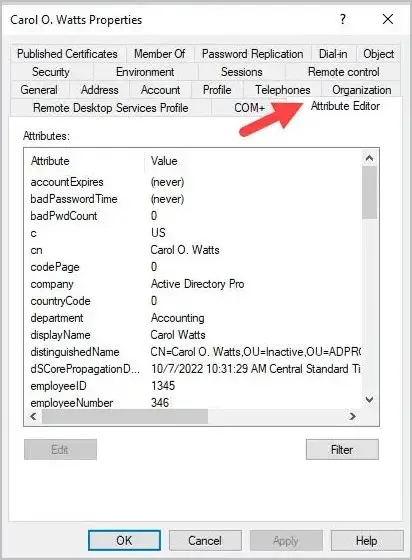
The attribute editor screen will show you all the user LDAP properties.
Now just find the attribute name and add it to the CSV. For example, I want to add information to the other Home telephone section for users.
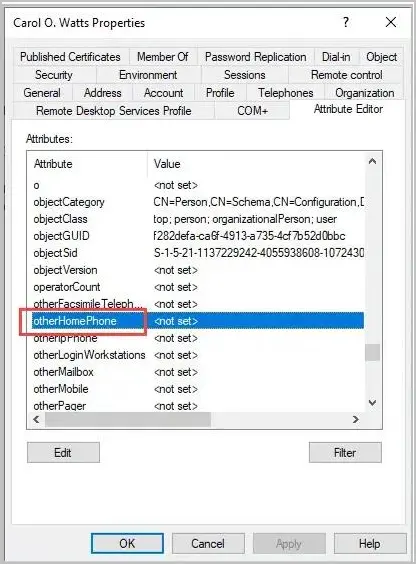
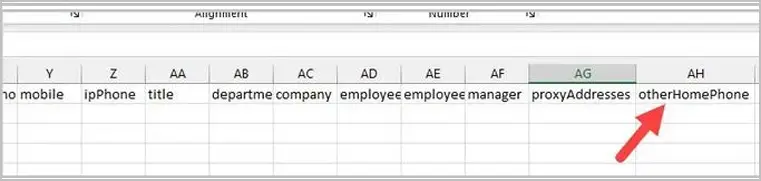
In the attribute editor, I see the name is “otherHomePhone”. I will add this to the CSV.
All done. That is how you add additional attributes to the CSV file to import with new accounts.