In this guide, you will learn about the three account lockout policy settings and how to properly configure each policy setting.
I’ll be referring to the recommended account lockout policy settings from both the Windows Security Baseline (aka Microsoft Security Toolkit) and the CIS benchmarks.
Table of contents:
- What are Account Lockout Policies?
- Account Lockout Policy Settings & Best Practices
- How to Create an Account Lockout Policy
What are Account Lockout Policies?
An account lockout policy is a set of three group policy settings that control when and for how long a user account is to be locked out.
This policy is critical for security as it can help prevent malicious users or hackers from accessing your account and computer systems.
What is a lockout?
When you have an account lockout policy configured a user account will be locked out after so many failed login attempts.
For example, if a hacker entered the wrong password three times the account would be locked out if there is a properly configured lockout policy. This helps to prevent unauthorized access to your network. If no policy is configured or was incorrectly configured a hacker could keep guessing an account’s password.
By default, Active Directory has no account lockout policy.
In the next section, I’ll go over each policy setting, the default value, and the recommended settings.
Related: How to Find the Source of Account Lockouts
Account Lockout Policy Settings and Best Practices
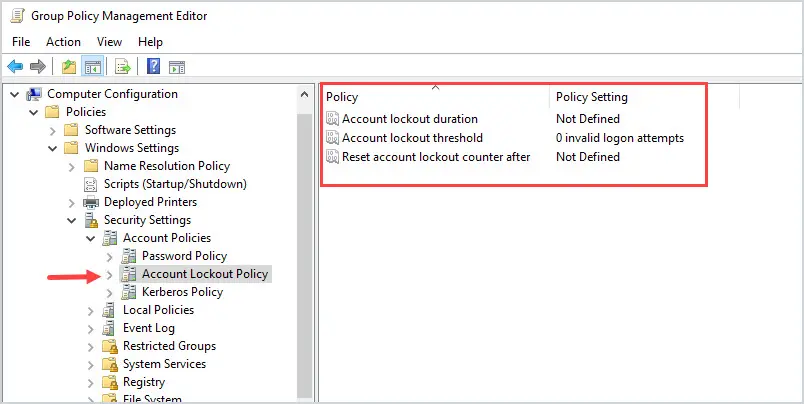
In group policy the lockout policy settings are located at:
Computer Configuration -> Policies -> Windows Settings -> Security Settings -> Account Policies -> Account Lockout Policy
Here is a screenshot of the default settings. By default, these policy settings are not defined.
It’s common for these settings to be configured using the Default Domain Policy GPO, but you can add them to a new or existing GPO. It’s up to you.
Account Lockout Duration
The account lockout duration setting determines the number of minutes that an account is locked out before it automatically unlocks.
If you set this policy to 0 then the account will not automatically unlock and must be unlocked manually by an administrator.
For example, if the account lockout duration was set to 15 minutes and the user “joe.smith” became locked out. It would automatically unlock after 15 minutes.
Recommended settings:
- Windows Security Baseline: 15 minutes
- CIS Benchmarks: 15 or more minutes
Account lockout threshold
The account lockout threshold setting determines the number of failed logon attempts that caused a user account to be locked out.
When an account is locked-out, it cannot be used until it is manually reset or automatically reset by the lockout duration policy.
For example, if the lockout threshold was set to 5 and the user “joe.smith” tried to logon 5 times with the wrong password, the account would be locked. And Joe would not be able to logon until the account was manually unlocked by an administrator or reset by the lockout duration policy.
Recommended settings:
- Windows Security Baseline: 10
- CIS Benchmarks: 5 or fewer but not 0
Microsoft says:
The threshold that you select is a balance between operational efficiency and security, and it depends on your organization’s risk level. To allow for user error and to thwart brute force attacks, Windows security baselines recommend a value of 10 could be an acceptable starting point for your organization.
https://learn.microsoft.com/en-us/windows/security/threat-protection/security-policy-settings/account-lockout-threshold
In my opinion, I think 10 allows too many password attempts. I would instead recommend 5 or fewer for the lockout threshold.
Reset Account Lockout Counter After
This policy setting determines the time in minutes that the failed logon attempt counter resets to 0 bad logon attempts.
For example, if the user “joe.smith” tries to logon and enters the wrong password, this will increment the failed logon attempt counter. This policy will reset that counter to 0.
It is recommended that this policy is set to less than or equal to the account lockout duration.
Recommended settings:
- Windows Security Baseline: 15 minutes
- CIS Benchmarks: 15 or more minutes
So now that you know what each setting does and its recommended settings, let’s walk through creating an account lockout policy.
How to Create an Account Lockout Policy
For these steps, I’ll use the CIS benchmark’s recommended settings.
Step 1: Check Account Lockout Policy with PowerShell
It is a good idea to check your domain’s current lockout policy before modifying or creating a new one.
You can easily do this with the below PowerShell command.
Get-ADDefaultDomainPasswordPolicy | Select LockoutDuration,LockoutObservationWindow,LockoutThreshold | FLThe screenshot below is from my test lab.

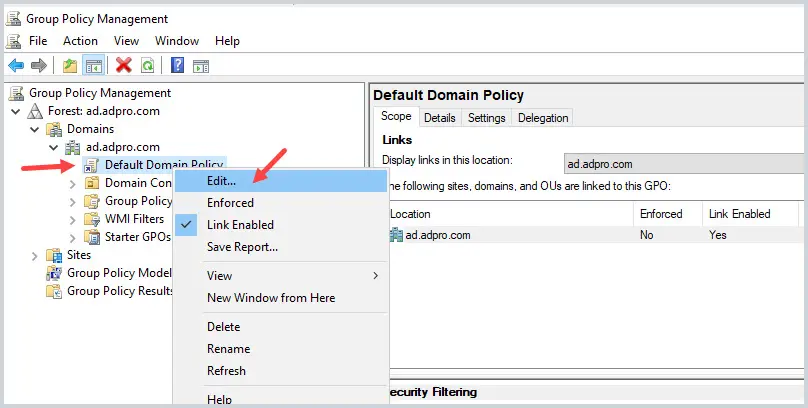
Step 2: Edit the Default Domain Policy
If you prefer, you can add these settings to another GPO or create a new one. Microsoft by default includes a password policy in the default domain policy, so I like to keep the lockout policy in the same GPO.
Step 3: Modify the Account Lockout Policy
In the default domain policy navigate to the account lockout policy section.
Computer Configuration -> Policies -> Windows Settings -> Security Settings -> Account Policies -> Account Lockout Policy
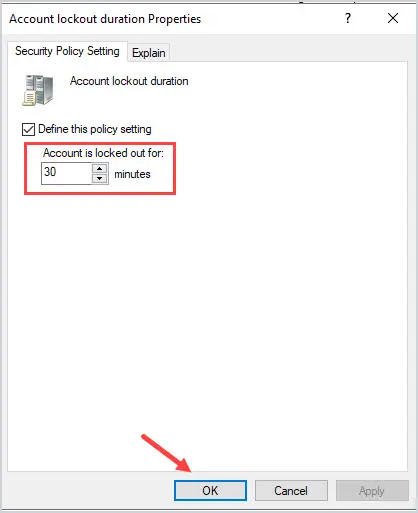
To modify each policy setting just double-click the policy to edit its settings. For example, I opened the “Account lockout duration”, entered 30, and clicked ok.
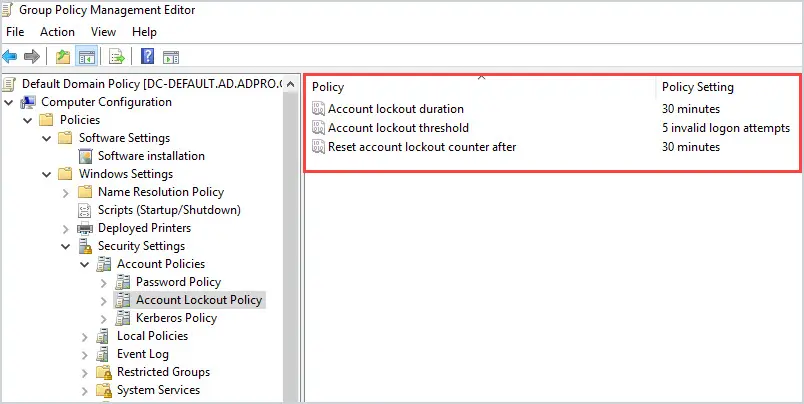
Set the 3 policy settings to your requirements. Again, I’ll use the CIS benchmark recommended settings.
- Account lockout duration: 30 minutes
- Account lockout threshold: 5 invalid logon attempts
- Reset account lockout counter after: 30 minutes
Once completed, all 3 policy settings should then be defined.
Step 4: Test the Account Lockout Policy
To test the policy attempt, logon and enter the wrong password 5 times (or whatever you set the lockout threshold to) and the account should become locked out.
Below is a screenshot of my account being locked out after 5 failed logon attempts.
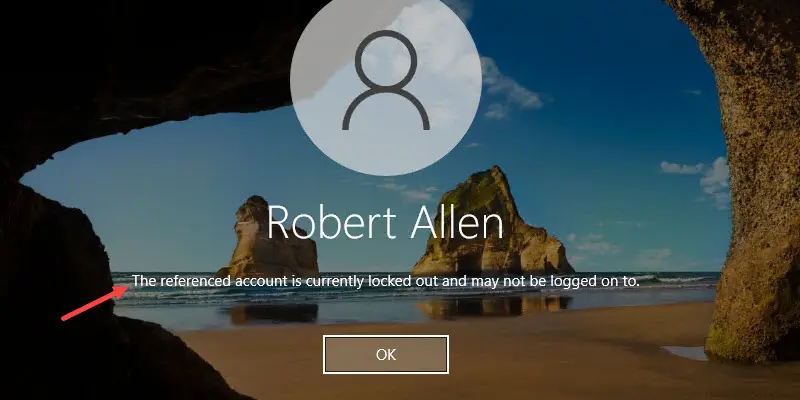
I will now have to wait 30 minutes or have an administrator manually unlock my account before I can attempt to logon again.
That is it for this guide.
If you have questions or comments please post them below.

Straightforward, thanks Robert
Understandable and useful, thanks.