This is a step by step guide to cleaning up group policy. In this guide, I’ll show you how to review your GPOs to determine if they can be deleted or not.
GPO Cleanup Steps:
- Step 1. Create a spreadsheet
- Step 2. Backup GPOs
- Step 3. How to Find Disabled GPOs (AllsettingsDisabled)
- Step 4. How to Find Unlinked GPOs
- Step 5. How to Find Empty GPOs (no policy settings configured)
- Step 6. Review GPO WMI Filters
- Step 7. Review GPO Security Filtering
- Step 8. Review and Cleanup GPOs
Note: In this guide, I’ll be using the group policy reports from the AD Pro Toolkit. This tool makes it very easy to generate a report on all GPO and settings. You can also use PowerShell and the group policy management console to create a report but will take additional steps.
Step 1. Create a Spreadsheet
Yuck, not another spreadsheet. I know but it’s a simple spreadsheet to help you easily identify GPOs that can potentially be removed.
If you are not using the AD Pro Toolkit you can manually create a spreadsheet with these headings:
- GPO Name
- Location
- Status
- UserVersion
- computerVersion
- WMI Filter
- Security Filtering
Using the toolkit select Reports -> All GPOs and click run. Next click Export to CSV.
In the list of reports select All GPOs and click run, then export to CSV.
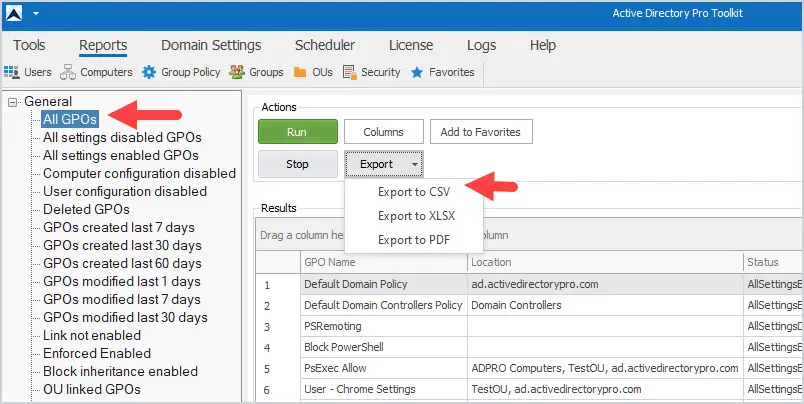
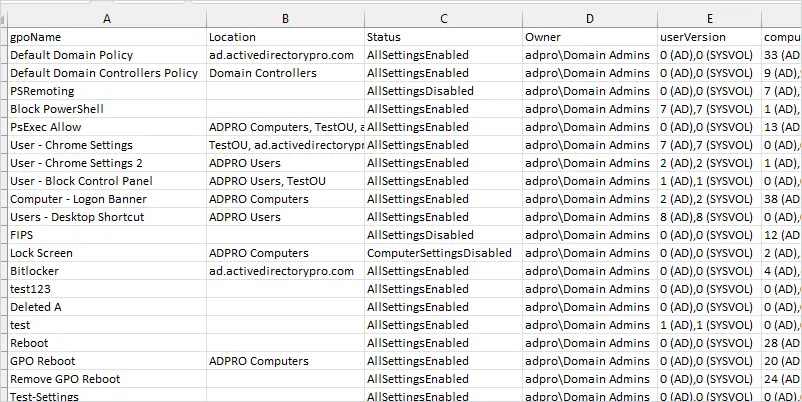
This will create a spreadsheet of all your GPOs and several settings that we will use for the cleanup process.
Step 2. Backup GPOs
Before you make any changes to your GPOs you should back them up.
You need to be able to restore a GPO as quickly as possible in case something breaks after the cleanup process. Refer to the backup gpo guide for steps.
Step 3. How to Find Disabled GPOs (AllsettingsDisabled)
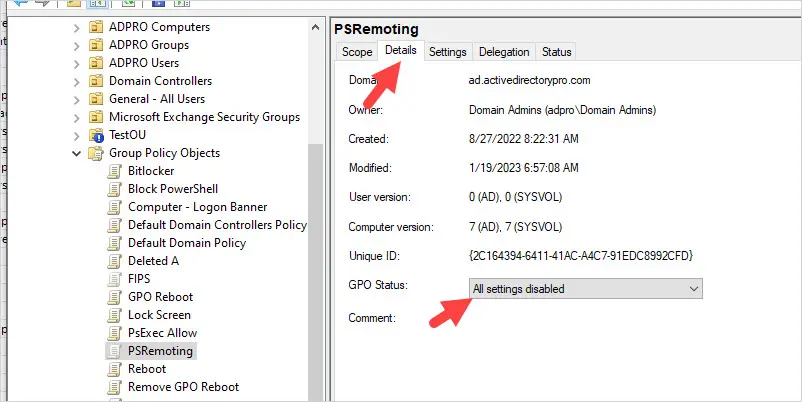
Disabled GPOs are ones that have their status set to “All settings disabled”. This means the GPOs are doing nothing. Even if the GPO is linked to the site or an OU the GPO is not applying any settings.
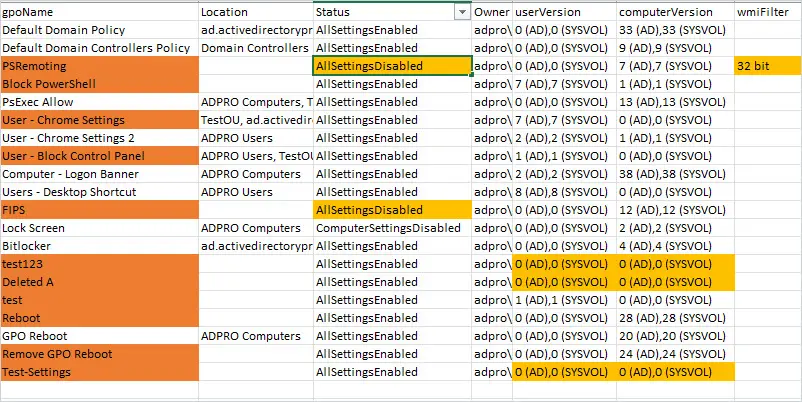
In the spreadsheet, I’m going to highlight any GPOs with orange that have the status set to “AllSettingsDisabled”. I’ll highlight the settings in yellow so I can easily see why the GPO is marked.
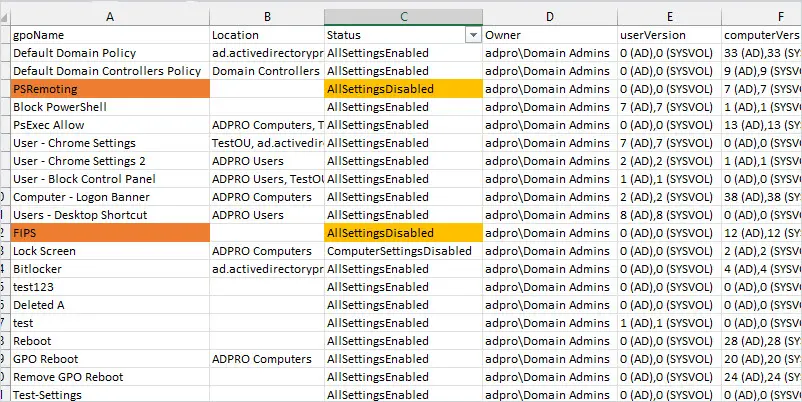
You can see above I have two GPOs “PSRemoting” and “FIPS” that are disabled.
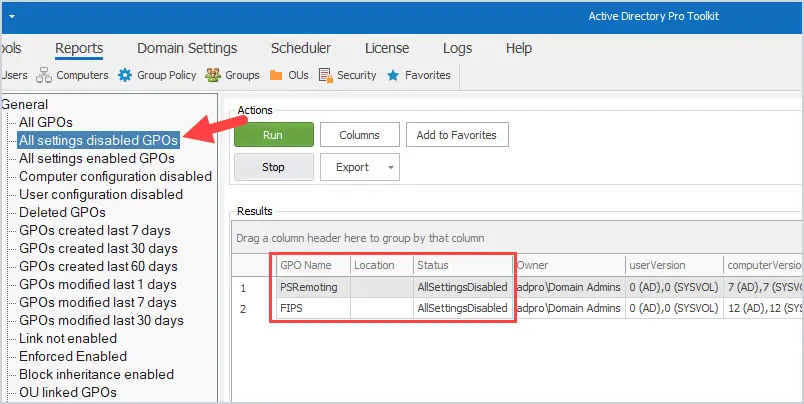
Alternatively, you can list all disabled GPOs by running the “All settings disabled GPOs” report.
In the group policy management console (GPMC) you will need to open each GPO, click on details and look for the GPO status.
Step 4. How to Find Unlinked GPOs
Unlinked GPOs are not linked to the site, domain, or OU. It’s a GPO that would currently not be in use. It’s possible an administrator created the GPO but never linked it or used it and then deleted the link. Whatever the case unlinked GPOs are currently not in use.
In the spreadsheet, unlinked GPOs have the location field blank.
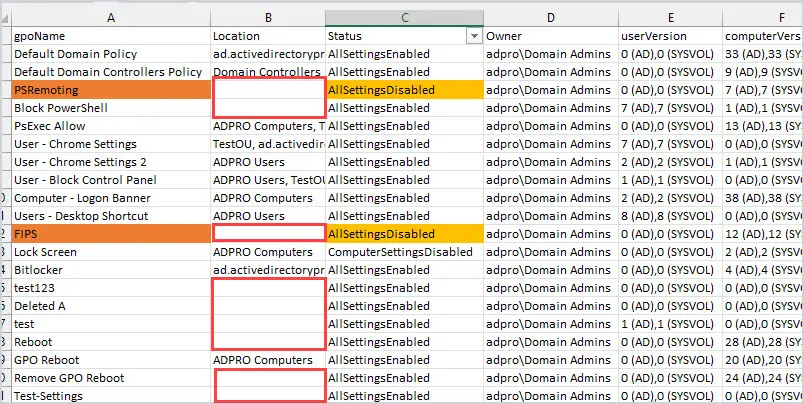
You can see above that I have several unlinked GPOs.
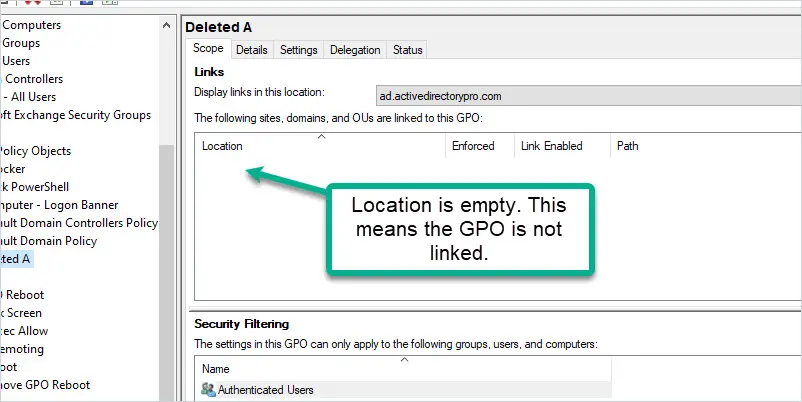
To find unlinked GPOs in the GPMC console you would need to click on each GPO and look at the location box.
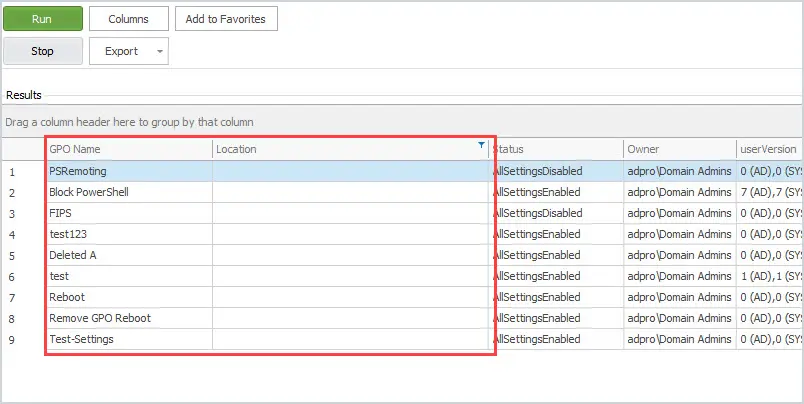
Alternatively, use the toolkit -> ALL GPOs report and review the ones that have nothing in the Location column. With the AD Pro Toolkit, I can also just filter the location column to display only the GPOs that have the location blank.
Step 5. How to Find Empty GPOs
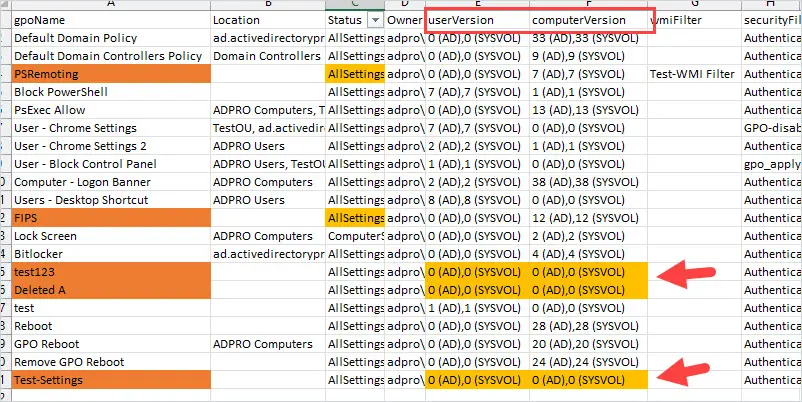
Empty GPOs are group policy objects that have no policy settings. Each time a GPO is modified the userVersion or ComputerVersion is incremented. If you create a new GPO and do not modify any settings the version will be 0. You want find all GPOs that have both the userVersion and ComputerVersion set to 0.
In the spreadsheet, I’ve found three GPOs that are empty.
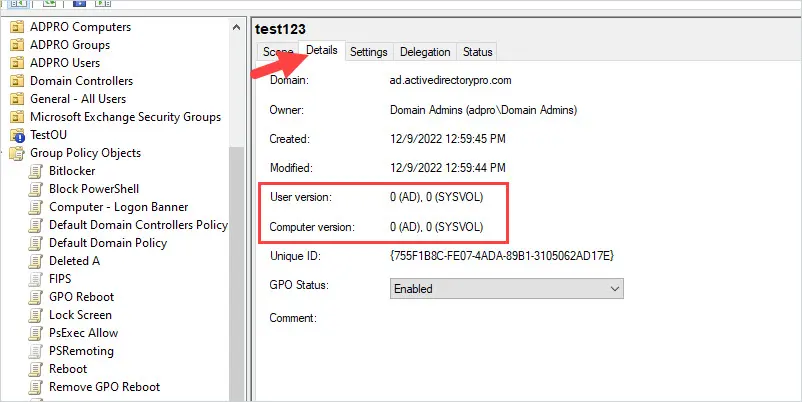
In the GPMC console, you would need to open each GPO and click on the details tab to see the user and computer version.
Step 6. Check GPO WMI Filter
Next, review any GPO that is using a WMI filter. A GPO WMI filter is used to target specific devices for example you want to apply a GPO only to computers running Windows 10.
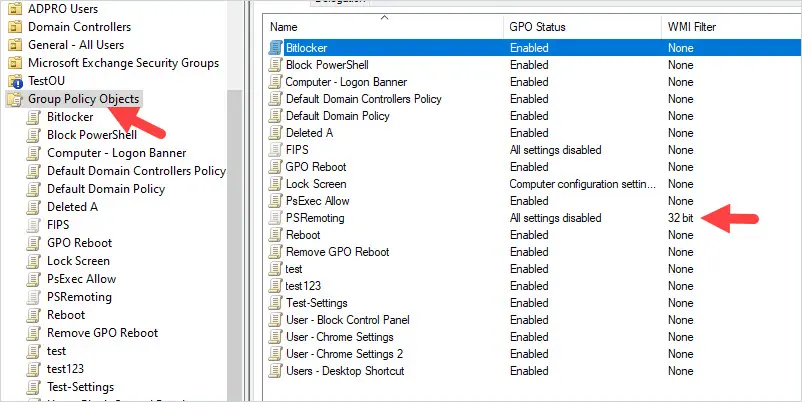
You may have some GPOs that use a WMI filter that i no longer needed. For example, this filter only targets Windows 10 computers that are 32 bit.
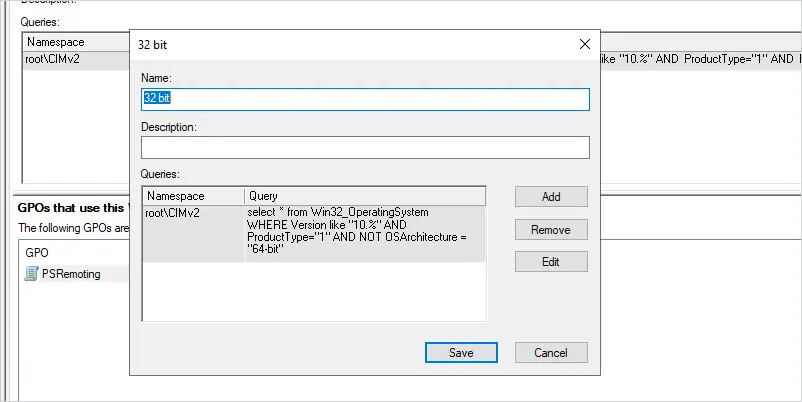
I don’t have any 32bit systems in my network so this GPO is not being used. I’ll highlight this on the spreadsheet. For any GPO that has a wmi filter, you will need to review the WMI query. to determine if it is still valid.
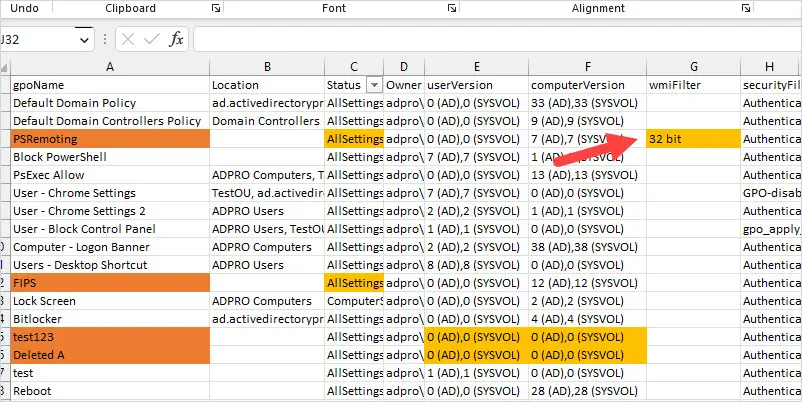
In the GPMC you can see which GPOs have a WMI filter set by clicking on “Group Policy Objects”.
Step 7. Review GPO Security Filtering
The last GPO settings to review are GPOs that have security filtering configured. By default, GPOs can be processed by the Authenticated users group. If someone has added a group or user to the security filtering then this will limit the scope of the GPO.
For example, I have two GPOs that have something other than “Authenticated Users”. I’ll mark these on the spreadsheet and review them.
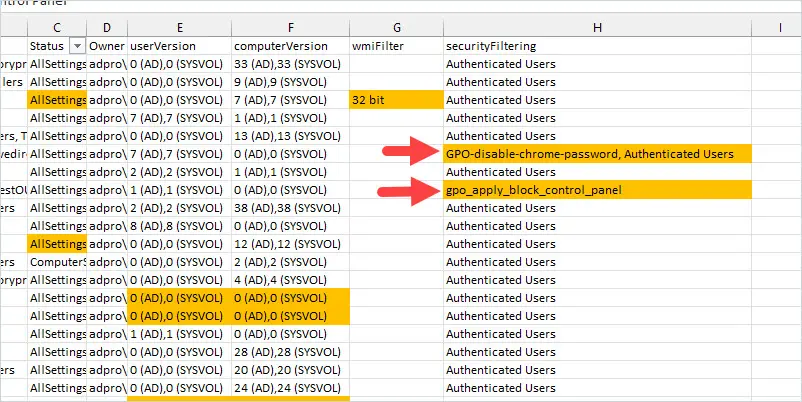
In the above example, the group “gpo_apply_block_control_panel” is configured but when I review the group it has no members. Looking at GPO’s delegation permissions, authenticated users do not have “Apply group policy” checked. This means only members of the “gpo_apply_block_control_pane” group can process the GPO. But because the group has no members the GPO is not being used.
Step 8. Review and Cleanup GPOs
Important: Don’t forget to backup your GPOs before deleting them.
If you completed all the above steps you should now have a spreadsheet like below with a list of GPOs that can potentially be deleted. The next step is to review the spreadsheet with your team and then get approval to remove them.
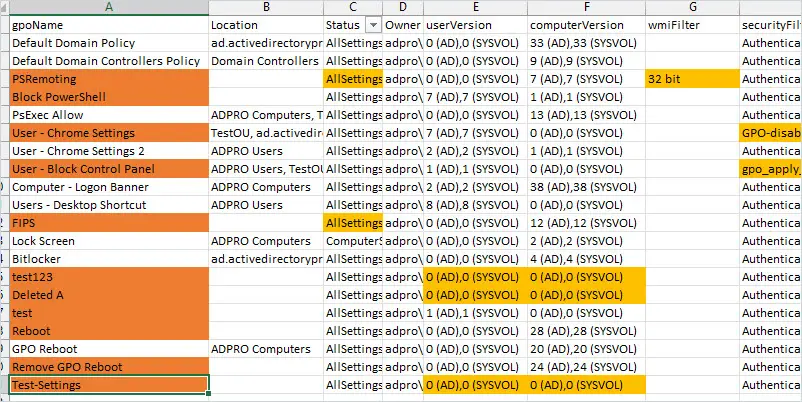
To recap here is what you should review for each GPO:
- Location = blank – These are GPOs that are not in use because they are not linked to any domain objects.
- Status = AllSettingsDisabled – These are GPOs that have the user and computer configuration disabled so no policy settings would apply.
- userVersion and computerVersion = 0 – These are empty GPOs. Someone created a GPO but did not configure any settings.
- Review WMI Filter – Check for GPOs that have a WMI filter configured. WMI filter limits which devices can apply the GPO.
- Security Filtering – Security filtering can limit which users or computers can process a GPO. It’s very easy to modify this and prevent a GPO from working.
Summary
Cleaning up group policy is not a simple process. It takes multiple steps to review each GPO and determine if they are still valid. The AD Pro Toolkit helps with the cleanup process by creating a simple report of all your GPOs and status settings. If you are not using the toolkit you can still use PowerShell or the GPMC to manually review each GPO. It will take more steps but it still works.

Very nice guide. Thanks
No problem